Introduction: The Transformative Power of Lighting Upgrades
Lighting is often an underestimated aspect of home improvement, yet it plays a critical role in both function and aesthetics. A well-designed lighting scheme doesn’t just brighten a room—it defines mood, improves productivity, and enhances safety. Whether you’re considering swapping out old fixtures, upgrading to energy-efficient LEDs, or reimagining your entire lighting plan, a thoughtful approach is essential. Many homeowners jump into lighting projects expecting a quick, inexpensive transformation, only to encounter pitfalls ranging from technical errors to unexpected costs and regulatory hurdles.
This comprehensive guide will shed light on the most common mistakes to avoid during home lighting upgrades, provide a transparent cost breakdown, and walk you through key compliance considerations. With practical advice and expert tips, you’ll learn how to make informed decisions that maximize both style and efficiency—while staying on the right side of building codes and safety standards. If you want your investment in better lighting to pay off for years to come, read on before making your next move.
Understanding Lighting Types and Their Roles
Ambient, Task, and Accent Lighting
Before diving into upgrades, it’s crucial to recognize the three main types of lighting in home design:
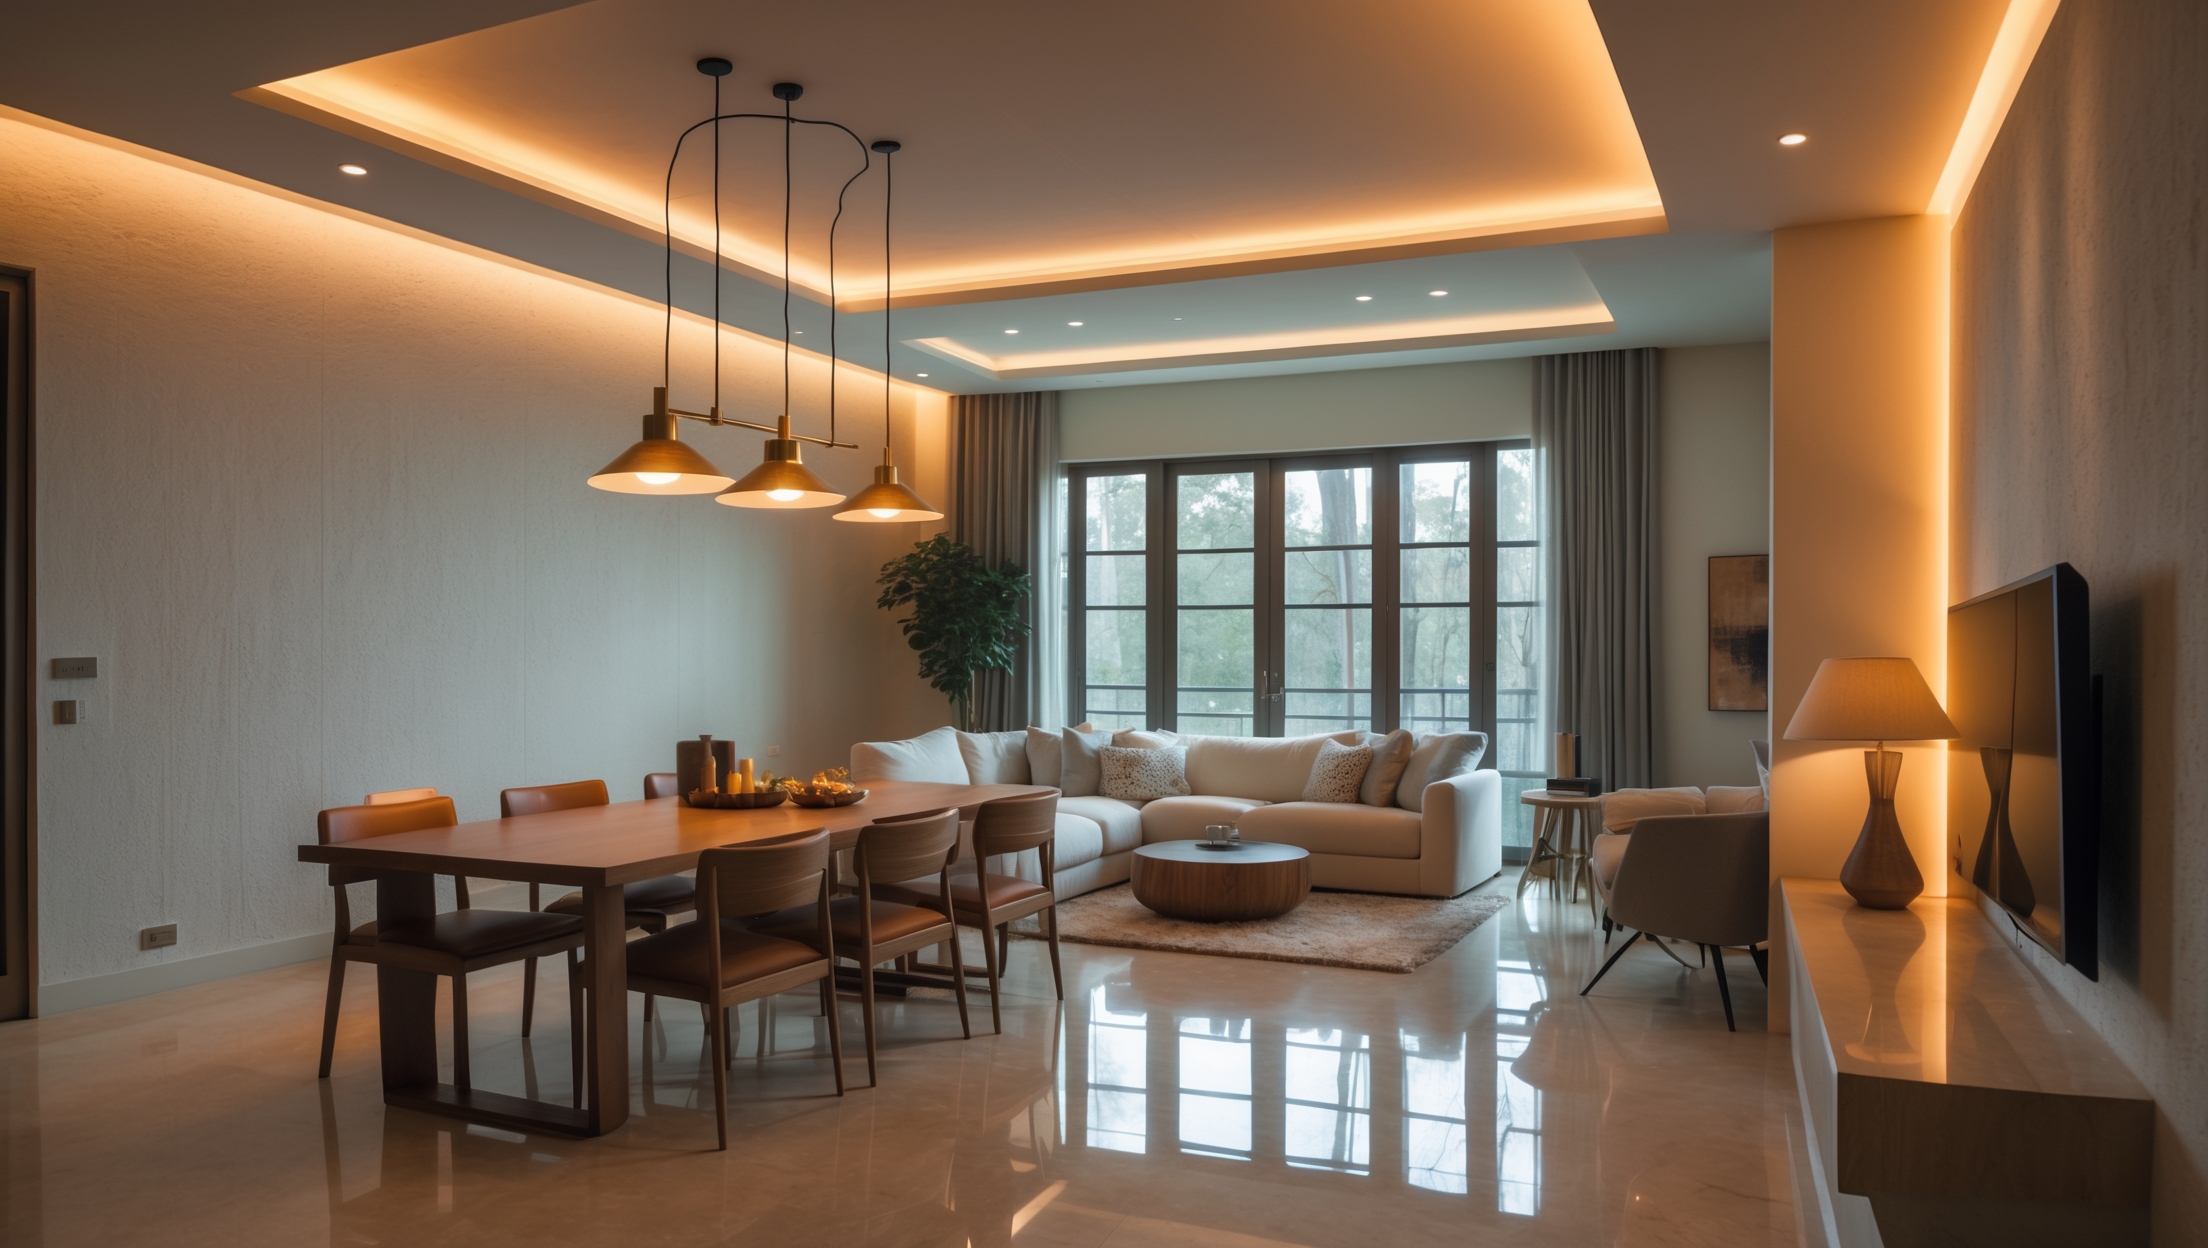
- Ambient Lighting: Provides general illumination. Usually achieved through ceiling-mounted fixtures, recessed lights, or large pendants.
- Task Lighting: Focused light for specific activities such as reading, cooking, or working. Desk lamps, under-cabinet strips, and vanity lights fall in this category.
- Accent Lighting: Highlights architectural features or artwork. Think track lights, wall sconces, or spotlights.
Successful lighting upgrades often combine these three for layered, dynamic results. Skipping one type can leave your space underwhelming or impractical.
Common Pitfalls in Home Lighting Upgrades
1. Overlooking Lighting Design Principles
Many DIYers make the mistake of focusing solely on fixture style or wattage, ignoring fundamental design principles. Poorly placed lights can cause glare, deep shadows, or uneven illumination. Over-lighting is just as problematic as under-lighting, leading to discomfort and wasted energy. Always map out your lighting plan, considering room size, ceiling height, and the activities performed in each space.
2. Ignoring Color Temperature and CRI
Not all bulbs are created equal. Color temperature (measured in Kelvin) affects the mood: 2700K–3000K yields a warm, cozy glow, while 4000K–5000K produces a cooler, more energetic feel. Color Rendering Index (CRI) measures how accurately colors appear under the light source. Skipping these specs can result in unflattering or impractical lighting.
3. Underestimating Electrical Load and Compatibility
Another frequent error is ignoring the home’s electrical capacity. Adding too many lights or high-wattage fixtures to a single circuit can trip breakers or cause overheating. Smart bulbs, dimmers, and LED drivers may not be compatible with older wiring or switches. Always check manufacturer requirements and consult a qualified electrician if in doubt.
4. Failing to Plan for Dimming and Controls
Dimmers and smart controls add flexibility and energy savings, but not all fixtures or bulbs are dimmable. Installing the wrong dimmer can cause flickering or shorten bulb life. Decide up front if you want smart home integration, timers, or motion sensors, and select compatible hardware from the start.
5. Neglecting Energy Efficiency and Rebates
Sticking with outdated incandescent or halogen bulbs can inflate utility bills. Modern LEDs use up to 80% less energy and last far longer. Many utilities and governments offer rebates or incentives for upgrading to energy-efficient lighting. Research available programs before purchasing.
6. Skipping Permits and Inspections
Even small electrical projects can require permits, especially if new wiring or circuits are involved. Skipping this step risks fines, insurance issues, or failed home inspections down the line. Always verify local code requirements before starting your project.
Cost Breakdown: What to Expect When Upgrading Lighting
Fixture Costs
Lighting fixtures range dramatically in price:
- Basic ceiling lights: $20–$80 each
- Recessed can lights: $25–$100 each (not including housing and trim)
- Pendant or chandelier: $60–$600+
- Under-cabinet LED strips: $30–$120 per kit
- Smart bulbs: $10–$40 each
High-end designer fixtures or custom installations can cost much more.
Bulbs and Controls
- LED bulbs: $3–$15 each depending on features
- Dimmers and smart switches: $20–$60 each
- Lighting control hubs: $50–$200
Labor and Installation
Professional installation costs depend on scope and complexity:
- Simple fixture swap (no new wiring): $60–$150 per fixture
- Adding new recessed lighting: $150–$300 per light (includes wiring and labor)
- Upgrading switches/dimmers: $50–$120 per switch
- Installing smart lighting systems: $500–$2,500+ for whole-home integration
DIY can save labor costs, but improper installation may void warranties or create hazards.
Permits and Inspection Fees
Permits for electrical work typically cost $50–$300 depending on your municipality and the extent of the upgrade. Inspections may be included or billed separately. Always factor these into your budget.
Hidden and Unexpected Costs
- Upgrading electrical panels or wiring: $500–$2,000+
- Wall or ceiling repairs after installation: $100–$500
- Decorative elements (medallions, trims): $20–$150 each
Sample Budget for a Mid-Sized Room Lighting Upgrade
- 4 recessed LED fixtures: $400 (installed)
- 1 modern pendant light: $250 (installed)
- Smart dimmer switch: $80 (installed)
- Permit and inspection: $120
- Total: $850
Adjust for fixture choices and labor rates in your area.
Step-by-Step Guide: Planning and Executing a Lighting Upgrade
Step 1: Assess Existing Lighting and Needs
Walk through each room and document current lighting. Note dark corners, glare issues, or over-lit zones. Identify what activities occur in each space and what improvements are needed (brighter task lighting, more ambiance, accent features, etc.).
Step 2: Develop a Layered Lighting Plan
For each room, combine ambient, task, and accent lighting. Sketch the layout or use digital planning tools. Consider:
- Ceiling height and fixture size
- Switch locations and control needs
- Opportunities for dimmers or smart controls
- Existing wiring versus new circuits
Step 3: Choose Fixtures and Bulbs Mindfully
Pick fixtures that suit your design style and functional needs. Select bulbs with the right color temperature, CRI, and wattage. Confirm that all components (bulbs, switches, dimmers) are compatible.
Step 4: Set a Realistic Budget
Tally up fixture, bulb, control, labor, and permit costs. Add a buffer (10–20%) for unexpected expenses. Research rebates or incentives for energy-efficient upgrades.
Step 5: Check Compliance and Permitting Requirements
Contact your local building department or consult your contractor to determine if your project requires a permit. Projects involving new wiring, circuit changes, or panel upgrades almost always do. Electrical work often needs to be performed or inspected by a licensed professional.
Step 6: Hire the Right Professionals
If your skills are limited to fixture swaps, hire a licensed electrician for anything involving new wiring, smart controls, or code compliance. Read reviews, check credentials, and verify insurance before hiring.
Step 7: Schedule the Upgrade and Inspection
Order all materials in advance. Schedule installation and, if applicable, inspections with your municipality. Keep receipts and permit documents for your records.
Compliance and Permit Essentials
When Are Permits Required?
Permit requirements vary by jurisdiction but generally include:
- Adding new circuits or outlets
- Modifying existing wiring
- Installing fixtures in new locations
- Upgrading electrical panels
Simple bulb or fixture swaps in existing boxes often do not require a permit, but always check local codes.
Common Code Violations to Avoid
- Improper wire gauge or overloading circuits
- Lack of grounding or bonding
- Inadequate box fill or unsecured junction boxes
- Non-rated fixtures in wet or damp locations (e.g., bathrooms, exteriors)
Violations can delay inspections and even invalidate homeowner’s insurance in case of fire or injury.
The Inspection Process
Inspections ensure that lighting upgrades meet safety standards. Expect the inspector to check:
- Proper fixture mounting and support
- Secure wiring connections
- Grounding and bonding
- Correct breaker and wire sizing
Pass the first time by following code and manufacturer instructions meticulously.
Maximizing Energy Efficiency and Comfort
Choosing High-Efficiency LEDs
Modern LEDs use up to 80% less energy than incandescents and may last over 20 years. Look for the ENERGY STAR label for tested performance and longevity. Select bulbs with a high CRI (90+) for true-to-life colors.
Optimizing Light Placement
Space ambient lights evenly and use wall washing or cove lighting for even distribution. Place task lights where needed—e.g., above kitchen counters or reading nooks. Use accent lighting to showcase art or architectural details.
Smart Controls and Automation
- Install dimmers to tailor brightness to mood and activity
- Use motion sensors in hallways, closets, and bathrooms
- Automate outdoor lighting for security and energy savings
- Integrate with smart home systems for voice or app control
Smart controls not only boost convenience but can significantly reduce energy waste.
Safety Checklist for Lighting Upgrades
- Always turn off power at the breaker before working on lighting
- Use a non-contact voltage tester to confirm circuits are de-energized
- Follow manufacturer installation instructions precisely
- Never exceed the wattage rating of fixtures or boxes
- Secure all wiring with approved connectors and enclosures
- Use UL-listed components and fixtures only
- For any new wiring, hire a licensed electrician and get a permit
Maintenance Best Practices
- Dust fixtures and bulbs regularly to maintain brightness
- Check for loose or flickering bulbs—tighten or replace as needed
- Inspect smart controls and update firmware when available
- Replace dimmer switches or bulbs at first sign of malfunction
- Test GFCI-protected circuits (for outdoor or bathroom lights) monthly
Conclusion: Illuminate with Confidence
Upgrading your home’s lighting can have a profound impact on comfort, safety, and energy savings—but only if approached with careful planning and attention to detail. By understanding the types of lighting, budgeting realistically, and sidestepping common errors, you’ll create spaces that are both beautiful and functional. Remember that compliance with local codes and permit requirements isn’t just a bureaucratic hurdle; it’s essential for protecting your investment and ensuring your family’s safety. Whenever in doubt, consult a licensed professional and make use of available rebates or incentives to stretch your budget further.
In today’s world, smart controls and high-efficiency LEDs offer unprecedented flexibility and long-term savings. Yet, the real magic of a lighting upgrade lies in its power to transform a room’s atmosphere and your daily experience. With the steps and checklists provided above, you’re equipped to bring your vision to life, avoid costly mistakes, and enjoy a home that’s brilliantly illuminated for years to come. Light the way to a brighter, safer, and more inviting living space—one fixture at a time.
You mentioned unexpected costs as a common pitfall during lighting upgrades. Could you provide a ballpark range for typical upgrades in a three-bedroom home, especially when switching to energy-efficient LEDs?
For a typical three-bedroom home, switching to energy-efficient LED lighting usually costs between $300 and $800. The final price depends on the number of fixtures, the type of LEDs chosen, and any wiring changes needed. Hiring a licensed electrician may add to the total, especially if fixture replacements or electrical updates are required.
Could you clarify what some of the main regulatory hurdles are for a homeowner doing their own lighting upgrade, especially when it comes to code compliance?
Some key regulatory hurdles include ensuring all wiring and fixtures meet local electrical codes, obtaining necessary permits before starting work, and using only certified components. Inspections may be required after installation to confirm compliance. DIY upgrades that skip these steps risk fines or safety issues, so always check with your local building authority first.
If I focus mostly on upgrading ambient lighting, will that impact how effective my task and accent lighting are, or should all three be done together for best results?
Upgrading ambient lighting can improve overall comfort, but it may not fully address specific needs that task and accent lighting target. For balanced and effective lighting, coordinating all three types—ambient, task, and accent—usually gives the best results. You can start with ambient upgrades, but consider adjusting the others to complement your new setup.
When trying to achieve a balanced mix of ambient, task, and accent lighting, do you have tips for prioritizing on a limited budget? Is it better to invest in high-quality fixtures for one layer or spread the budget across all three types?
On a limited budget, it’s usually best to ensure each lighting layer—ambient, task, and accent—is represented, even if that means choosing more affordable fixtures for some. Prioritize higher quality for the layer most essential to your needs, like task lighting in work areas, while using budget-friendly options for the others.
If I switch to energy-efficient LEDs throughout my house, are there any unexpected technical issues or compatibility problems I should watch out for with existing wiring or dimmer switches?
When switching to LEDs, older dimmer switches may not be compatible, causing flickering or limited dimming range. Some LED bulbs also require specific fixture types. Your existing wiring is usually fine, but always check bulb and fixture compatibility and consider upgrading dimmers to LED-compatible models for best results.
When upgrading to energy-efficient LEDs, are there certain types or brands that tend to be more compatible with older wiring in US homes, or do you usually need to update the fixtures too?
Many modern LED bulbs are designed to work with standard fixtures found in older US homes, especially those labeled as ‘retrofit’ or ‘direct replacement.’ However, compatibility can vary, especially with dimmer switches or unique fixtures. You usually don’t need to upgrade the fixture unless it’s very old or in poor condition, but double-check bulb packaging for compatibility notes.
Could you give a rough estimate of how much it might cost to upgrade all the lighting in a typical three-bedroom home, including the switch to LEDs and some accent lighting?
Upgrading all the lighting in a typical three-bedroom home, including switching to LEDs and adding some accent lighting, usually costs between $1,000 and $3,000. The total depends on fixture choice, labor rates, and how many accent lights you want. Getting quotes from local electricians can help you budget more precisely.
What’s the best way to avoid the pitfall of missing one type of lighting? Sometimes my rooms feel underlit even after installing new fixtures, and I’m not sure if I’m layering lights correctly.
To avoid missing a lighting type, use the three-layered approach: ambient (overhead), task (focused), and accent (decorative or highlighting). Check each room for these layers and adjust as needed. For example, add floor lamps for task lighting or wall sconces for accent. This balanced mix helps eliminate underlit areas.
When planning a full lighting upgrade that combines ambient, task, and accent lighting, do you have tips for balancing cost without sacrificing functionality?
To balance cost and functionality, prioritize quality fixtures for areas where lighting impacts daily tasks most, like kitchens or workspaces. Use dimmers and multi-purpose fixtures to add flexibility. Consider LED options for energy savings and longer life. For accent lighting, limit it to focal points to control expenses without losing design impact.
You mentioned regulatory hurdles with lighting upgrades—what are some common building code issues homeowners run into, and how can we avoid them from the start?
Common building code issues with lighting upgrades include improper wiring, inadequate fixture spacing, and using non-compliant fixtures or switches. To avoid these, always check local code requirements before starting, use certified products, and hire a licensed electrician for installation. Getting permits when required and scheduling inspections can also help ensure your project stays compliant from the beginning.
When planning a lighting overhaul, how can I accurately estimate the total cost if I want to combine ambient, task, and accent lighting without overspending?
Start by listing all the areas you want to upgrade and noting which lighting type—ambient, task, or accent—is needed in each. Get quotes for fixtures and installation separately. Set a budget per room, prioritize essential areas, and factor in possible electrical work. Comparing prices from multiple suppliers and electricians can also help you stay within budget.
When upgrading to energy-efficient LEDs, are there compatibility issues I should watch for with existing dimmer switches or wiring, or is it usually a straightforward swap?
When upgrading to LED bulbs, compatibility with existing dimmer switches can be an issue. Many older dimmers are designed for incandescent bulbs and may cause flickering or buzzing with LEDs. It’s best to use LED-compatible dimmers. In most cases, the wiring itself is fine, but always check bulb and switch compatibility before swapping.
The article mentions cost breakdowns for lighting upgrades. Do you have any typical price ranges for replacing old ceiling fixtures versus installing new recessed lighting from scratch?
Replacing old ceiling fixtures typically costs between $100 and $400 per fixture, depending on the style and labor rates. Installing new recessed lighting from scratch usually ranges from $200 to $500 per light, since it involves additional wiring, cutting, and possibly ceiling repairs.
When you mention regulatory hurdles and compliance tips, are there specific building codes or safety standards that homeowners commonly overlook when upgrading their lighting?
Yes, homeowners often overlook local building codes that require specific types of wiring, proper placement of fixtures, and the use of certified materials. Ground fault circuit interrupters (GFCIs) in wet areas and correct wattage ratings for fixtures are also commonly missed safety standards during lighting upgrades.
You mentioned regulatory hurdles during lighting upgrades. For a DIYer, what are the most common compliance mistakes to watch out for, and how do I double-check if I’m following code?
DIYers often overlook issues like improper wiring, using non-rated fixtures, or overcrowding electrical boxes, which can violate code. Always use fixtures and materials rated for your location, and never bypass grounding. To double-check compliance, consult your local building department or request a copy of the current electrical code before starting your upgrade.
I see unexpected costs can pop up during lighting projects. Could you give examples of what usually drives costs up the most, so I can plan my renovation budget more accurately?
Some common factors that drive up lighting upgrade costs include unforeseen electrical wiring issues, needing to update old fixtures or panels to meet code, and patching or repainting surrounding areas after installation. Custom fixtures or specialty lighting controls can also add to your budget. Planning for a contingency fund helps cover these surprises.
Does the guide discuss how to determine which lighting type—ambient, task, or accent—should be prioritized during a renovation, especially if the budget is tight?
Yes, the guide covers how to decide which lighting type to focus on during renovations. It suggests prioritizing ambient lighting first, as it provides general illumination, then adding task or accent lighting based on your specific needs and budget. This approach ensures you cover essential lighting before considering extras.
When combining ambient, task, and accent lighting as suggested, is there a preferred order for installation or planning to avoid layout or wiring issues later on?
It’s best to start by planning your ambient lighting first, since it forms the foundation of your room’s illumination and wiring. Next, layer in task lighting where specific activities happen, and finally add accent lighting for highlights. This order helps prevent wiring conflicts and ensures each layer complements the others.
What kind of price range should I expect for upgrading to energy-efficient LEDs throughout an average-sized home, including installation costs?
For an average-sized home, upgrading to energy-efficient LED lighting typically costs between $500 and $1,500, including installation. The final price depends on the number of fixtures, types of LEDs chosen, and local labor rates. Getting a few quotes from electricians can help you get a more precise estimate for your situation.
I’m planning on switching all my main lights to LEDs, but I’m concerned about the brightness and color temperature differences from my existing setup. Any tips on matching new LEDs to older lighting for a consistent look?
To match your new LEDs with your existing lighting, check the color temperature (measured in Kelvins) on your current bulbs and look for LEDs with the same value. Also, compare lumens instead of watts to match brightness. Testing one or two bulbs first can help ensure a consistent look before replacing all your lights.
I’m trying to estimate the cost for upgrading my whole house to energy-efficient LEDs like you mentioned. Do you have any ballpark figures for a medium-sized home, including labor and fixtures?
For a medium-sized home, switching to energy-efficient LED lighting typically costs between $800 and $2,500. This range includes quality fixtures and professional labor, but the price can vary depending on fixture style and the number of lights you need to replace.
If I’m planning to swap out old fixtures for LEDs, are there any pitfalls I should watch for specifically with compatibility or wiring, or is it usually a straightforward upgrade?
Swapping old fixtures for LEDs can be straightforward, but check for compatibility with your existing dimmer switches and wiring. Some older dimmers may not work well with LEDs, causing flickering or buzzing. Also, make sure the fixture can physically accommodate the new LED bulbs or integrated units.
The article mentions unexpected costs during lighting upgrades—what are some common expenses that catch homeowners by surprise?
Homeowners are often surprised by costs like upgrading outdated wiring, repairing drywall after fixture changes, adding new circuits, or resolving code compliance issues. Sometimes, electrical panel upgrades or permits are needed, which can add to expenses. Hidden damage behind old fixtures can also lead to additional repair costs.
When swapping out old fixtures for newer LEDs, are there common compatibility issues with existing dimmer switches or wiring that homeowners should be aware of before starting the upgrade?
Yes, older dimmer switches often aren’t compatible with new LED fixtures, leading to flickering or limited dimming range. It’s also important to check that your wiring can handle the new lights, especially if you’re upgrading from much older systems. Consider replacing dimmers with models designed for LEDs and double-checking wiring compatibility to prevent issues.
Could you provide more details on what some of the common regulatory hurdles are when upgrading lighting, and how to check if my planned changes will comply with local building codes?
Common regulatory hurdles include meeting energy efficiency standards, proper placement of fixtures for safety, and using approved wiring methods. To check compliance, review your local building codes, which are often available on your city or county website, or consult with a licensed electrician who is familiar with regulations in your area.
When creating a lighting plan, how do you decide the right mix of ambient, task, and accent lighting so the space doesn’t feel either too harsh or too dim?
To get the right mix, start by considering the room’s primary function and natural light levels. Use ambient lighting for general brightness, add task lights where specific activities happen (like reading or cooking), and use accent lighting to highlight features or create mood. Layer these types and use dimmers to fine-tune the atmosphere, avoiding spaces that feel overly harsh or too dim.
If I want to reimagine my entire lighting plan instead of just swapping a few fixtures, what’s the best first step to make sure I don’t miss one of the three lighting types you described?
Start by creating a simple floor plan of each room and note how you use each space. Then, list ambient, task, and accent lighting needs for every area. This way, you can ensure your new plan includes all three lighting types before selecting fixtures.
The article mentions a transparent cost breakdown—could you provide more details on the typical price range for upgrading from traditional bulbs to energy-efficient LEDs throughout a medium-sized house?
Upgrading a medium-sized house from traditional bulbs to energy-efficient LEDs usually costs between $100 and $300 for the bulbs themselves, depending on the number of fixtures and the quality chosen. Labor costs, if hiring an electrician, might add another $100 to $200, but DIY installation is common and can save money.
After reading about how skipping one type of lighting can leave a room underwhelming, what’s the best way to layer ambient, task, and accent lights in a small office space without making it feel cluttered?
In a small office, use a ceiling fixture or recessed lights for ambient lighting. Add a slim desk lamp for task lighting, focusing it on your work area. For accent lighting, consider an LED strip under a shelf or a small wall sconce. Choose fixtures with clean lines and keep everything proportional to the room size to avoid clutter.
Could you explain a bit more about what kinds of regulatory hurdles I might run into if I change out old light fixtures myself? I want to make sure I don’t accidentally violate any building codes.
When replacing light fixtures yourself, you’ll need to ensure that all wiring follows local electrical codes and that fixtures are rated correctly for existing wiring and junction boxes. Common hurdles include using non-listed fixtures, improper wire connections, or overloading circuits. It’s worth checking if your area requires permits or inspections for electrical work, even for simple upgrades.
Does the article mention if upgrading to energy-efficient LEDs usually involves rewiring, or can I just swap out old bulbs without changing the fixtures?
The article explains that in most cases, you can simply swap out your old bulbs for energy-efficient LEDs without needing to rewire or change fixtures, as long as your fixtures are compatible. However, it also notes that some older dimmer switches or specialty fixtures may require upgrades for best results.
If I’m upgrading my kitchen lighting to include both task and ambient lights, are there common mistakes people make with placement or brightness levels that I should watch out for?
Yes, common mistakes include placing task lights too far from work areas, causing shadows, or using bulbs that are too dim for food prep. For ambient lights, people sometimes use overly bright fixtures that create glare. Ensure your task lighting is focused over counters and sinks, and balance overall brightness for comfort.
I’m just starting to plan my first lighting upgrade and don’t really know much about codes. How do I figure out what building or electrical codes apply to swapping out old fixtures in an older home?
To find out which codes apply, check with your local city or county building department, as requirements can vary by location and home age. They can let you know about any permits or inspections needed and which electrical standards you must follow for fixture upgrades.
You mention unexpected costs when redoing home lighting. What are some expenses that most homeowners overlook during these upgrades?
Homeowners often overlook costs like upgrading electrical panels if the new lighting requires more power, patching or repainting ceilings after fixture changes, and disposal fees for old fixtures. Hiring a licensed electrician for code compliance and potential permit fees can also add to the final bill.
When reimagining an entire lighting plan, how do you balance the cost between energy-efficient LEDs and more decorative fixtures without sacrificing compliance with building codes?
Start by prioritizing LEDs for main lighting to ensure energy efficiency and meet code requirements. For decorative areas, you can use a few statement fixtures, but opt for LED-compatible options. This way, you keep operational costs low and maintain compliance, while still highlighting focal points with attractive designs.
If I want to create layered lighting in my store but can only prioritize one upgrade right now, should I start with ambient, task, or accent lighting to make the biggest impact?
If you can only prioritize one lighting upgrade, start with ambient lighting. It provides the main source of illumination, helps customers feel comfortable in your store, and sets the overall mood. Once that’s improved, you can layer in task and accent lighting as your budget allows.
What are some common technical errors homeowners make when switching to energy-efficient LEDs? I want to avoid costly mistakes if I try installing them myself.
Homeowners often choose bulbs with the wrong base or incompatible dimmer switches, leading to flickering or malfunction. Overlooking wattage limits and incorrect wiring are also common issues. Always check fixture compatibility, use appropriate dimmers, and ensure power is off before installation to avoid problems and extra costs.
You mention a transparent cost breakdown for lighting upgrades—can you share what a realistic budget range might look like for an average-size living room if I want to upgrade both ambient and task lighting?
For an average-size living room, upgrading both ambient and task lighting typically costs between $400 and $1,200. This range covers new fixtures, bulbs, dimmers, and basic installation, but could be higher if you choose designer fittings or need electrical rewiring.
When it comes to staying compliant with building codes and safety standards, are there common mistakes that first-time DIYers make during lighting upgrades?
First-time DIYers often overlook the need for proper permits, use the wrong type of wiring, or install fixtures that aren’t rated for certain locations. Failing to follow local code requirements and not connecting grounding wires correctly are also common mistakes that can lead to safety issues.
Could you share more details on the most common regulatory hurdles homeowners face with lighting upgrades? I want to avoid any code violations before replacing my fixtures.
Homeowners often encounter issues with proper wiring, fixture grounding, and using fixtures or bulbs that meet local energy efficiency codes. You’ll also need to ensure that any new fixtures are certified for their intended use (like damp-rated for bathrooms) and that all work follows local electrical codes, including permits if needed. Checking with your local inspector before starting helps avoid problems.
You mentioned unexpected costs being a common pitfall—could you share what usually causes budgets to go over and how to estimate more accurately before starting?
Budgets often go over due to surprises like outdated wiring, needing extra fixtures, or discovering structural issues once work begins. To estimate more accurately, get a detailed quote from your electrician, set aside a contingency fund (around 10–20%), and check if electrical upgrades will trigger other code compliance work.
The article mentions unexpected costs and regulatory hurdles—could you give some examples of what kind of code compliance problems homeowners typically run into when updating lighting?
Homeowners often encounter code compliance issues like improper wiring, using fixtures not rated for certain locations (like wet areas), or installing lights without the required permits. Another common problem is failing to upgrade to energy-efficient fixtures where local codes require it. Addressing these early can help avoid fines or costly rework.
I noticed you mention regulatory hurdles with lighting upgrades—could you clarify what specific building codes or safety standards I should be aware of before starting a project?
Before starting a home lighting upgrade, be aware of the National Electrical Code (NEC), which sets safety standards for wiring and fixtures. Also, local building codes may require permits or inspections. Check for energy efficiency regulations, especially for new fixtures, and ensure all products are UL-listed for safety compliance.
You mention compliance with building codes—how do I find out if my DIY lighting plans meet local safety standards before starting the project?
To check if your DIY lighting plans comply with local safety standards, contact your city or county building department—they can provide specific electrical codes and permit requirements. You might also find helpful guides on their official website, or you can consult a licensed electrician for advice before starting your project.
When planning a lighting upgrade to include all three types—ambient, task, and accent—how do you suggest prioritizing the budget if I can’t afford to do everything at the same time?
If your budget is limited, start by investing in ambient lighting since it provides overall illumination. Next, focus on task lighting in important areas like kitchens or offices. Accent lighting can be added later as your budget allows to highlight features and add atmosphere.
If I want to upgrade to energy-efficient LEDs throughout my house, what are typical unexpected costs I should budget for beyond just the new bulbs and fixtures?
In addition to bulbs and fixtures, you might need to budget for potential electrical upgrades if your wiring is outdated, extra labor for fixture modifications, dimmer switches compatible with LEDs, patching or painting after fixture changes, and disposal fees for old fixtures or hazardous bulbs like CFLs.
If we want to redo the lighting in several rooms but don’t have a big budget, which upgrades typically give the best results for both style and energy savings?
Swapping out old bulbs for LED ones is usually the most cost-effective upgrade, offering immediate energy savings. Also, updating outdated fixtures with modern designs in key areas like living rooms or kitchens can boost style affordably. Consider installing dimmer switches for added control without a big expense.
I’m curious, when upgrading to LEDs as the article suggests, are there any specific compatibility issues with existing dimmer switches or wiring that homeowners should watch out for?
Yes, when switching to LEDs, not all existing dimmer switches are compatible. Older dimmers may cause flickering or buzzing with LED bulbs. It’s important to use dimmable LEDs and, if needed, replace your dimmer switch with one specifically rated for LEDs. Wiring is usually fine, but always check the bulb and switch specifications.
You mentioned unexpected costs during lighting upgrades—could you provide some examples of surprise expenses homeowners often run into, especially when dealing with older homes?
Homeowners upgrading lighting in older homes often encounter extra costs like outdated wiring that needs replacing, insufficient electrical panels, hidden water damage around fixtures, or the need for unexpected permits. Sometimes, cutting into walls reveals issues like old insulation or faulty connections, all of which can add to project expenses.
When upgrading to energy-efficient LEDs as mentioned, are there any specific compatibility issues I should watch out for with older dimmer switches or existing wiring?
Yes, older dimmer switches often aren’t compatible with LED bulbs and may cause flickering or reduced dimming range. It’s best to use dimmers specifically rated for LEDs. Also, most standard home wiring works with LEDs, but always check bulb and fixture requirements to avoid issues.
If someone skips one of the lighting types, like task or accent lighting, what are the most common issues they end up facing in daily life? Would you recommend prioritizing one over the others if working with a limited budget?
Skipping task lighting often leads to eye strain or trouble completing activities like reading or cooking, while missing accent lighting can make a space feel flat or less inviting. If you’re on a budget, prioritize task and ambient lighting first, since they impact daily functionality and comfort the most. Accent lighting can be added later as funds allow.
Do you have any advice on how to prioritize which rooms to start with when planning a full-home lighting upgrade, especially if my budget is limited?
Focus first on high-use areas like the kitchen, living room, and bathrooms, since improved lighting there will have the biggest daily impact. Next, address entryways and workspaces. Bedrooms can often wait unless they have specific needs. This approach helps you get the most value and comfort from your budget.
When upgrading to energy-efficient LEDs, have you run into any compatibility issues with existing dimmer switches or do you usually need to swap those out too?
Compatibility issues between energy-efficient LEDs and existing dimmer switches are quite common. Many older dimmers aren’t designed for LEDs, which can cause flickering or buzzing. In most cases, you’ll need to replace the old dimmer with one that’s specifically rated for LED bulbs to ensure smooth operation.
When planning to upgrade to LEDs, do you recommend replacing all fixtures at once for the best efficiency, or is it okay to do it room by room? Are there any pitfalls to watch out for with a phased approach?
Upgrading to LEDs room by room is perfectly fine and helps manage costs. Just ensure new LEDs are compatible with your existing dimmers and fixtures. Mixing old and new lighting might cause uneven brightness or color, so keep that in mind for areas where lighting consistency is important.
If I want to upgrade to LEDs throughout my house, are there certain older fixtures that usually can’t accommodate new bulbs without rewiring or replacing them entirely?
Yes, some older fixtures, especially those with dimmers not rated for LEDs or with unusual socket types, may not work properly with new LED bulbs. In these cases, you might need to rewire or replace the fixture to ensure compatibility and safe operation.
If I want to redo my living room lighting, is it better to focus first on ambient lighting or should I prioritize task and accent lighting for the best effect? I’m not sure where to start.
Start by focusing on ambient lighting since it provides the overall illumination and sets the mood of your living room. Once you have a good ambient base, you can add task and accent lighting to highlight specific areas or features and improve functionality. This layered approach yields the best results.
For compliance, are there specific building codes or permits I need to worry about if I’m just swapping out old ceiling fixtures for new LED ones, or is that considered minor enough that I don’t need to check with anyone?
Swapping old ceiling fixtures for new LED ones is usually considered a minor upgrade and often doesn’t require a permit. However, it’s still a good idea to check your local building codes or ask your municipality, as requirements can vary by area. If you’re updating wiring or making major changes, permits might be needed.
When it comes to upgrading to energy-efficient LEDs, are there any hidden costs or compatibility issues with existing dimmer switches that homeowners should look out for during installation?
Yes, upgrading to LED bulbs can reveal hidden costs and compatibility issues with existing dimmer switches. Many older dimmers may not work properly with LEDs, causing flickering or limited dimming range. You might need to replace the dimmer switch with one rated for LEDs, which adds to the overall cost.
You mention compliance tips when upgrading lighting, but I’m not sure what specific building codes or safety standards I should look out for in a typical suburban home. Are there common mistakes homeowners make with permits or inspections?
When upgrading lighting, homeowners often overlook getting the required electrical permits and scheduling final inspections, which are usually mandated by local codes. Common safety standards include following the National Electrical Code (NEC) for wiring and fixture placement. Using non-certified fixtures or doing DIY wiring without a permit are typical mistakes that can lead to compliance issues.
When upgrading to energy-efficient LEDs, do you notice a significant difference in upfront costs versus long-term savings? I’m trying to figure out if it’s really worth the initial investment.
Switching to energy-efficient LEDs usually means a higher upfront cost compared to traditional bulbs, but you’ll notice lower electricity bills over time. Most users recover their investment within a couple of years, thanks to the LEDs’ longer lifespan and reduced energy use. Over several years, the long-term savings often outweigh the initial expense.
When planning a lighting upgrade with ambient, task, and accent lighting, is there a recommended way to budget for each type to avoid unexpected costs?
A practical approach is to allocate your budget based on the primary function: about 60% for ambient lighting, 30% for task lighting, and 10% for accent lighting. This helps prioritize essentials and reduces surprises, but always account for fixture quality and installation costs in each category.
Could you provide more detail on the most common technical errors homeowners make when upgrading to energy-efficient LEDs, and how these can be avoided during installation?
A common mistake is using incompatible dimmer switches with LEDs, which can cause flickering or failure. Homeowners also sometimes exceed wattage ratings or install bulbs that don’t fit fixtures. To avoid these issues, check compatibility between bulbs and dimmers, ensure correct bulb size and wattage, and follow manufacturer installation instructions closely.
When upgrading to energy-efficient LEDs, are there any specific compatibility issues with old dimmer switches I should watch out for?
Yes, many older dimmer switches were designed for incandescent bulbs and may not work properly with LED bulbs. This can cause flickering, buzzing, or lights not dimming smoothly. To avoid these issues, make sure your dimmer switch is labeled as LED-compatible or consider upgrading to a newer dimmer designed for LEDs.
Could you clarify which lighting upgrades most often trigger building code compliance issues? I’m planning a mix of recessed and under-cabinet LEDs and want to avoid any setbacks.
Recessed lighting can sometimes trigger code issues, especially regarding insulation contact (IC-rated fixtures), fire rating, and airtight requirements. For under-cabinet LEDs, make sure wiring and low-voltage transformers meet electrical codes. Use certified fixtures, follow local code for placement and circuit protection, and consider hiring a licensed electrician to ensure compliance.
You mention unexpected costs being common with lighting projects—could you give some examples of expenses that typically catch people off guard when upgrading to LEDs or new fixtures?
Unexpected costs often include things like upgrading older wiring to meet code, replacing incompatible dimmer switches, repairing ceiling or wall damage from old fixture removal, and sometimes needing professional installation if fixtures are complex. Permit fees and disposal charges for old bulbs or fixtures can also add up.
The article mentions unexpected costs when upgrading lighting. What are some examples of hidden costs that homeowners should watch for besides just the price of new fixtures or bulbs?
Some hidden costs can include the need to update electrical wiring, hiring a licensed electrician, repairing ceiling or wall damage after installation, permit fees for major changes, or replacing incompatible switches and dimmers. Sometimes, older homes may require upgrades to meet current electrical codes, which adds to the expense.
When breaking down costs for a full lighting plan reimagining, what’s the typical price range for labor versus materials like LEDs or new fixtures?
For a full lighting plan overhaul, labor costs usually make up about 40–60% of the total budget, while materials like LEDs and new fixtures account for 40–60%. Typical price ranges are $2,000–$5,000 for labor and $1,500–$4,000 for materials, depending on the size and complexity of your space.
If I want to integrate ambient, task, and accent lighting in an open-concept living space, what sequence of installation would you recommend to avoid common technical mistakes?
Begin by installing ambient lighting first, as it forms the foundation and ensures even overall illumination. Next, add task lighting in key activity areas like reading nooks or kitchens. Finally, install accent lighting to highlight artwork or architectural features. This sequence prevents wiring complications and helps balance the lighting layers effectively.
I want to update the lighting in my kitchen and living area, but I’m not sure how to make sure everything is up to code. What are the most common compliance issues homeowners run into with new fixtures or wiring?
Homeowners often run into issues like using non-rated fixtures in damp areas, overloading circuits, improper grounding, and failing to meet spacing requirements for outlets. It’s also common to overlook permits or inspections. Checking local building codes and, if unsure, consulting a licensed electrician can help ensure your updates are compliant and safe.
You mention that skipping one of the three lighting types can leave a space impractical. For a small retail shop, are there guidelines on balancing ambient, task, and accent lighting effectively?
For a small retail shop, try to use ambient lighting for general visibility, add focused task lighting at checkout or workstations, and use accent lighting to highlight products or displays. Balance all three by layering them—start with even ambient light, supplement with targeted task lights, and use accent fixtures sparingly to draw attention to key areas.
About the cost breakdown you referenced, do you have any estimates for how much of the budget typically goes toward fixtures versus labor and compliance fees in a full-home lighting upgrade?
In a full-home lighting upgrade, fixtures usually account for about 40–60% of the total budget. Labor costs generally make up 30–40%, and compliance fees or permits can range from 5–10%, depending on local regulations and project complexity.
How much should I realistically budget for a whole-house upgrade if I want layered ambient, task, and accent lighting like you describe?
For a whole-house lighting upgrade with layered ambient, task, and accent lighting, you should budget roughly $4,000 to $10,000, depending on your home’s size, fixture choices, and installation complexity. Higher-end options or smart controls may increase costs. Consulting with a lighting designer can help you prioritize features within your budget.
If I want to add more task lighting in my kitchen but I’m happy with the current ambient lights, do I need to worry about overloading circuits or other safety issues, or is it usually straightforward to just add under-cabinet strips?
Adding under-cabinet strips is often straightforward, but you should still check the total load on your kitchen circuit. Kitchens can have several appliances that draw a lot of power. Make sure your new lighting doesn’t exceed the circuit’s amperage limit, and always follow manufacturer instructions for safe installation.
You mentioned that skipping one type of lighting can make a space impractical. Is it okay to use just ambient and task lighting if I don’t really have art or architectural features to highlight?
Yes, using just ambient and task lighting is absolutely fine, especially if you don’t have features you’d want to showcase with accent lighting. The key is making sure your spaces are well-lit for comfort and function, so as long as those needs are met, you can skip accent lighting.
If I want to upgrade to LEDs in my whole house, what kind of unexpected costs should I budget for besides the new bulbs and fixtures?
Beyond bulbs and fixtures, you might need to budget for possible electrical work if your wiring is outdated or incompatible with new LEDs, especially dimmers. There could be costs for safe disposal of old fixtures, patching or repainting if fixture sizes change, and hiring a licensed electrician for installation to ensure code compliance.