Introduction: Prioritizing Safety in Every Home Improvement Project
Whether you’re tackling a weekend DIY project or overseeing a major remodel, safety should always be your top priority. Home improvement can be exciting and rewarding, but it also comes with inherent risks—ranging from minor cuts and falls to hazardous chemical exposure and fire hazards. Yet, with proper planning and a comprehensive safety checklist, you can significantly minimize these risks and ensure that your renovation efforts protect both your family and your investment.
This article offers a detailed, step-by-step safety checklist for home improvement projects. We’ll cover essential planning, tool handling, hazardous materials, electrical precautions, personal protective equipment, and post-project safety checks. Our goal is to help you create a safer environment, avoid costly accidents, and enjoy the satisfaction of a job well done.
Planning for Safety: The Foundation of Any Project
1. Assess Project Scope and Risks
Before you pick up a hammer or power drill, take time to review your project. Ask yourself:
- What tasks will be performed (e.g., demolition, painting, wiring)?
- Are any hazardous materials (asbestos, lead paint, chemicals) involved?
- Will specialized tools or heavy equipment be required?
- Who will be on-site (children, pets, family, contractors)?
By identifying potential hazards early, you can put safeguards in place and plan for any professional help you might need.
2. Prepare the Work Area
- Clear clutter and unnecessary items from the workspace.
- Secure loose rugs, furniture, and cords to prevent tripping.
- Ensure adequate lighting—use portable work lights if necessary.
- Establish clear pathways for movement and emergency exits.
3. Communicate the Plan
- Inform all household members about the work schedule and areas to avoid.
- If hiring professionals, discuss safety protocols and access restrictions.
- Keep emergency contact numbers visible and accessible.
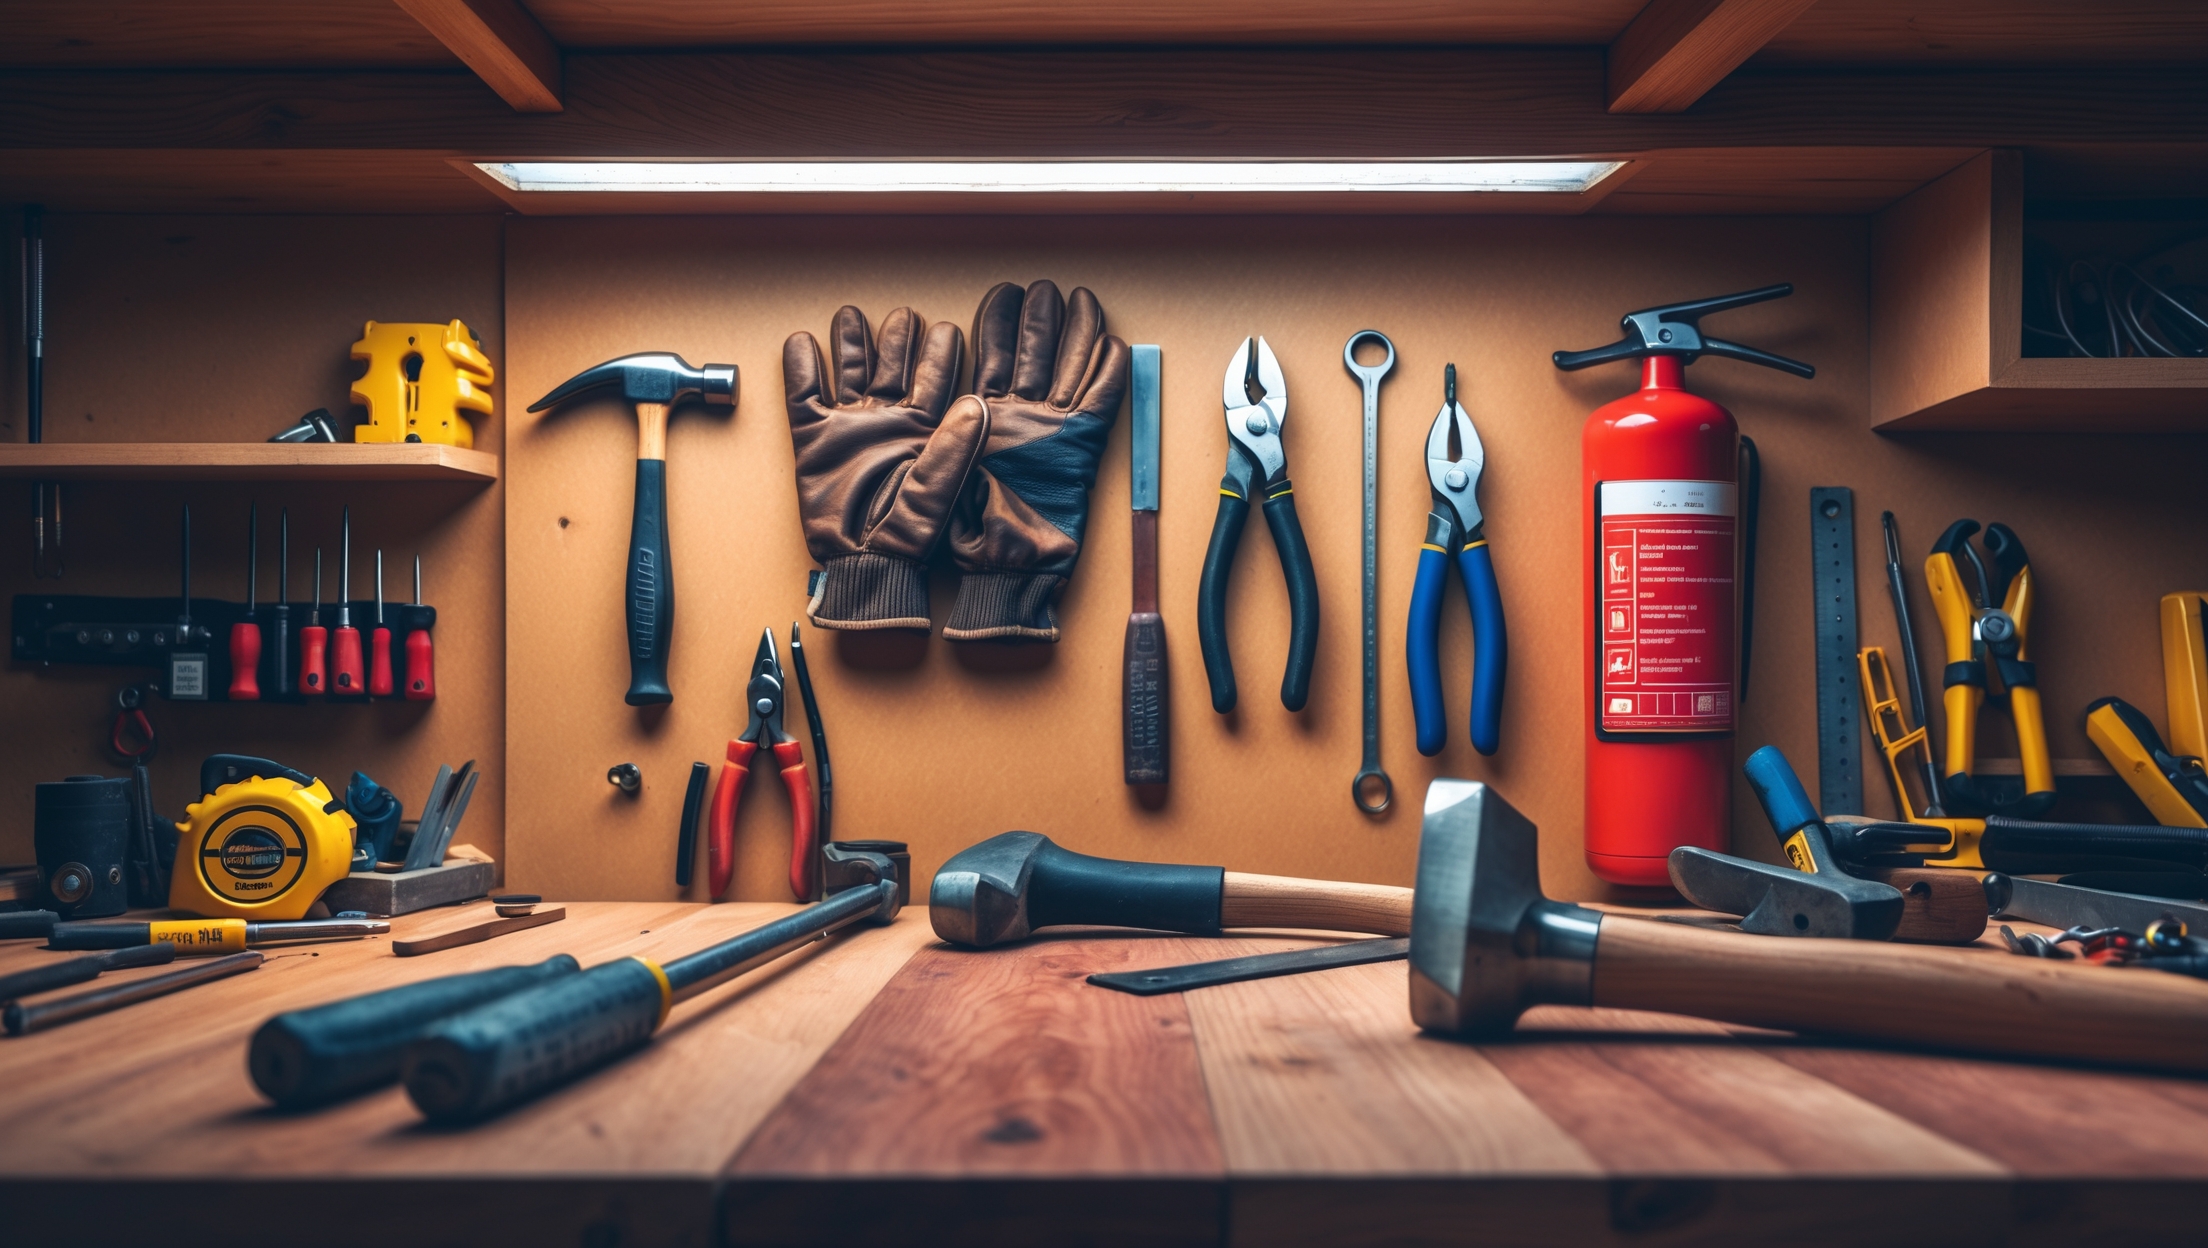
Personal Protective Equipment (PPE): The First Line of Defense
1. Essential Gear for Every Project
- Safety glasses or goggles: Protect eyes from flying debris and splashes.
- Work gloves: Prevent cuts, abrasions, and chemical burns.
- Dust masks or respirators: Shield lungs from dust, fumes, and mold spores.
- Ear protection: Use earplugs or earmuffs when operating loud tools.
- Sturdy footwear: Wear closed-toe shoes or boots with non-slip soles.
- Hard hats: Essential for overhead work or demolition tasks.
- Knee pads: Protect joints during flooring or tiling projects.
2. Specialized Protection
- Use chemical-resistant gloves and aprons when handling solvents or paints.
- Wear flame-resistant clothing for welding or soldering tasks.
- Apply sunscreen and wear hats for outdoor projects.
Tool and Equipment Safety: Using the Right Tools the Right Way
1. Inspect Before Use
- Check power cords for fraying or exposed wires.
- Ensure blades, bits, and attachments are sharp and securely fastened.
- Verify that safety guards are in place and functioning.
2. Follow Manufacturer Instructions
- Read manuals and safety warnings before operating unfamiliar tools.
- Use each tool only for its intended purpose.
- Never bypass safety features or attempt makeshift repairs.
3. Safe Handling and Storage
- Unplug tools when changing accessories or making adjustments.
- Keep tools out of reach of children and pets.
- Store sharp or heavy tools securely after each use.
- Clean tools regularly to prevent malfunction.
Electrical Safety: Preventing Shocks and Fires
1. Know Your Limits
- If you lack training, hire a licensed electrician for wiring or panel upgrades.
- Never attempt repairs on live circuits—always shut off power at the breaker.
- Use a voltage tester to confirm circuits are de-energized before working.
2. Safe Extension Cord Use
- Choose cords rated for the intended load and environment (indoor/outdoor).
- Inspect for damage before each use.
- Keep cords clear of water, heat sources, and walkways.
- Do not daisy-chain (connect multiple extension cords together).
3. GFCI Outlets and Surge Protection
- Install Ground Fault Circuit Interrupter (GFCI) outlets in bathrooms, kitchens, garages, and outdoors.
- Use surge protectors for sensitive electronics and expensive tools.
Dealing with Hazardous Materials: Safe Removal and Disposal
1. Identifying Hazards
- Asbestos: Common in insulation, floor tiles, and siding in homes built before 1980.
- Lead paint: Used in homes built before 1978.
- Mold: Grows in damp, poorly ventilated areas.
- Chemicals: Paints, solvents, adhesives, and cleaners.
2. Safe Handling Procedures
- Do not disturb suspected asbestos or lead materials—consult certified professionals.
- Contain work areas with plastic sheeting and seal vents when working with dust or mold.
- Wear appropriate PPE, including respirators, gloves, and coveralls.
- Ventilate workspaces and use air purifiers when possible.
3. Proper Disposal
- Never dispose of hazardous waste in household trash or drains.
- Contact local authorities for designated hazardous waste facilities.
- Store chemicals in labeled, sealed containers until proper disposal.
Fall Prevention: Staying Safe from Heights
1. Ladder Safety
- Choose the right ladder for the job (step, extension, platform).
- Inspect for damage, loose rungs, or missing feet before use.
- Set up on a firm, level surface and fully extend locks.
- Maintain three points of contact (two hands and a foot or two feet and a hand) at all times.
- Never stand on the top rung or overreach.
2. Working on Roofs or Elevated Areas
- Use harnesses and anchor points when necessary.
- Clear debris and wet leaves before starting.
- Check weather conditions—avoid work during rain, snow, or high winds.
Fire Safety: Preventing and Preparing for Emergencies
1. Fire Prevention
- Keep flammable materials (paints, solvents) away from heat sources.
- Do not overload electrical outlets or circuit breakers.
- Clean up sawdust and oily rags promptly—store rags in metal containers with lids.
2. Emergency Preparedness
- Have a working fire extinguisher within reach—check its expiration date regularly.
- Install smoke and carbon monoxide detectors in work areas and test monthly.
- Plan and practice evacuation routes with your household.
Child and Pet Safety: Securing the Site for the Whole Family
1. Restricting Access
- Use safety gates or temporary barriers to close off work zones.
- Remove toxic plants, sharp tools, and small objects from reach.
2. Safe Storage
- Store chemicals and tools in locked cabinets or sheds.
- Secure heavy objects and ladders to prevent tipping.
Post-Project Safety: Ensuring Long-Term Protection
1. Inspection and Cleanup
- Inspect all work for exposed wires, protruding nails, or unstable fixtures.
- Clean up all debris, dust, and leftover materials.
- Dispose of waste according to local regulations.
2. Restoring Safety Devices
- Reinstall smoke detectors, fire extinguishers, and security systems if they were temporarily removed.
- Test all alarms and replace batteries as needed.
3. Documentation
- Keep records of repairs, materials used, and safety upgrades for future reference or resale value.
- Update emergency contacts and maintenance logs.
Conclusion: Make Safety a Habit, Not an Afterthought
Every home improvement project, no matter the size or complexity, carries potential risks that can be mitigated through careful planning and adherence to best safety practices. By following this comprehensive safety checklist, you empower yourself to protect your loved ones, safeguard your investment, and enjoy the process of enhancing your home. Remember, the time and effort you dedicate to safety procedures are always well spent—they can prevent accidents, costly repairs, and even save lives.
As you embark on your next renovation, keep this checklist at hand and tailor it to your specific needs. Encourage everyone involved—family members, friends, and contractors—to share in the safety culture. Invest in quality protective gear, maintain your tools, and stay informed about potential hazards unique to your property. With these habits, you’ll not only complete projects successfully but also foster a home environment built on security and peace of mind.
If you found this checklist helpful, consider sharing it with fellow DIY enthusiasts and neighbors. Together, we can raise the standard for safety in home improvement and ensure that progress never comes at the expense of well-being.
You mentioned assessing for hazardous materials like asbestos or lead paint before starting a project. If I’m not sure whether my house has these, what are the first steps I should take to identify or test for them before beginning any work?
Great question! If your home was built before the late 1970s, there’s a chance it could have asbestos or lead paint. The safest approach is to contact a certified professional to test for these hazards. DIY kits are available for lead paint, but for asbestos, professional testing is important since disturbing it can be dangerous. It’s best to confirm before you do any demolition or sanding.
Can you give examples of personal protective equipment that are essential for smaller DIY projects versus bigger renovations? I want to make sure I’m adequately prepared but not overspending.
For smaller DIY projects, essentials include safety glasses, work gloves, and a dust mask. For bigger renovations, you’ll want to add items like a hard hat, hearing protection, steel-toed boots, and a respirator. This way, you stay safe without buying unnecessary gear.
Thanks for the checklist! I noticed you mentioned hazardous materials like asbestos and lead paint. How can I tell if my home has these, especially in older houses? And if I do find them, is it safe to remove them myself or should I always call a professional?
Great question! If your home was built before the late 1970s, there’s a chance it could have asbestos or lead paint. Testing kits are available, but for safety, it’s best to hire certified professionals for inspection and removal. Disturbing these materials can be dangerous, so professionals have the right equipment and training to handle them safely.
When planning for hazardous materials like asbestos or lead paint, is it usually safe to handle small removals myself, or should I always hire a licensed professional, even for minor projects?
Even small amounts of asbestos or lead paint can pose serious health risks if not handled properly. For safety, it’s best to hire a licensed professional for any removal or disturbance, no matter how minor your project may seem.
In the section about preparing the work area, you mention securing loose rugs and cords to prevent tripping. Do you have any specific recommendations for temporary solutions when major rearrangement isn’t possible?
If major rearrangement isn’t possible, consider using non-slip rug pads or double-sided carpet tape to keep rugs securely in place. For cords, try cord covers or tape them down along the edges of the floor to reduce tripping hazards. These temporary fixes can help keep your work area safer during your project.
I’m curious about setting up adequate lighting for a workspace—are there certain types of portable work lights or setups that are safer or more reliable for DIY projects than others?
For DIY projects, LED work lights are a great choice—they stay cool, give off bright light, and are energy efficient. Look for lights with sturdy bases or tripod stands for stability, and use models with grounded cords or battery power to help prevent electrical hazards. Make sure your setup lights the entire workspace evenly to avoid shadows and reduce tripping risks.
If I’m planning a DIY remodel with young kids and pets around, how can I best communicate safety plans to all family members to make sure everyone follows the necessary precautions?
Hold a family meeting before you start, explaining the project and specific safety rules in simple language. Set clear boundaries for kids and pets, like off-limits areas. Use signs or barriers as reminders, and check in regularly to reinforce the safety rules as the project continues.
When you mention hazardous materials like asbestos or lead paint, how can I tell if my older home actually contains these before beginning a renovation?
If your home was built before the late 1970s, there’s a chance it may contain asbestos or lead paint. The safest way to find out is to hire a certified inspector who can test materials and paint for these hazards before you start renovations.
After finishing a home improvement project, what specific post-project safety checks should I do before letting my family use the space again?
After finishing your project, ensure all tools and materials are cleared away, outlets and wiring are safely covered, and no sharp edges or loose hardware remain. Check that paint or adhesives are dry and fumes have dissipated. Test smoke and CO detectors if you made electrical changes, and verify the area is clean and well-ventilated before use.
If I need to bring in a professional for part of a renovation, what are some key safety protocols I should make sure they follow to protect my home and family?
Ensure any professional you hire is licensed and insured. They should use proper protective equipment, contain dust and debris, and follow fire safety rules. Confirm they secure tools when not in use and keep work areas clear of hazards, especially if children or pets are present. Ask about their clean-up procedures and emergency plans before work begins.
After completing a DIY renovation, what are some effective ways to check for lingering hazards, especially if pets or young children live in the home?
After finishing your renovation, inspect for exposed nails, loose wires, and sharp edges at low levels. Ensure all tools and chemicals are stored out of reach. Test smoke and carbon monoxide detectors, and vacuum thoroughly to remove dust or debris. Cover outlets and secure heavy furniture if young kids or pets are present.
If I hire professionals for certain parts of a project, are there specific safety protocols or documentation I should request from them to ensure my family’s well-being throughout the renovation?
When hiring professionals, always request proof of proper licensing, insurance, and any relevant safety certifications. Make sure they follow OSHA safety standards, use protective equipment, and provide clear timelines for potentially hazardous work. Ask for written documentation on their safety procedures and how they’ll secure the site to protect your family during the renovation.
Could you give some tips on how to safely handle tools if I have kids and pets around? I’m trying to set up my workspace so it’s as secure as possible.
To keep your workspace secure, always store tools out of reach when not in use, ideally in locked cabinets. Use safety covers on sharp tools, unplug power tools when stepping away, and set up clear boundaries to keep kids and pets out of the work area. Keep floors clear to prevent tripping and never leave tools unattended.