Introduction: Why Crawl Space Encapsulation Matters
When it comes to home improvement, the crawl space is often overlooked. Yet, this hidden area beneath your home can have a profound impact on your property’s structural integrity, indoor air quality, and energy efficiency. Moisture intrusion, mold growth, and pest infestations are common problems in unsealed crawl spaces, leading to costly repairs and health concerns. Crawl space encapsulation—a process that involves sealing the crawl space with a vapor barrier and other materials—offers a reliable solution. In this comprehensive guide, we’ll walk you through the step-by-step encapsulation process, provide a detailed cost breakdown, and share expert maintenance practices. Whether you’re a DIY enthusiast or considering professional help, this guide will help you make informed decisions and protect your investment for years to come.
Understanding Crawl Space Encapsulation
What Is Crawl Space Encapsulation?
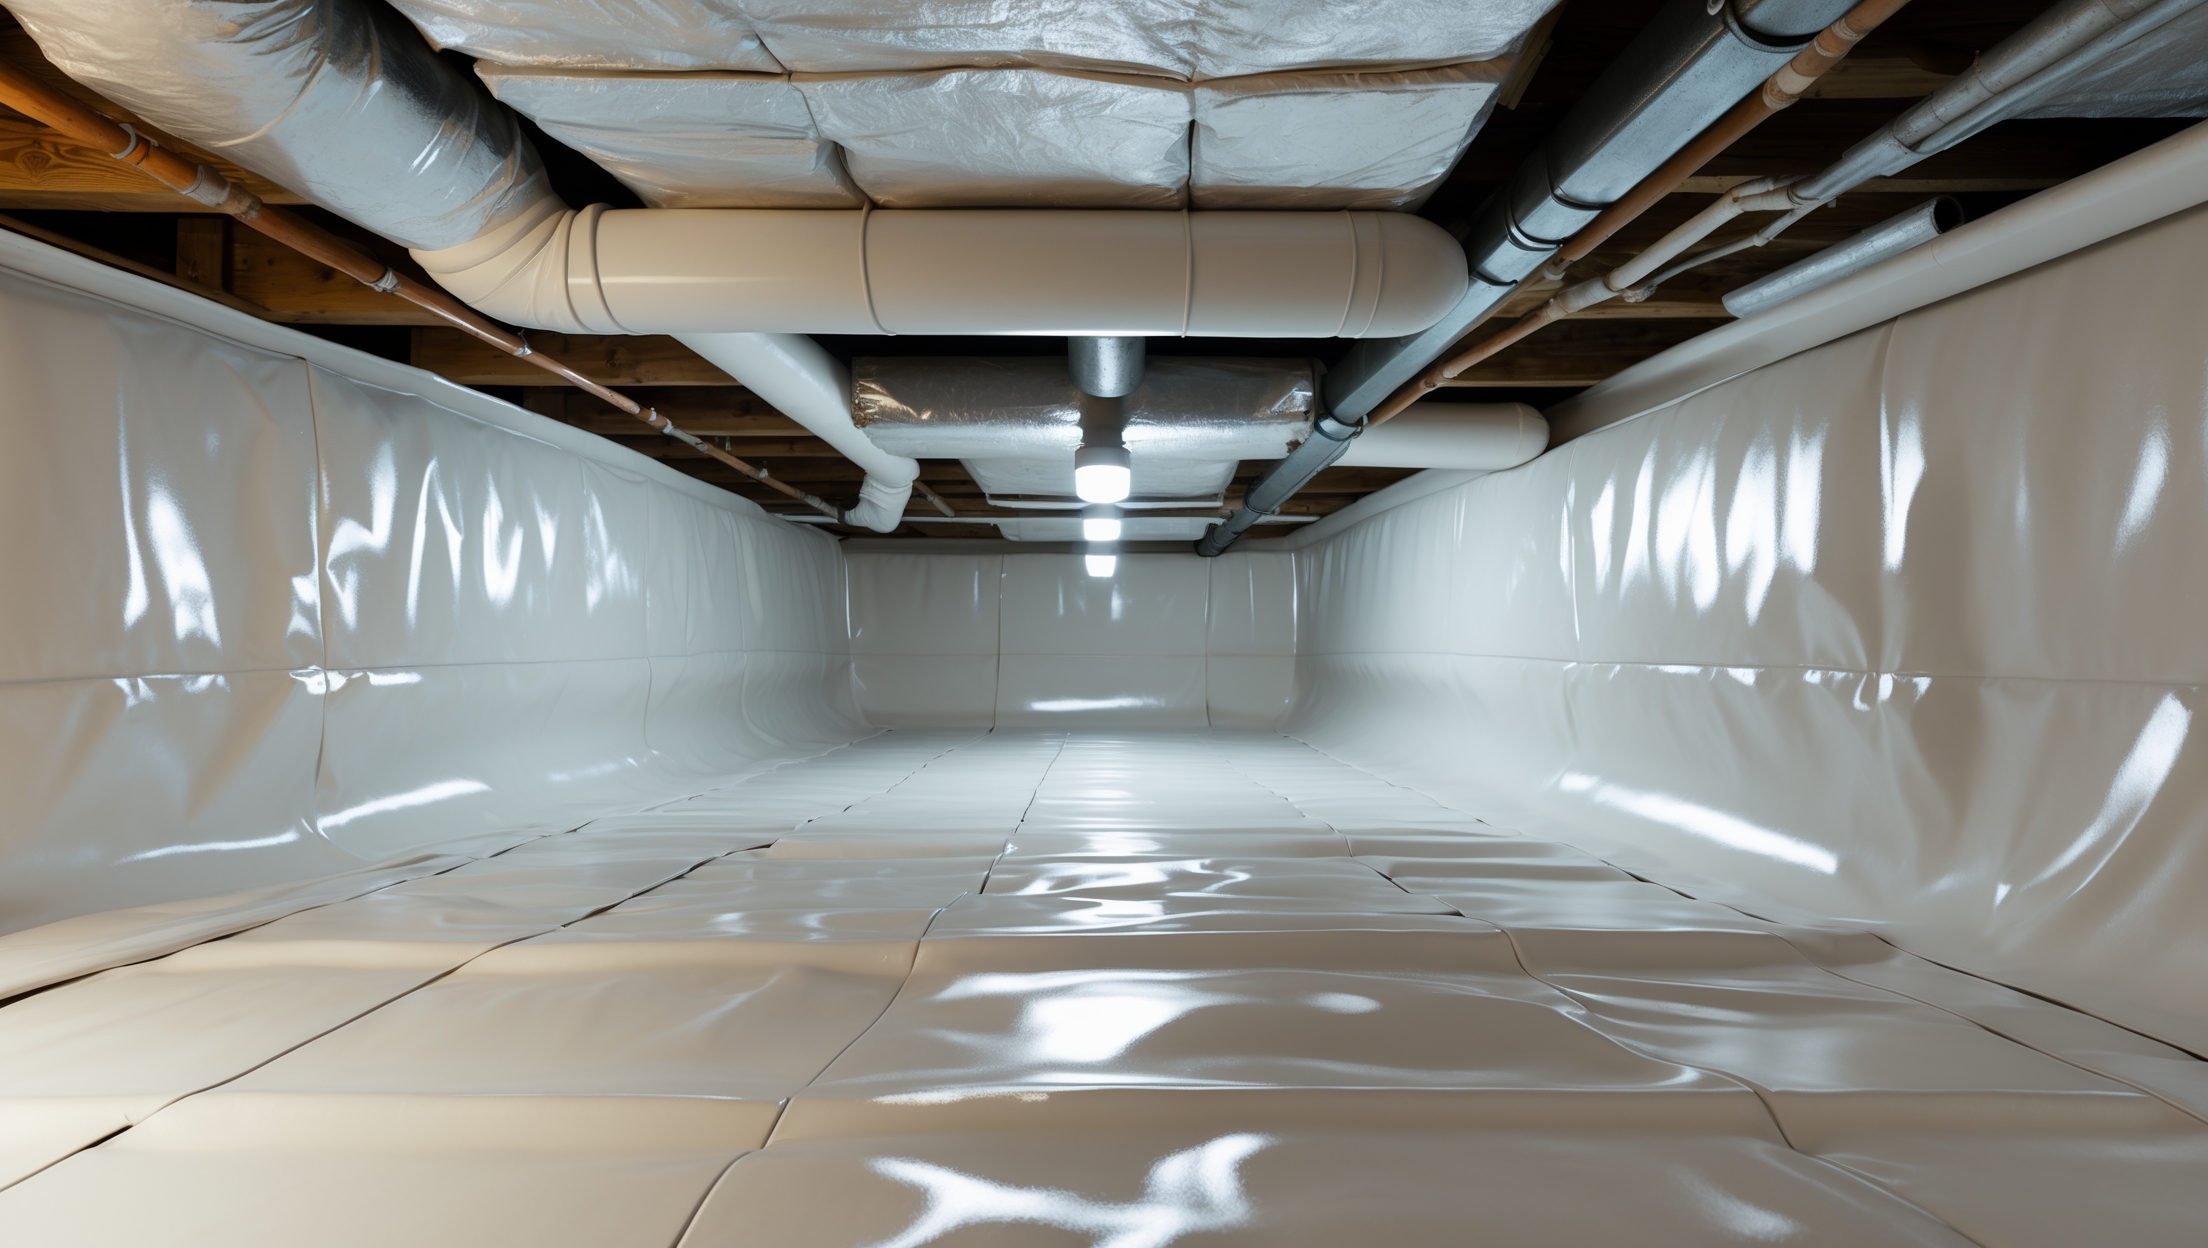
Crawl space encapsulation is the process of sealing your crawl space with a heavy-duty vapor barrier, insulation, and sometimes a dehumidifier to create a dry, controlled environment. Unlike traditional vented crawl spaces, encapsulation eliminates outside air and moisture, helping to prevent mold, rot, and pest problems.
Benefits of Encapsulation
- Moisture Control: Prevents wood rot, mold, and mildew.
- Improved Air Quality: Reduces allergens and airborne contaminants entering your living space.
- Energy Efficiency: Minimizes heat loss in winter and heat gain in summer, lowering utility bills.
- Pest Prevention: Seals out rodents, insects, and other pests.
- Structural Protection: Maintains the integrity of floor joists and subflooring.
Step-by-Step Crawl Space Encapsulation Process
Step 1: Inspection and Preparation
Begin by thoroughly inspecting the crawl space for existing damage. Look for standing water, mold, pest activity, and structural issues. Take note of any insulation that needs replacement and ensure all utility lines are accessible.
- Remove debris, old insulation, and any organic material.
- Address existing issues such as leaks, foundation cracks, or wood rot before encapsulation.
Step 2: Addressing Drainage and Water Intrusion
Effective water management is critical. If standing water is present or the soil is damp, consider installing a perimeter French drain and sump pump system to redirect water away from the foundation.
- Grade the soil so that water flows to the sump pump.
- Seal foundation vents or install vent covers as needed.
Step 3: Mold Remediation (If Needed)
If mold is detected, it must be remediated before proceeding. Use EPA-registered fungicides and follow safety guidelines. Severe infestations may require professional remediation.
Step 4: Insulating Walls and Rim Joists
Insulating the crawl space walls and rim joists helps maintain stable temperatures:
- Use rigid foam board or closed-cell spray foam for walls.
- Seal gaps and cracks in rim joists with spray foam or caulk.
Step 5: Installing the Vapor Barrier
The vapor barrier is the heart of encapsulation. Choose a 12-20 mil polyethylene barrier for durability.
- Lay the barrier across the floor, extending it up the walls (6-12 inches above grade).
- Overlap seams by at least 12 inches and seal with waterproof tape.
- Secure the barrier to the walls using mechanical fasteners and seal with caulk or specialized tape.
- Seal around piers and utility penetrations to ensure a continuous barrier.
Step 6: Sealing the Crawl Space Entrance
Install an airtight door or hatch to limit outside air intrusion. Weatherstrip all edges and ensure easy access for future maintenance.
Step 7: Installing a Dehumidifier (Optional but Recommended)
Depending on your climate and moisture levels, installing a crawl space-specific dehumidifier can keep humidity below 60% and prevent future mold growth. Route condensate to the sump pump or a designated drain.
Cost Breakdown: Materials, Labor, and Ongoing Expenses
Material Costs
- Vapor Barrier (12-20 mil): $0.50–$0.75/sq. ft.
- Rigid Foam Insulation: $1.00–$1.50/sq. ft.
- Sump Pump: $150–$400
- French Drain System: $10–$25/linear foot (if needed)
- Dehumidifier: $800–$1,500 (crawl space rated)
- Sealing Tapes and Caulks: $100–$250 total
- Miscellaneous (fasteners, vent covers, etc.): $100–$300
Labor Costs
Professional encapsulation typically runs $3,000–$8,000 for a 1,500 sq. ft. crawl space, depending on complexity and regional labor rates. DIY projects may cost $1,500–$3,000 in materials but require significant time and effort.
Permitting and Inspection
Some municipalities require permits for encapsulation, especially if electrical or plumbing work is involved. Permit fees range from $50–$300. Check local codes before starting.
Ongoing Maintenance Costs
- Dehumidifier Operation: $10–$30/month in electricity
- Annual Inspection: $100–$300 (if outsourced)
- Routine Repairs: Varies; expect minor tape or barrier patching every few years
Essential Tools and Equipment Guide
- Utility knife with extra blades
- Heavy-duty tape (butyl or vapor barrier tape)
- Caulk gun and waterproof sealant
- Measuring tape
- Protective gear (coveralls, gloves, goggles, respirator)
- Hammer drill or impact driver (for fasteners)
- Work lights or headlamp
- Moisture meter
- Shop vacuum
- Dehumidifier (if installing)
- Sump pump (if needed)
Maintenance Best Practices for Encapsulated Crawl Spaces
Routine Inspections
Inspect the crawl space at least twice a year, ideally in spring and fall. Look for tears in the vapor barrier, pooled water, pest activity, and insulation integrity.
Dehumidifier Upkeep
- Clean air filters every 3–6 months.
- Check and clear condensate lines to prevent clogs.
- Test humidity settings and recalibrate as needed.
Barrier and Seal Check
- Patch holes or rips in the vapor barrier immediately using matching tape or new material.
- Re-seal any gaps around penetrations or piers.
Check for Pests
Look for droppings, nests, or gnaw marks. If found, contact a pest control professional and repair any entry points in the barrier or foundation walls.
Monitor for Water Intrusion
After heavy rains, inspect for water accumulation. Test the sump pump regularly to ensure functionality.
Common Crawl Space Encapsulation Mistakes to Avoid
- Skipping Drainage Solutions: Encapsulation without addressing water intrusion leads to failure and mold growth.
- Using Thin or Inadequate Vapor Barriers: Material less than 12 mil is prone to tears and seepage.
- Failing to Seal Seams and Penetrations: Gaps allow moisture and pests to enter.
- Neglecting Insulation: Uninsulated walls lead to energy loss and condensation.
- Overlooking Vent Sealing: Open vents defeat the purpose of encapsulation.
- Ignoring Local Codes: Failure to get permits or follow code can result in fines and required rework.
When to Hire a Professional vs. DIY
DIY Suitability
If your crawl space is dry, mold-free, and under four feet high, a capable DIYer can tackle encapsulation with careful planning and the right tools. Be prepared for tight spaces and physical work.
Professional Help Recommended When:
- There is standing water or chronic flooding.
- Mold remediation is needed.
- Structural repairs are required.
- You need to add or update electrical/plumbing lines.
- Local code compliance is complex.
Frequently Asked Questions
How long does crawl space encapsulation last?
With quality materials and proper installation, encapsulation can last 20+ years. Regular inspections and maintenance are key to longevity.
Can I encapsulate a crawl space in a flood-prone area?
Yes, but you must install robust drainage (French drains, sump pump) and use a heavy-duty barrier. Consult local codes and consider professional installation.
Will encapsulation increase my home value?
Encapsulation improves air quality, energy efficiency, and protects structural integrity, making your home more appealing to buyers and potentially increasing its value.
Conclusion: Protecting Your Home for the Long Term
Crawl space encapsulation is a high-impact home improvement project that yields benefits far beyond what’s visible. By sealing out moisture and pests, you’re protecting your home’s structure, improving air quality, and increasing energy efficiency—all of which contribute to long-term savings and peace of mind. While the upfront investment can be significant, especially if professional labor or drainage systems are needed, the cost of inaction can be much higher due to potential structural repairs and health issues resulting from poor indoor air quality. Whether you choose the DIY route or hire a professional, following best practices and maintaining your encapsulated crawl space will pay dividends for decades. Make regular inspections and maintenance part of your home care routine, and you’ll enjoy a healthier, more resilient home environment. If you haven’t yet considered crawl space encapsulation, now is the perfect time to take this important step toward safeguarding your biggest investment—your home.
Can you explain a bit more about the maintenance practices after encapsulation? I want to be sure I keep the crawl space in good shape long term without missing anything important.
After encapsulation, regular maintenance is key. Inspect the crawl space at least twice a year for any tears in the vapor barrier, standing water, or pest activity. Make sure dehumidifiers are running properly, replace filters as needed, and check for signs of mold or mildew. Promptly address any plumbing leaks or drainage issues you notice.
How often should the vapor barrier and dehumidifier in an encapsulated crawl space be inspected or replaced to keep everything working properly?
Inspect the vapor barrier and dehumidifier in your encapsulated crawl space at least once a year. Replace the vapor barrier if it shows rips, mold, or significant wear, and check the dehumidifier’s filters and operation annually, replacing the unit if it no longer controls humidity effectively.
Is it possible to do crawl space encapsulation in stages for budget reasons, or does everything need to be sealed and installed at once for it to be effective?
It’s possible to encapsulate your crawl space in stages if needed for budget reasons. Just make sure each phase is done thoroughly—for example, start with moisture control and sealing the ground, then move on to walls and vents. Keep in mind, full effectiveness comes with complete encapsulation, but phased work is better than none.
The article mentions using a vapor barrier and sometimes a dehumidifier for crawl space encapsulation. Is it always necessary to add a dehumidifier, or are there conditions where just the vapor barrier is enough?
A vapor barrier alone may be enough if your crawl space has no persistent moisture issues and good ventilation. However, if humidity levels remain high after encapsulation or your area is prone to dampness, adding a dehumidifier is recommended to prevent mold and moisture problems.
Can you give a rough estimate of how much the DIY materials typically cost for a standard-sized crawl space if I follow the steps you described?
For a standard-sized crawl space, expect DIY material costs to range from $1,500 to $3,000. This typically covers vapor barriers, tape, sealants, insulation, and a dehumidifier. The final cost depends on your crawl space size and the quality of materials you choose.
In the step-by-step process, are there certain signs during the inspection that mean you should hold off on encapsulation until repairs are done? For example, if you spot minor mold, should you address it before laying the vapor barrier?
Yes, if you spot issues like mold, standing water, or structural damage during the inspection, it’s best to address those first. Even minor mold should be remediated before installing the vapor barrier to prevent future problems and ensure the encapsulation is effective and safe.
If my crawl space already has some minor mold growth, should I handle that myself before encapsulating, or is it better to have a professional take care of the mold as part of the overall process?
If you notice minor mold growth, it’s generally safer to have a professional handle removal before encapsulation. Professionals can ensure the mold is fully removed and won’t spread during the process, which is important for maintaining healthy indoor air quality.
I saw that encapsulation can improve energy efficiency, but do you know roughly how much homeowners typically save on utility bills after sealing the crawl space?
Homeowners usually see savings of about 10% to 20% on their heating and cooling bills after encapsulating their crawl space. The exact amount can vary depending on factors like climate, the condition of the home, and how well the encapsulation is done.
Can you provide a ballpark range for how much it costs to encapsulate a crawl space in an average-sized home? Are there any parts of the process where it’s possible to save money with DIY work?
Encapsulating a crawl space in an average-sized home typically costs between $5,000 and $15,000, depending on materials and labor. You can often save money by handling some prep work yourself, like cleaning the space or removing debris, but sealing and installing vapor barriers is best left to professionals for lasting results.
Once the crawl space is sealed, how often should I be checking on it or performing maintenance to make sure mold and pests stay out?
After encapsulation, it’s best to inspect your crawl space every six months. Look for signs of moisture, mold, or pests, and check that vapor barriers and seals are intact. Also, monitor any installed dehumidifiers or sump pumps to ensure they’re working properly.
About the cost breakdown—can you give a ballpark estimate for a medium-sized crawl space if I want to hire a professional versus attempting a DIY approach?
For a medium-sized crawl space, hiring a professional typically ranges from $5,000 to $15,000, depending on materials and local labor rates. If you tackle it DIY, costs usually fall between $1,500 and $4,000, mainly for materials like vapor barriers, sealants, and insulation.
When you mention sealing the crawl space with a vapor barrier, does that usually mean covering just the floor or should the walls be sealed too? I want to be sure I do it right the first time.
Sealing your crawl space with a vapor barrier should include both the floor and the walls for the best results. Overlapping and sealing the barrier up the walls (usually about 6–12 inches or even full height) helps prevent moisture from entering through either surface.
After finishing encapsulation, is it necessary to install a dehumidifier in every case, or are there situations where that’s not needed?
A dehumidifier isn’t always required after encapsulation, but it’s often recommended, especially in humid climates or if moisture issues have been a problem. In drier regions or well-ventilated homes with no previous moisture problems, you might not need one. It’s best to monitor humidity levels in the crawl space to decide.
Could you explain a bit more about how to tell if my old insulation needs to be replaced before starting encapsulation? I’m not sure what signs to look for during the inspection step.
When inspecting your crawl space, look for insulation that is damp, sagging, falling out of place, or shows signs of mold or pest damage. Insulation that feels brittle, has a musty odor, or is compressed and no longer fluffy should also be replaced before encapsulation.
The article outlines the benefits of energy efficiency and moisture control, but I’m curious—what kind of ongoing maintenance is typically required to keep an encapsulated crawl space performing well after the initial installation?
Ongoing maintenance for an encapsulated crawl space usually includes checking for tears or damage in the vapor barrier, inspecting and cleaning vents or dehumidifiers, monitoring humidity levels, and ensuring drains remain clear. It’s a good idea to schedule an annual inspection to catch any issues early and keep everything working efficiently.
Could you give a general idea of how much maintenance is actually needed once the encapsulation is done? I’m worried about long-term upkeep with a busy family schedule.
Once your crawl space is encapsulated, maintenance is minimal. You’ll mainly need an annual inspection to check for any tears in the barrier, ensure the dehumidifier (if installed) is working, and confirm there are no leaks. This usually takes very little time and is often handled by professionals.
When encapsulating a crawl space, do you recommend adding a dehumidifier even in regions with mild humidity, or is the vapor barrier usually enough to control moisture levels?
In regions with mild humidity, a well-installed vapor barrier is often enough to control moisture in your crawl space. However, if you notice persistent dampness or have sensitive indoor air quality needs, adding a dehumidifier can provide extra protection and peace of mind.
Is installing a dehumidifier always necessary during encapsulation, or are there situations where just a vapor barrier and insulation are enough to control moisture and air quality?
A dehumidifier isn’t always required if your crawl space has minimal moisture and good ventilation, and if the vapor barrier and insulation are properly installed. However, in most climates, adding a dehumidifier better controls humidity and air quality, especially if your area is prone to dampness or if previous moisture issues existed.
If I choose to install a vapor barrier and insulation myself, how can I tell if I also need to add a dehumidifier, or is that only recommended in certain climates?
A dehumidifier is especially useful if your crawl space still feels damp or humid after installing a vapor barrier and insulation, or if you live in a humid climate. Check humidity levels with a hygrometer; if they’re above 60%, a dehumidifier is recommended to prevent mold and moisture issues.
The article mentions that crawl space encapsulation often involves adding a dehumidifier. Do you recommend a specific type or capacity of dehumidifier for most homes, or does it depend on the climate and crawl space size?
The best dehumidifier depends on both the size of your crawl space and your local climate. Larger or more humid areas usually need higher-capacity dehumidifiers, typically rated for 50–70 pints per day. It’s a good idea to measure your space and check the manufacturer’s recommendations to ensure proper humidity control.
For someone on a limited budget, which part of the encapsulation process should I prioritize to get the most impact on moisture and air quality?
If you’re on a limited budget, prioritize sealing any visible foundation cracks and installing a high-quality vapor barrier on the crawl space floor. These steps do the most to prevent moisture intrusion and improve air quality, even if you postpone other upgrades like dehumidifiers or insulation.
In terms of total costs, how much of the price usually goes toward materials like the vapor barrier and insulation, as opposed to labor, if hiring professionals for the job?
When hiring professionals, materials like vapor barrier and insulation typically make up about 30–40% of the total cost. The remaining 60–70% usually covers labor, prep work, and equipment. Actual percentages can vary depending on your crawl space size and complexity.
For budgeting purposes, could you give a rough estimate of what percentage of the total cost typically goes to the vapor barrier versus added features like insulation or a dehumidifier?
Typically, the vapor barrier accounts for about 30-40% of the total crawl space encapsulation cost. Additional features like insulation and a dehumidifier can make up the remaining 60-70%, with each feature’s share depending on your specific choices and local prices.
The article mentions adding insulation and sometimes a dehumidifier—are there situations where one or both might not be necessary for encapsulation in milder US climates?
In milder US climates, sometimes only a vapor barrier is enough, especially if moisture and temperature fluctuations are minimal. Insulation may not be needed if your home already stays comfortable and energy efficient. A dehumidifier is usually optional unless humidity remains high after encapsulation. It’s important to assess your specific crawl space conditions before deciding.
Can you provide a rough estimate on how much maintenance is actually required after encapsulation, and what the most common issues are that homeowners run into over time?
After encapsulation, maintenance is usually minimal—inspections once or twice a year are recommended. Common issues include occasional tears in the vapor barrier, sump pump failures, or dehumidifier problems. Addressing these early helps keep the system working effectively and prevents moisture from returning.
If I’m considering doing some parts of the encapsulation project myself, which steps are realistic for a homeowner to handle, and which ones should definitely be left to professionals?
Homeowners can usually handle tasks like cleaning the crawl space, laying down the vapor barrier, and installing insulation if they’re comfortable with basic DIY. However, electrical work, major mold remediation, and installing sump pumps or dehumidifiers should be left to professionals for safety and proper installation.
Could you clarify how the costs break down between doing encapsulation as a DIY project versus hiring professionals? I’d like to understand where most of the expense comes from before making a decision.
DIY encapsulation costs are mainly for materials like vapor barriers, tape, insulation, and possibly tools, usually totaling $1,500–$4,000. Hiring professionals adds labor charges and expertise, raising the total to $5,000–$15,000 depending on crawl space size and issues. Most of the professional expense comes from labor, equipment, and ensuring the job meets high standards.
I noticed you mentioned both DIY and hiring a professional for encapsulation. Could you provide a general cost comparison between doing it yourself versus having a contractor handle everything?
DIY crawl space encapsulation typically costs between $1,500 and $3,000, mainly for materials. Hiring a professional contractor usually ranges from $5,000 to $15,000, depending on the crawl space size and complexity. While DIY saves money, professional work often comes with warranties and expertise that can help prevent future problems.
Can you give a ballpark idea of how much regular maintenance might cost after encapsulating the crawl space, especially if a dehumidifier is involved?
After encapsulation, regular maintenance—including dehumidifier servicing, filter changes, and inspections—typically ranges from $150 to $350 per year. If your dehumidifier needs repairs or replacement parts, costs could be higher. Annual checkups help catch issues early and keep your system running efficiently.
I’m considering doing this as a DIY project, but I’m concerned about identifying existing insulation that should be replaced during the inspection. Are there any specific signs or tests I should look for to know if insulation needs to go?
During your inspection, look for insulation that is damp, moldy, sagging, compressed, or falling down—these are clear signs it should be replaced. Also, if it feels brittle, crumbles when touched, or has a musty odor, it’s likely damaged. Pay extra attention to any areas with visible water stains or pest activity.
Could you give a rough estimate for how much of the total encapsulation cost is typically labor versus materials for an average-sized crawl space?
For an average-sized crawl space, labor often makes up about 60–70% of the total encapsulation cost, while materials account for the remaining 30–40%. Actual percentages can vary, but this is a common breakdown in most professional installations.
I noticed you mention using a heavy-duty vapor barrier and sometimes a dehumidifier. How do you decide if a dehumidifier is necessary, or will the vapor barrier alone usually be enough for most homes?
A vapor barrier is essential for blocking ground moisture, but a dehumidifier is recommended if your crawl space still shows signs of high humidity, condensation, or musty odors after encapsulation. Homes in very damp climates or with persistent moisture issues usually benefit from adding a dehumidifier for extra protection.
About the costs you mentioned, is it possible to DIY the entire encapsulation process on a tight budget, or are there steps that really require bringing in a professional?
You can DIY many aspects of crawl space encapsulation, such as installing vapor barriers and sealing vents, to save on costs. However, tasks like mold remediation, electrical work, or extensive structural repairs are best left to professionals for safety and effectiveness.
Does encapsulation typically involve insulating the foundation walls as well, or just sealing with a vapor barrier and adding a dehumidifier? I want to make sure I address energy efficiency as well as moisture.
Encapsulation usually involves sealing with a vapor barrier and managing humidity, but for better energy efficiency, it’s highly recommended to insulate the foundation walls as well. Insulating the walls helps reduce heat loss and further controls moisture, creating a healthier and more efficient crawl space environment.
How much ongoing maintenance should I expect after encapsulating my crawl space, and are there signs I should look for to catch issues early?
After encapsulating your crawl space, expect to check it every 6 to 12 months. Look for signs like moisture, puddles, musty odors, or loose vapor barriers. Also, inspect for pests and ensure the dehumidifier (if installed) is running properly. Promptly addressing small issues helps prevent costly repairs later.
If I decide to DIY the encapsulation, what kind of maintenance schedule would you recommend to keep moisture and pests at bay long-term?
For a DIY encapsulated crawl space, inspect the vapor barrier and seams every 6 months for damage or moisture signs. Check for pests quarterly, especially after wet weather. Replace dehumidifier filters and clean drainage systems yearly. Address any leaks or tears immediately to maintain the barrier’s effectiveness.
In the step-by-step process, how do you deal with existing insulation if some of it is still in decent shape? Is it better to fully replace it or just patch up specific areas during encapsulation?
If the existing insulation is still in good condition—dry, intact, and free from mold—you can leave it in place and patch up any damaged areas. However, if there are signs of moisture or deterioration, it’s best to fully replace those sections to ensure a proper seal and long-term effectiveness of your encapsulation.
You mentioned adding a dehumidifier during encapsulation. Do most homeowners find this necessary, or is the vapor barrier and insulation generally enough to keep moisture under control?
A vapor barrier and insulation do help a lot, but many homeowners still need a dehumidifier, especially in humid climates or if moisture levels remain high after encapsulation. The dehumidifier adds an extra layer of protection by actively removing any lingering moisture, which can prevent mold and structural issues.
For homeowners considering DIY encapsulation, what specific warning signs during the initial inspection would mean it’s better to bring in a professional instead?
If you notice standing water, widespread mold, structural damage, strong musty odors, or evidence of pests during your initial crawl space inspection, it’s best to consult a professional. These issues could signal bigger problems that require specialized assessment and treatment before encapsulation.
Once the crawl space is sealed and encapsulated, how often should I inspect or maintain it to prevent new mold or pest issues from cropping up?
After sealing and encapsulating your crawl space, it’s best to inspect it at least once or twice a year. Check for moisture, signs of pests, and any damage to the vapor barrier. Address any issues promptly to prevent mold or pest problems from developing.
The article mentions sealing the crawl space with a vapor barrier and sometimes a dehumidifier. For small businesses operating in older buildings, is installing a dehumidifier always necessary, or can we rely on the vapor barrier alone?
For many older buildings, a high-quality vapor barrier can greatly reduce moisture problems, but a dehumidifier is sometimes still needed, especially in humid climates or if past moisture issues exist. Monitoring humidity after installing the vapor barrier helps determine if additional dehumidification is needed for your business.
After encapsulating a crawl space, how often should I check everything for maintenance, and what are the key signs of an issue developing even after doing the job right?
It’s a good idea to inspect your encapsulated crawl space at least twice a year. Look for signs like new moisture, musty odors, condensation on the vapor barrier, pests, or damaged insulation. These could mean a problem needs attention, even if the encapsulation was done properly.
Does the cost breakdown in your guide cover both DIY and professional encapsulation, and are there specific steps that tend to be a lot more expensive if you hire a contractor instead of doing it yourself?
The cost breakdown in the guide covers both DIY and professional encapsulation. Steps like installing drainage systems, vapor barriers, and insulation tend to be much more expensive when done by a contractor, mainly due to labor charges and specialized equipment.
Could you provide a ballpark estimate for the costs involved if I decide to do crawl space encapsulation myself versus hiring a professional?
DIY crawl space encapsulation usually costs between $1,500 and $4,000, mainly for materials like vapor barriers, tape, and sealants. Hiring a professional can range from $5,000 to $15,000 or more, depending on the size and condition of your crawl space, as well as local labor rates.
How does the cost of doing crawl space encapsulation yourself compare to hiring a professional, especially when you factor in buying a dehumidifier and tools?
DIY crawl space encapsulation usually costs less upfront, since you save on labor. However, you’ll need to buy materials, tools, and a quality dehumidifier, which can add up. Professionals charge more overall but include specialized equipment and expertise. For most homeowners, DIY might save money but takes more time and risk of mistakes.
When choosing a vapor barrier for encapsulation, are there specific materials or thicknesses you recommend for homes in humid climates? I’ve seen a range of options but not sure which meets code or lasts the longest.
For humid climates, it’s best to use a reinforced polyethylene vapor barrier with at least 12 to 20 mil thickness. This type meets most building codes, is highly durable, and resists tears and moisture. Thicker barriers may cost more but generally last longer and provide better protection in damp environments.
I noticed the guide helps with cost breakdowns, but what are some ways to reduce costs if you’re doing this as a DIY project versus hiring a professional?
To reduce costs on a DIY crawl space encapsulation, buy materials in bulk, use basic tools you already own, and handle tasks like debris removal and minor repairs yourself. Skip premium products if lower-cost alternatives meet your needs, and look for sales or discounts at local hardware stores.
Is there any advice on how often the encapsulated crawl space should be inspected for issues like mold or pest activity after installation, or signs to look out for between professional checkups?
It’s recommended to inspect your encapsulated crawl space at least twice a year for signs of mold, moisture, or pests. Between professional visits, look for musty odors, visible condensation, torn vapor barriers, or any droppings and pest activity. Early detection helps prevent bigger problems.
Does encapsulating a crawl space affect the humidity levels in the rest of the house? If so, do you recommend always adding a dehumidifier during the process, or is that only necessary in really humid areas?
Encapsulating a crawl space usually lowers humidity levels throughout your home by sealing out ground moisture. Adding a dehumidifier is often recommended to keep the encapsulated area dry, especially in climates with higher humidity, but in drier regions it may not always be necessary. Assessing your local climate and home’s moisture levels can help you decide.
Could you share more about the typical maintenance tasks required after the crawl space is encapsulated? I want to make sure I keep everything in good shape and avoid future issues.
After encapsulation, it’s important to check the crawl space regularly for moisture, inspect the vapor barrier for damage, and clean any debris. Make sure the dehumidifier (if installed) is working and that vents or sump pumps are clear. Annual professional inspections can also help catch small problems early.
I see that encapsulation can help with energy efficiency, but how does the upfront cost compare to the potential savings on utility bills over time?
The upfront cost of crawl space encapsulation can be significant, often ranging from $5,000 to $15,000 depending on your home’s size and needs. However, homeowners typically see lower heating and cooling bills, with utility savings of 10% to 20% per year. Over several years, these savings can help offset the initial investment.
How often should I check on the encapsulated crawl space after installation, and are there certain maintenance steps homeowners tend to overlook?
It’s best to inspect your encapsulated crawl space at least twice a year, or more often if you notice musty smells or excess humidity. Commonly overlooked steps include checking for condensation on the vapor barrier, making sure seals remain tight, and replacing dehumidifier filters regularly.
You mention a step-by-step process and a detailed cost breakdown, but how much of the total cost typically goes toward the vapor barrier compared to insulation and other materials?
The vapor barrier usually accounts for about 25% to 35% of the total crawl space encapsulation cost. Insulation often takes another 20% to 30%, while the rest covers labor, sealing supplies, and other materials like drainage or dehumidifiers. Actual percentages can vary based on your crawl space size and chosen materials.
If an inspection reveals minor mold growth before encapsulation, does the guide provide advice on safe removal steps to take before proceeding with sealing the crawl space?
Yes, the article does mention that any mold should be addressed before encapsulation begins. It suggests cleaning affected areas with appropriate mold removal products and ensuring the space is completely dry before proceeding, though it recommends consulting a professional for widespread or stubborn mold.
The article mentions a detailed cost breakdown—can you share what the main cost drivers are for professional versus DIY encapsulation, especially in older homes?
The main cost drivers for professional encapsulation are labor, specialized materials, and warranties. DIY costs are typically lower but mainly include materials like vapor barriers, sealants, and insulation. In older homes, additional expenses often come from repairing damage, removing debris, and addressing mold or uneven surfaces before encapsulation can begin.
If there’s already some mold or pest damage before starting the encapsulation process, is it better to address all of that first or can some repairs be handled after the vapor barrier is installed?
It’s best to address any mold or pest damage before installing the vapor barrier. Taking care of these issues beforehand ensures that problems won’t be trapped or worsen under the barrier, which could lead to costly repairs or health risks later on.
When doing the inspection step, how do you tell if old insulation just needs repair versus a full replacement before encapsulation?
During inspection, check if the old insulation is damp, moldy, sagging, or crumbling—these are signs it needs full replacement. If it’s dry, intact, and just has minor gaps or looseness, you can often repair or re-secure it instead of replacing.
Could you give a rough estimate of how much energy savings a family might see after sealing a previously vented crawl space, especially in climates with hot summers and cold winters?
Sealing a previously vented crawl space typically leads to energy savings of about 10% to 20% on heating and cooling costs for a family, especially in regions with extreme seasons. The exact savings depend on home size, insulation, and local climate, but most homeowners notice lower utility bills after encapsulation.
You mentioned energy efficiency as a benefit—have you seen homeowners actually notice a difference in their utility bills after encapsulating their crawl spaces?
Yes, many homeowners do report lower utility bills after crawl space encapsulation. Sealing and insulating that area reduces drafts and keeps indoor temperatures more stable, so HVAC systems don’t work as hard. The exact savings vary, but improvements in energy efficiency are definitely a common result.
Does the step-by-step encapsulation process differ if your crawl space already has some moisture issues or minor mold? Should remediation be completed before starting encapsulation, or are there products that handle both simultaneously?
If your crawl space has moisture issues or minor mold, it’s important to address those first. Remediation, such as drying out the area and removing mold, should be completed before encapsulation. This ensures the encapsulation is effective and prevents trapping existing problems under the vapor barrier.
How often should I check the encapsulated crawl space for maintenance issues after the initial installation, and are there any specific warning signs I should watch out for?
It’s best to inspect your encapsulated crawl space at least twice a year. Look out for signs like moisture on the vapor barrier, musty odors, increased humidity, or visible mold. Also check for tears in the liner, standing water, or pest activity. Addressing these early helps maintain a healthy crawl space.
The article mentions energy efficiency as a benefit—roughly how much can encapsulating the crawl space reduce typical heating and cooling costs in an older home?
Encapsulating a crawl space in an older home can typically reduce heating and cooling costs by about 15% to 25%. The exact savings depend on factors like your home’s size, insulation, and current air leakage, but many homeowners notice a significant drop in their energy bills after encapsulation.
Can you explain how often the vapor barrier and other encapsulation materials need to be checked or replaced for ongoing effectiveness?
It’s a good idea to inspect your vapor barrier and encapsulation materials at least once a year. Look for tears, moisture buildup, or signs of pests. Typically, quality vapor barriers can last 10–20 years, but replace them sooner if you notice damage or persistent issues.
You mentioned that encapsulation can lower utility bills by improving energy efficiency. About how long does it usually take for homeowners to see noticeable savings on their energy costs after the process?
Most homeowners begin to notice lower energy bills within the first one to three billing cycles after encapsulation, depending on the season and how much the system is used. If your HVAC runs less to maintain comfortable temperatures, the savings can show up pretty quickly.
Could you elaborate on what kind of regular maintenance is necessary after encapsulation? Is there anything a business owner in a humid region should watch out for specifically?
After encapsulation, it’s important to check dehumidifiers or sump pumps regularly to ensure they’re working well, and inspect for any new tears or moisture on the vapor barrier. In humid regions, pay extra attention to humidity levels and look for signs of condensation or mold, as these can develop quickly if ventilation or equipment fails.
If my crawl space already has some mold and old insulation, do I need to fully remediate everything before encapsulation, or can some issues be addressed after sealing?
It’s important to fully remediate mold and remove old or damaged insulation before encapsulation. Sealing the crawl space with existing issues can trap moisture and mold, leading to bigger problems later. Proper cleanup and repairs ensure the encapsulation is effective and your crawl space stays healthy.
If I decide to do the crawl space encapsulation myself, how much time should I set aside for the inspection and preparation steps? I have a busy schedule and want to make sure I can manage the process.
For a typical DIY crawl space, inspection and preparation usually take 4 to 8 hours, depending on the size, clutter, and current condition. This includes checking for mold, pests, and moisture, plus cleaning out debris. You might want to split the work over two days if your schedule is tight.
Could you give a rough ballpark for the ongoing maintenance costs after encapsulation, like running a dehumidifier or checking the vapor barrier?
Ongoing maintenance after crawl space encapsulation typically ranges from $100 to $300 per year. This estimate covers electricity for running a dehumidifier, occasional filter replacements, and periodic inspections to ensure the vapor barrier is intact and there are no new moisture issues.
You mention checking for standing water during the inspection step. If I find some, do I need to install a sump pump as part of encapsulation, or are there other solutions just as effective?
If you find standing water in your crawl space, a sump pump is often the most effective long-term solution, especially for ongoing moisture issues. However, if the water is from a one-time event or minor leakage, improving drainage around your home or repairing plumbing leaks may be enough. The best approach depends on the water source and amount.
If my crawl space already has some existing insulation but it’s a bit old, should I remove it completely before encapsulating, or can I just put the vapor barrier over it?
It’s best to remove old or compromised insulation before encapsulating your crawl space. Old insulation may trap moisture or hide mold, which can cause issues later. After removal, you can proceed with sealing, installing a vapor barrier, and then adding new insulation if needed.
Could you explain how the crawl space encapsulation process affects long-term maintenance? Are there certain things homeowners need to check regularly even after everything is sealed and finished?
Encapsulation reduces moisture issues and pest problems in the long run, so maintenance is generally simpler. However, homeowners should periodically inspect the vapor barrier for tears, check for standing water, ensure the sump pump (if installed) works, and monitor for any new mold or musty odors to keep the encapsulation effective.
You mention that encapsulation improves energy efficiency—will this usually have a noticeable impact on monthly energy bills, or is the benefit more long-term?
Encapsulation can lead to noticeable savings on your monthly energy bills, especially if your crawl space was previously unsealed or damp. Many homeowners see reduced heating and cooling costs soon after the work is done, and those savings tend to add up over the long term as well.
Could you share more details on the typical costs for a DIY encapsulation, especially if I already have some insulation but need to buy a dehumidifier?
For a DIY crawl space encapsulation, costs can range from $1,500 to $4,000, depending on your crawl space size and materials. Since you already have some insulation, your main expenses will be the vapor barrier (about $0.50–$1.50 per square foot), tape, sealant, and a dehumidifier, which typically costs $200–$800.
If you spot mold or water damage during the initial inspection, should those issues be handled before starting the encapsulation, and if so, what’s the best approach to fix them?
Yes, mold and water damage should be addressed before starting encapsulation. First, repair any leaks or drainage issues to stop moisture. Remove mold with appropriate cleaners or hire a professional if it’s extensive. Dry the area completely before proceeding with encapsulation to ensure the system works effectively and problems don’t return.
I noticed you mentioned both DIY and professional options for encapsulation. Are there certain situations when it’s safer to call in a pro rather than try to tackle crawl space sealing yourself?
Yes, hiring a professional is safer if your crawl space has mold, structural damage, standing water, or electrical hazards. Professionals also have the right equipment for large or complex spaces and can ensure proper sealing and ventilation. For straightforward, dry spaces, DIY might be possible, but safety and lasting results are top priorities.
If my crawl space already has some signs of mold, do I need to remove it all before starting encapsulation or will the process itself address that?
You’ll need to remove all visible mold and address any underlying moisture issues before encapsulation. Encapsulation seals in the environment, so existing mold could continue to grow and cause problems if not dealt with first. Professional mold remediation is often recommended before starting the encapsulation process.
The article mentions using a dehumidifier in some cases. How do I know if my crawl space actually needs one, and are there specific models you suggest for smaller homes?
You may need a dehumidifier if your crawl space still feels damp or shows signs of moisture, like condensation or musty odors, even after encapsulation. For smaller homes, look for compact, energy-efficient models rated for crawl spaces, such as the Aprilaire 1820 or Santa Fe Compact70.
For someone who has never inspected a crawl space before, what signs should I look for that would mean I need to replace insulation before starting the encapsulation process?
If you’re inspecting your crawl space for the first time, check for insulation that is wet, sagging, moldy, torn, missing, or smells musty. Any signs of rodent or pest infestation also indicate replacement is needed before starting encapsulation.
I’m wondering if crawl space encapsulation really makes a noticeable difference in energy bills for older homes, or is it mainly about preventing moisture and pests?
Crawl space encapsulation can noticeably lower energy bills in older homes by reducing drafts and keeping temperatures more stable. While its main job is preventing moisture and pests, the improved insulation often leads to less work for your heating and cooling systems, resulting in energy savings.
I saw that adding a dehumidifier is sometimes part of encapsulation. How do you determine if a dehumidifier is actually needed, and are there any specific models recommended for crawl spaces?
A dehumidifier is needed if, after encapsulation, humidity levels in your crawl space still exceed 60%. You can monitor this using a hygrometer. For crawl spaces, models like the Aprilaire 1820 or Santa Fe Compact70 are popular choices due to their size, efficiency, and durability in tight spaces.
I’m curious if there’s a big difference in results between doing the encapsulation myself as a DIY project versus hiring a professional. Are there steps that really should not be skipped if I do it myself?
The main difference between DIY and professional encapsulation is often in thoroughness and quality. Key steps you shouldn’t skip if you do it yourself are sealing all vents and gaps, installing a quality vapor barrier, and ensuring proper drainage. Missing these can lead to moisture problems even after encapsulation.
If mold or pest activity is discovered during the initial inspection, should remediation be completed before starting encapsulation, or can some steps overlap to save time?
Remediation for mold or pests should be fully completed before starting encapsulation. This ensures the crawl space is clean and safe, and prevents sealing in problems that could worsen over time. Overlapping steps isn’t recommended, as it may compromise the effectiveness of the encapsulation.
If my crawl space already has some mold and old insulation, should I handle remediation and replacement before encapsulation, or can those steps be combined to save on labor costs?
It’s best to address mold remediation and remove old insulation before starting encapsulation. This ensures a clean, healthy space and prevents trapping moisture or contaminants. Some contractors may bundle these services, so combining them in one project can still save on overall labor costs.
You mentioned using a dehumidifier in some cases. How do I know if my crawl space actually needs one after installing the vapor barrier and insulation?
After installing a vapor barrier and insulation, monitor your crawl space for signs of lingering moisture, like musty odors, condensation, or high humidity readings (above 60%). If these issues persist, a dehumidifier is recommended to maintain dry conditions and prevent mold growth.
Does the step-by-step process change at all if your crawl space has existing pest problems or water damage, or should that be handled separately before encapsulation starts?
If your crawl space has pest problems or water damage, those issues should definitely be addressed before starting encapsulation. Treating pests and repairing water damage first ensures the encapsulation will be effective and long-lasting. The main encapsulation steps remain the same, but handling these problems is an important prerequisite.
If my crawl space already has some mold and minor wood rot, do I need to fully remediate those issues before starting encapsulation, or can some of the work be done simultaneously?
It’s important to fully remediate mold and wood rot before starting encapsulation. Encapsulating over existing issues can trap moisture and worsen the damage. Address the mold and repair any rotted wood first, then begin the encapsulation process for best results.
If I find a little bit of mold during the inspection phase, do I need to have it professionally removed before installing the vapor barrier, or are there DIY methods that are safe for small areas?
For small patches of mold, you can often use DIY methods like scrubbing with a mixture of water and detergent or a commercial mold remover. Wear protective gear and ensure the area dries completely before installing the vapor barrier. If the mold covers a large area or keeps returning, consider hiring a professional.
I’m interested in the cost breakdown—are there DIY-friendly steps I could tackle myself to save money on encapsulation, or is it better left entirely to professionals?
You can definitely save money by handling some parts yourself, like cleaning out the crawl space, laying down the vapor barrier, or installing insulation if you’re handy. More technical tasks like sealing vents, applying spray foam, or installing a sump pump are best left to professionals for safety and effectiveness.
Does encapsulating a crawl space completely get rid of moisture problems, or is it still necessary to use a dehumidifier even after sealing it with a vapor barrier?
Encapsulating a crawl space with a vapor barrier does a lot to control moisture, but it usually doesn’t eliminate it entirely. Using a dehumidifier is still recommended to handle any residual humidity and keep the space consistently dry after encapsulation.
Could you give a rough idea of how much more energy efficient a home becomes after encapsulating the crawl space, and if the savings usually justify the upfront costs?
Encapsulating your crawl space can improve a home’s energy efficiency by reducing heating and cooling costs—often by 10% to 20%. Whether the savings justify the upfront costs depends on your climate, insulation quality, and energy rates, but many homeowners see payback within several years due to lower utility bills and fewer moisture-related repairs.
After encapsulation, what kind of maintenance should I expect to do each year to keep the crawl space dry and in good shape? Are there signs I should watch for that might mean something’s gone wrong?
After encapsulation, check your crawl space annually for any tears in the vapor barrier, pooling water, or signs of mold. Inspect the dehumidifier and sump pump to ensure they’re working. Watch for musty odors, increased indoor humidity, or water stains—these could mean repairs are needed.
The article mentions a detailed cost breakdown, but how much should I budget for ongoing maintenance after the initial encapsulation is done?
After the initial encapsulation, you should budget about $150 to $500 per year for ongoing maintenance. This typically covers annual inspections, possible dehumidifier servicing, and minor repairs to the vapor barrier or drainage system if needed.
Does the encapsulation process always require adding a dehumidifier, or are there situations where a vapor barrier is enough to keep moisture under control in the crawl space?
A vapor barrier alone can sometimes be enough if the crawl space already has low humidity and no major moisture issues. However, in areas with persistent dampness or high humidity, adding a dehumidifier is usually recommended to ensure long-term moisture control and prevent mold growth.
How long does the encapsulation process usually take if I hire a professional, and will I need to be out of the house during any part of it?
The encapsulation process typically takes one to three days when done by professionals, depending on the size and condition of your crawl space. You can usually stay in your home during the work, as most of the activity is confined to the crawl space area.
The article mentions installing a dehumidifier as part of encapsulation. How do I determine if my crawl space actually needs one, and are there specific signs to look out for before making that investment?
To decide if your crawl space needs a dehumidifier, look for persistent moisture, musty odors, visible mold, or high humidity readings (above 60%). Even after encapsulation, if you notice these signs or live in a very humid climate, a dehumidifier is likely necessary to maintain ideal conditions.
You mentioned adding a dehumidifier in some cases. How do I know if my crawl space actually needs one, or if the vapor barrier and insulation are enough?
A dehumidifier is needed if your crawl space still has high humidity or condensation even after installing a vapor barrier and insulation. You can use a hygrometer to monitor humidity levels—if they’re consistently above 60%, adding a dehumidifier is a good idea. Musty odors, mold, or damp wood are also signs you might need one.
Can you elaborate on what ongoing maintenance is typically required after the crawl space has been encapsulated, especially when a dehumidifier is installed?
After encapsulation, ongoing maintenance includes checking the vapor barrier for damage, ensuring vents and seals remain intact, inspecting for water leaks, and cleaning or replacing the dehumidifier filter regularly. It’s also important to test the dehumidifier, empty its reservoir if not self-draining, and monitor humidity levels to make sure the system works effectively.
For homeowners considering DIY encapsulation, what are the most common mistakes to avoid during the inspection and preparation stage, especially regarding existing mold or pest issues?
A common mistake is skipping a thorough inspection for mold or pests before encapsulation. If you seal over existing mold or infestations, problems can worsen. Always address and remediate any mold or pest issues first, and ensure the crawl space is completely dry and clean before moving forward with installation.
Does encapsulation help with pest problems right away, or do I need to remove existing infestations first before sealing up the crawl space? Not sure what to expect when dealing with rodents or insects down there.
Encapsulation helps prevent new pests from entering your crawl space, but any existing infestations should be removed before sealing. This ensures you don’t trap rodents or insects inside, which could cause further issues. It’s best to address any pest problems first, then proceed with encapsulation for ongoing protection.
When preparing for encapsulation, how do you determine if you need to add a dehumidifier in addition to the vapor barrier and insulation? Are there specific signs or measurements I should look for during the initial inspection?
To decide if you need a dehumidifier, measure the humidity level in your crawl space before and after installing the vapor barrier and insulation. If humidity stays above 60%, or you notice persistent dampness, condensation, or musty odors, a dehumidifier is recommended to keep moisture under control.
Is there an average time that a DIY crawl space encapsulation project takes from inspection to completion, or does it really depend on the size and condition of the crawl space?
The time needed for a DIY crawl space encapsulation can vary quite a bit. On average, for a moderately sized and accessible crawl space in fair condition, expect about 2 to 4 days. Larger or more complicated spaces, or those with repairs needed, may take significantly longer.
Does crawl space encapsulation always involve installing a dehumidifier, or are there situations where the vapor barrier and insulation alone are enough?
A dehumidifier is not always required with crawl space encapsulation. In some cases, if moisture levels are naturally low and the vapor barrier and insulation are properly installed, those steps alone can be enough. However, in humid climates or when persistent moisture issues are present, a dehumidifier is recommended to maintain optimal conditions.
For someone considering DIY encapsulation versus hiring a professional, what are the key cost differences and potential pitfalls to watch out for during installation?
DIY encapsulation usually costs less, as you save on labor fees, but materials alone can be several hundred to a few thousand dollars. Hiring a pro is more expensive upfront, but ensures thorough sealing and moisture control. Common DIY pitfalls include improper sealing, missing moisture sources, or using the wrong vapor barrier thickness, which can lead to future mold or structural issues.
If you discover mold during the inspection step, do you recommend handling remediation yourself or should that always be done by certified professionals before encapsulation?
If you find mold during your crawl space inspection, it’s safest to have certified professionals handle the remediation, especially if the area is large or the mold is extensive. Professionals ensure thorough, safe removal and help prevent future issues before you proceed with encapsulation.
You listed improved energy efficiency as a benefit of encapsulation—have you noticed any rough percentage savings on utility bills after sealing a crawl space?
Homeowners typically see energy savings of around 10% to 20% on their utility bills after encapsulating a crawl space. The exact percentage can vary depending on the home’s condition and local climate, but sealing helps reduce drafts and keeps indoor temperatures more stable, leading to noticeable savings.
Does encapsulation work equally well in homes with heavy clay soil or areas that flood frequently, or are there extra steps recommended to handle high groundwater?
Encapsulation can help in homes with heavy clay soil or frequent flooding, but extra steps are often needed. Installing a sump pump, a robust drainage system, or a thicker vapor barrier is usually recommended to manage high groundwater and prevent moisture from accumulating under the encapsulation.
After encapsulating a crawl space, how often should homeowners plan to check for moisture or mold recurrence as part of ongoing maintenance?
Homeowners should check their encapsulated crawl space for moisture or mold recurrence at least twice a year, typically in the spring and fall. If your area is prone to heavy rain or high humidity, consider inspecting more frequently to catch issues early.
For someone considering professional encapsulation, what kind of maintenance costs or routine tasks should I expect after the installation is done?
After professional encapsulation, ongoing maintenance tasks include checking the vapor barrier for damage, ensuring the dehumidifier (if installed) is working properly, and inspecting for moisture or mold. Annual inspections by a professional may cost $100–$300, plus occasional expenses for filter changes or repairs as needed.
You mentioned the cost breakdown—can you give a ballpark estimate for a mid-sized home, and does the price change much if I already have some insulation in place?
For a mid-sized home, crawl space encapsulation typically ranges from $5,000 to $15,000. If your space already has some insulation, you may save on material and labor costs, potentially lowering the price by $1,000 to $3,000 depending on what’s reusable.
Is it possible to do crawl space encapsulation as a DIY project if I have some home improvement experience, or are there steps that really require a professional?
You can handle some parts of crawl space encapsulation yourself, especially if you’re comfortable with DIY projects. Tasks like cleaning, laying the vapor barrier, and installing insulation are manageable. However, electrical work, serious mold removal, or structural repairs are best left to professionals for safety and proper results.
I noticed the article mentions both DIY and professional options for encapsulation. For a small business property, are there significant differences in long-term maintenance costs or durability between hiring a pro versus tackling it yourself?
For a small business property, hiring a professional typically results in better durability and less frequent maintenance due to higher-grade materials and expert installation. DIY encapsulation can save money upfront, but may lead to higher long-term costs if issues arise from improper sealing or material choice.
Does encapsulating a crawl space actually help lower energy bills in the long run, and if so, how soon might you notice those savings?
Encapsulating a crawl space can help lower energy bills by reducing drafts and keeping temperatures more consistent. Many homeowners notice savings within a few months, but the timeline can vary depending on your home’s insulation and HVAC efficiency.
If my crawl space already has some minor mold and moisture issues, should I address these before starting the encapsulation process, or will encapsulation alone resolve them?
It’s important to address any existing mold and moisture issues before starting the encapsulation process. Encapsulation will help prevent future problems, but it won’t remove mold that’s already present. Removing current mold and thoroughly drying the space ensures the encapsulation is effective and healthy.
Does the step-by-step process you described work for crawl spaces that already have some mold present, or should mold remediation be done first before starting any encapsulation work?
Mold remediation should always be done before starting crawl space encapsulation. Encapsulating over existing mold can trap moisture and worsen the problem, so it’s important to address any mold issues first to ensure a healthy and long-lasting result.
You mentioned that encapsulation often includes a vapor barrier, insulation, and sometimes a dehumidifier. How do I determine whether adding a dehumidifier is necessary for my specific crawl space?
To decide if you need a dehumidifier, monitor your crawl space’s humidity after installing the vapor barrier and insulation. If humidity frequently stays above 60%, odors persist, or you notice mold, a dehumidifier is recommended. A professional can assess moisture levels and advise on your specific situation.
If the inspection phase reveals some minor mold, can I treat it myself as part of the prep work, or is it best to get a professional involved before encapsulating?
For minor mold, you can usually handle it yourself by cleaning the area with a mold-specific cleaner and wearing proper protective gear. However, if the affected area is larger than about 10 square feet or if you’re unsure of the extent, it’s safer to consult a professional before encapsulating.
Do you recommend hiring a professional for crawl space encapsulation, or is this realistic for a DIY project? I’m pretty handy but don’t want to miss any important steps.
If you’re handy and comfortable with projects like moisture barriers, insulation, and sealing, DIY crawl space encapsulation can be realistic. However, professionals bring experience to handle mold, pests, and tricky spaces, ensuring all steps are covered. For complex or damp crawl spaces, or if you’re unsure about ventilation and vapor barriers, hiring a pro might be safer and more effective.
How does adding a dehumidifier to the encapsulation process affect ongoing maintenance costs, and is it really necessary if I already have a vapor barrier and insulation?
Adding a dehumidifier increases ongoing maintenance costs since you’ll need to pay for electricity and occasional servicing, such as filter changes. While a vapor barrier and insulation greatly reduce moisture, a dehumidifier is still helpful in very humid climates or if moisture persists. If your crawl space stays dry without it, you may not need a dehumidifier.
How significant is the difference in energy savings between using just a vapor barrier versus adding insulation and a dehumidifier as recommended in the article?
Using only a vapor barrier will help control ground moisture, but adding insulation and a dehumidifier, as the article suggests, can significantly boost energy savings. Insulation reduces heat loss, while a dehumidifier keeps humidity lower, helping your HVAC system run more efficiently and lowering overall energy costs.
Can you give an idea of the typical maintenance tasks and how often they need to be done after completing crawl space encapsulation?
After crawl space encapsulation, you should check the vapor barrier and seals for damage every 6 to 12 months, monitor the dehumidifier or sump pump monthly to ensure they’re working properly, and look for signs of moisture or pests during seasonal changes. Routine inspections help keep the system effective and prolong its lifespan.
Could you explain more about the maintenance practices after encapsulation? How often should I check for issues like mold or insulation problems once the vapor barrier is installed?
After encapsulation, it’s important to inspect your crawl space at least twice a year. Look for signs of mold, moisture, or insulation damage, especially after heavy rain. Also, check the vapor barrier for any tears or gaps and ensure your dehumidifier, if installed, is working properly. Address any issues promptly to maintain a healthy environment.
If my crawl space already has some mold or minor structural issues, should I handle those repairs myself before encapsulation, or is it better to hire a professional from the beginning?
If your crawl space has mold or structural issues, it’s usually safer to hire a professional. Mold remediation and repairs can be more complex than they appear, and experts will make sure everything is addressed properly before encapsulation, helping prevent future problems.
After encapsulating a crawl space, are there specific maintenance steps homeowners should perform annually to ensure the barrier and insulation remain effective?
Yes, annual maintenance is important. Homeowners should inspect the vapor barrier for tears or water intrusion, check for mold or pest issues, ensure the insulation is intact, and verify that any vents or dehumidifiers are functioning properly. Addressing small issues early helps maintain effectiveness.
The article mentions energy efficiency improvements, but how quickly can homeowners typically see changes in utility bills after encapsulation is completed?
Homeowners usually notice changes in their utility bills within one to three months after crawl space encapsulation. The exact timeframe can vary depending on your home’s condition and local climate, but most people experience improved energy efficiency and lower heating or cooling costs fairly soon after the work is finished.
Once the crawl space is encapsulated, what kind of ongoing maintenance should homeowners expect to keep everything functioning properly and avoid future issues?
After encapsulation, homeowners should inspect the crawl space at least twice a year for moisture, mold, or tears in the vapor barrier. It’s important to make sure sump pumps and dehumidifiers (if installed) are working properly and to clear any debris from vents and drains. Address any pest activity promptly to maintain the integrity of the encapsulation.
Can you give a rough idea of how much the materials and tools would cost for a DIYer versus hiring a professional for encapsulation?
For a DIY crawl space encapsulation, materials and tools typically cost between $1,500 and $4,000, depending on the size and condition of your crawl space. Hiring a professional usually ranges from $5,000 to $15,000, which includes labor and warranties. DIY is more budget-friendly, but professionals handle complex issues and ensure proper installation.
When the article mentions adding insulation during the crawl space encapsulation process, is there a recommended type or R-value to use for maximum effectiveness in different climates?
The best type of insulation and R-value depend on your local climate. In colder regions, rigid foam board with an R-value of R10–R19 is usually recommended. In warmer climates, R6–R10 may be sufficient. Always check local building codes and consider closed-cell spray foam for added moisture protection.
Could you share more details on how long a typical crawl space encapsulation takes from start to finish if I hire a professional versus doing it myself?
A professional crawl space encapsulation usually takes 1 to 3 days, depending on the size and complexity of the space. If you choose to do it yourself, it can take several days to a week or more, as DIY projects often involve extra time for planning, gathering materials, and working at your own pace.
For homes with high humidity, do you find that adding just a vapor barrier is enough, or is a dehumidifier always necessary for long-term moisture control?
A vapor barrier is an important first step and can significantly reduce moisture coming from the ground. However, in homes with consistently high humidity levels, a dehumidifier is usually recommended to maintain dry conditions over the long term. The best results often come from combining both methods.
If my crawl space already has some water damage and a bit of mold, do I need to deal with all of that before starting encapsulation, or can the process take care of existing issues?
You’ll need to address water damage and mold before starting encapsulation. Encapsulation seals in the space, so pre-existing moisture and mold can worsen if not removed first. It’s best to repair any damage, dry out the area, and properly treat mold to ensure long-term protection and a healthy environment.
How do the upfront costs of professional encapsulation compare to a DIY approach, especially when it comes to materials like insulation and vapor barriers?
Professional encapsulation usually costs significantly more upfront than DIY, mainly because of labor charges and higher-grade materials. DIY costs are limited to purchasing materials like insulation and vapor barriers, which can save you money, but professionals often use more durable products and ensure proper installation, which can affect long-term performance.
Does the encapsulation process always require adding a dehumidifier, or are there situations where just the vapor barrier and insulation are enough?
A dehumidifier isn’t always required for crawl space encapsulation. In dry climates or homes with minimal moisture, a vapor barrier and insulation may be enough. However, if your crawl space has high humidity or moisture issues, adding a dehumidifier helps maintain ideal conditions and prevents mold or damage.
If mold or standing water is found during the inspection phase, does the encapsulation process need to be paused until those issues are resolved, or can they be addressed during the same project timeline?
If mold or standing water is found, those issues must be resolved before encapsulation continues. Mold removal and water remediation are typically handled during the project, but encapsulation itself should not proceed until the crawl space is clean and dry to ensure long-term effectiveness.
What is a realistic budget range for a small business property versus a residential home, and are there ways to cut costs without sacrificing the structural benefits detailed here?
For a residential home, crawl space encapsulation usually costs between $5,000 and $15,000. Small business properties, depending on size and complexity, may range from $10,000 to $30,000. To reduce costs without compromising on structural benefits, consider getting multiple quotes, choosing durable but cost-effective materials, and handling minor prep work—like cleaning—yourself before professionals arrive.
Could you give a rough estimate of what percentage of the total cost usually goes toward materials versus labor if I wanted to hire professionals instead of doing it myself?
When hiring professionals for crawl space encapsulation, materials typically account for about 40% to 50% of the total cost, while labor makes up the remaining 50% to 60%. The exact split can vary based on your region and specific project needs.
You mention that encapsulation helps with energy efficiency and air quality, but are there situations where a traditional vented crawl space might be preferable or more cost-effective?
A traditional vented crawl space can be preferable in very dry climates where moisture isn’t a concern and humidity is consistently low. In such cases, venting can be simpler and less costly upfront. However, for most homes, especially in humid or mixed climates, encapsulation usually offers better long-term benefits for energy efficiency and air quality.
The article mentions that encapsulation can improve energy efficiency. Do you have any info on how much homeowners typically save on utility bills after sealing their crawl space?
Homeowners often see utility bill savings of about 10% to 20% after crawl space encapsulation. The exact amount varies depending on your home’s size, climate, and insulation quality, but sealing the crawl space generally reduces heating and cooling costs by minimizing moisture and drafts.