Introduction: Empowering First-Time Home Renovators
Taking on your first home renovation project is exciting—and a little intimidating. The right power tools can make the difference between a frustrating, slow process and a smooth, satisfying experience. But with aisles full of bright-colored gadgets and brands promising “pro results,” where does a new DIYer even start? This in-depth guide is designed for first-time home renovators who want a practical, no-nonsense understanding of which power tools are truly essential, how to choose tools that fit your specific project needs and budget, and how to use them safely and effectively. We’ll walk you through each must-have tool, explain its purpose, highlight real-world considerations (like corded vs. cordless, features that matter, and maintenance basics), and offer expert tips on building a versatile starter toolkit that will serve you well for years. Whether you’re planning to tackle a simple room update or your first big remodel, this guide will help you invest wisely and work with confidence.
Why Start with Power Tools?
Hand tools are vital, but power tools bring speed, precision, and efficiency to home improvement. With a core set of reliable power tools, you can:
- Cut lumber, drywall, and trim quickly and accurately
- Drive screws and drill holes with less fatigue
- Sand and finish surfaces for a pro-level look
- Make clean, safe cuts in a variety of materials
Investing in essentials—not the entire hardware store—will allow you to complete most beginner and intermediate renovation tasks. Let’s break down the power tools every first-time renovator should own, what to look for when shopping, and how to stay safe while building your skills.
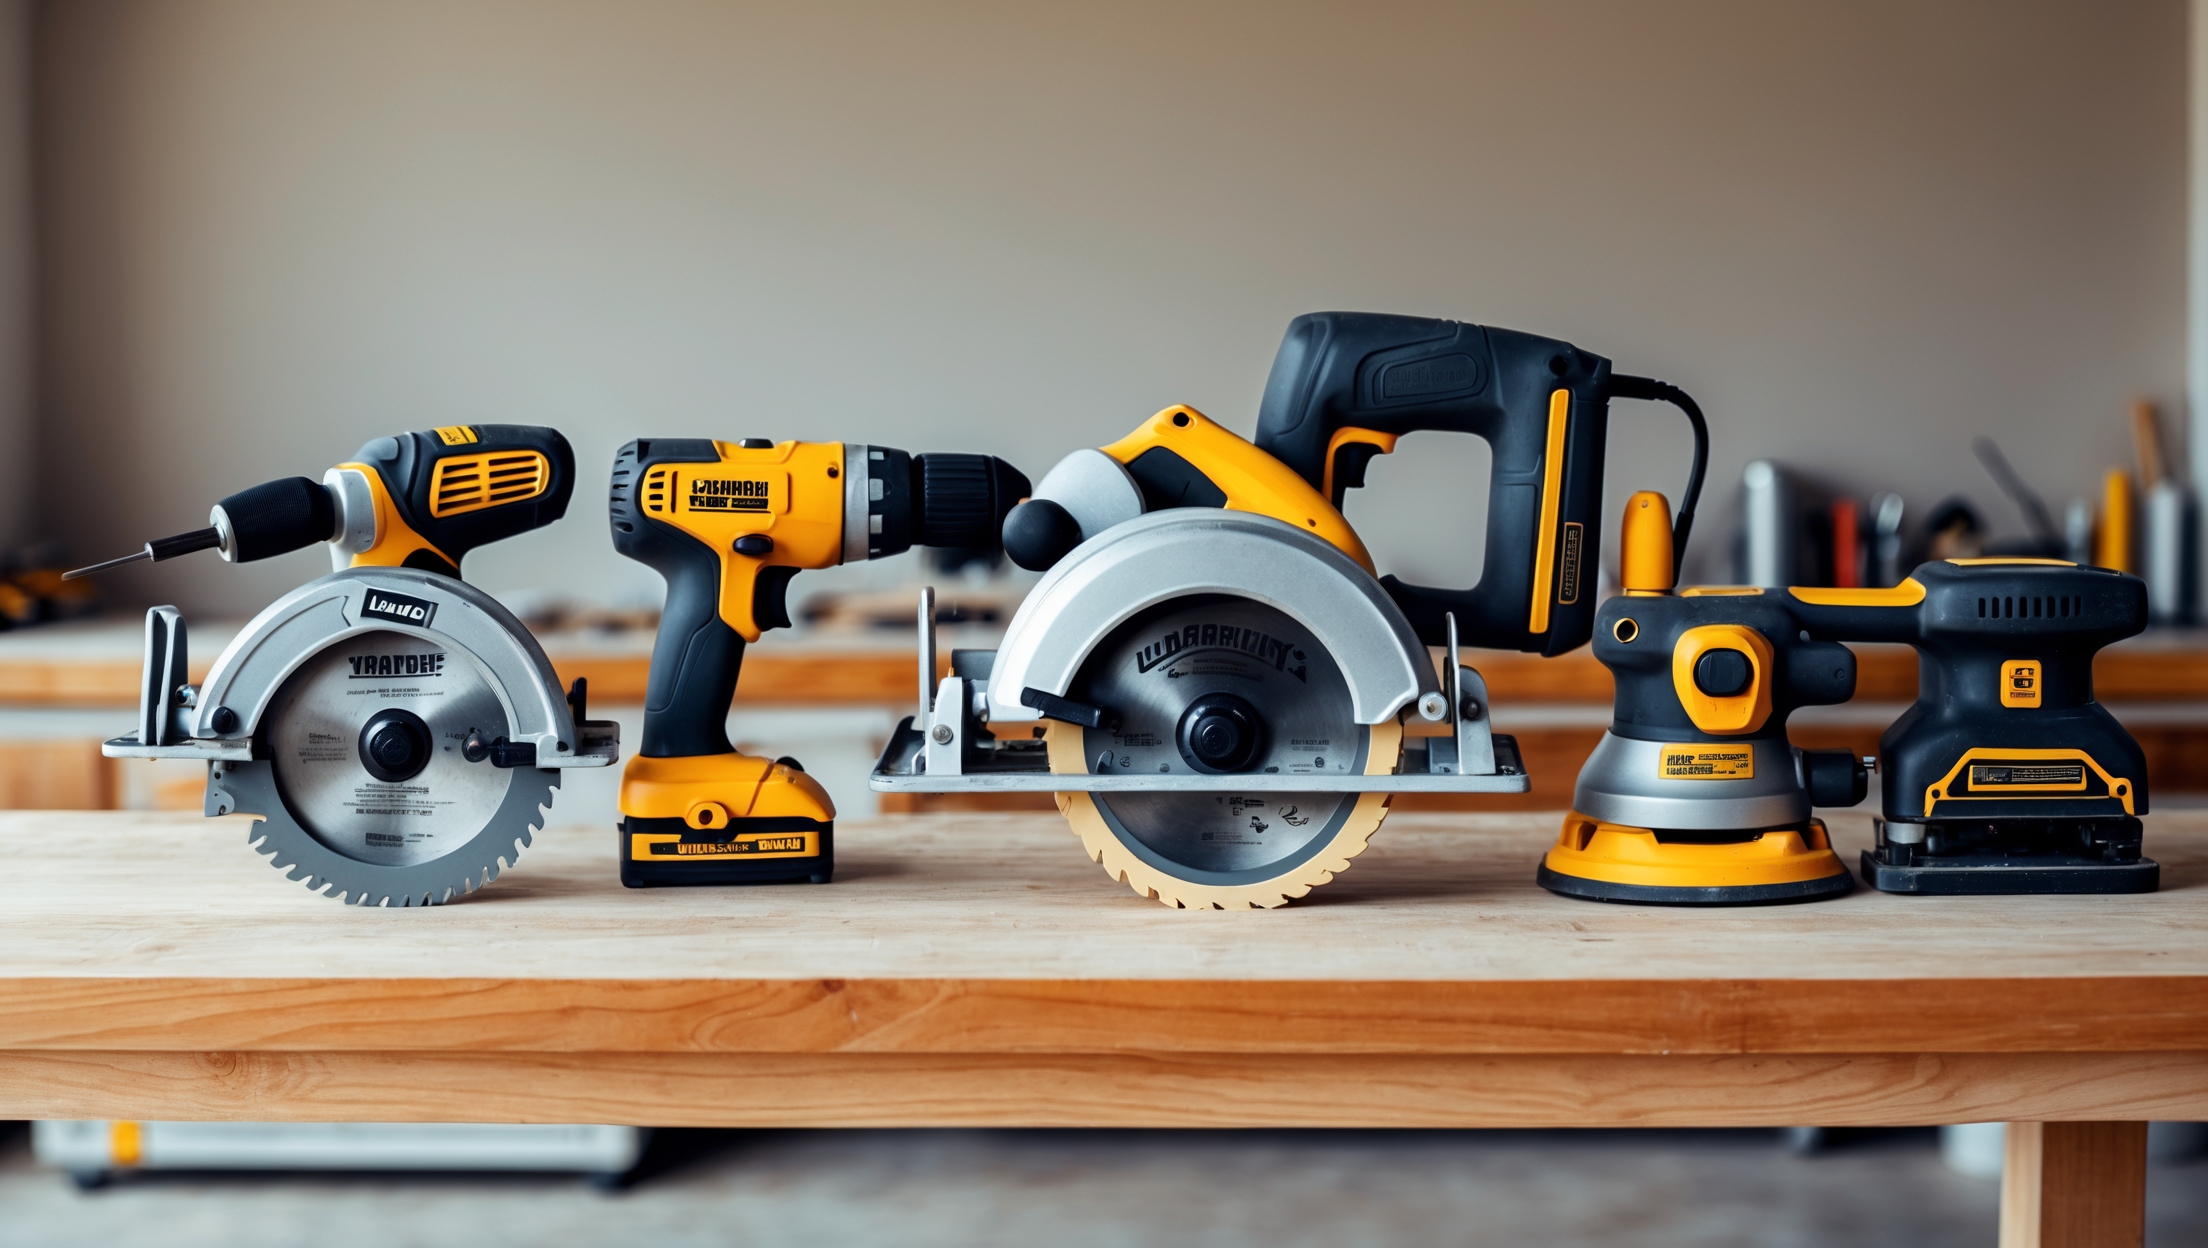
Core Power Tools: The Foundational Five
1. Drill/Driver Combo
No tool is more versatile for a first-timer than a cordless drill/driver. It’s your go-to for assembling furniture, installing shelves, hanging drywall, and even mixing paint with the right attachment. Look for:
- Voltage: 18V or 20V offers a great balance of power and weight for most home tasks.
- Chuck Size: 3/8″ is standard and works for most bits.
- Clutch Settings: Adjustable for precise screw driving and to avoid stripping screws.
- Battery: Lithium-ion for longer life; consider buying an extra battery.
Pro tip: Choose a model from a well-known brand with a broad ecosystem of compatible tools and batteries for future expansion.
2. Circular Saw
For straight cuts in lumber, plywood, and even some tile and plastic, a circular saw is essential. It’s perfect for framing, flooring, and trimming tasks. Key considerations:
- Blade Size: 7-1/4″ is standard and accommodates most home projects.
- Corded vs. Cordless: Cordless offers flexibility; corded is lighter and often more powerful for continuous use.
- Adjustable Bevel: Lets you make angled cuts for trim and framing.
- Safety Features: Electric brake, blade guard, and comfortable handles.
Practice on scrap wood to get comfortable adjusting depth and angle before tackling your project.
3. Jigsaw
A jigsaw excels at curved and plunge cuts, making it indispensable for cutting out sink openings, notching boards, or creating custom shapes. Consider:
- Orbital Action: Increases cutting speed for rough cuts; turn it off for fine, clean lines.
- Quick-Change Blade: Saves time and keeps your project moving.
- Variable Speed: Allows control for different materials.
Stock up on a variety of blades for wood, metal, and plastic; cheap blades dull quickly and can splinter your work.
4. Random Orbit Sander
For flawless paint jobs and smooth surfaces, a random orbit sander is a must. Unlike basic sheet sanders, it minimizes swirl marks and works on curved surfaces. Look for:
- Dust Collection: A built-in bag or vacuum port keeps your workspace clean and safe.
- Pad Size: 5″ is standard for most home tasks.
- Variable Speed: Useful for delicate finishes.
Change sanding discs frequently and never force the sander—let the tool do the work for a smooth, even finish.
5. Oscillating Multi-Tool
This “problem solver” tool can plunge-cut, sand, scrape, and grind in tight spots where no other tool fits. It’s ideal for undercutting door jambs, removing grout, or trimming pipes and nails. Choose:
- Quick-Change Head: Makes swapping attachments fast and frustration-free.
- Accessory Variety: Look for a kit with sanding, cutting, and scraping heads.
- Variable Speed: Offers more control and cleaner results.
Start slow, use the right blade for the material, and let the oscillation do the cutting—never force the tool.
Bonus Tools: Worth Considering as Your Projects Grow
- Impact Driver: For heavy-duty screw driving, especially in deck and framing projects.
- Miter Saw: For repeated, precise angle cuts in trim, molding, or framing lumber.
- Shop Vac: Keeps your workspace dust-free and safe.
- Rotary Tool: Handy for fine detail work, grout removal, and polishing.
- Straightedge or Laser Level: For precise layouts and installations.
Don’t feel pressured to buy everything at once—focus on what your current project requires, and build your arsenal as your skills and ambitions grow.
How to Choose the Right Tools for You
1. Prioritize Projects
List your next three projects and identify the essential cuts, holes, and finishes required. For example, kitchen cabinet installation needs a drill/driver and sander; laying laminate flooring may require a jigsaw and oscillating tool.
2. Set a Realistic Budget
Expect to spend $300–$600 for a solid basic set of five quality power tools, including batteries and a charger. Avoid “bargain” kits with underpowered tools—they often underperform, break easily, and can be unsafe. Consider:
- Buying reputable brands’ starter bundles for cost savings
- Purchasing refurbished or gently used tools from authorized dealers
- Renting specialty tools for one-off tasks (like a tile saw or demolition hammer)
3. Corded vs. Cordless: Weighing the Pros and Cons
- Cordless: Offers convenience and portability, especially for projects in different rooms or outdoors. Downside: Batteries add cost and may require charging mid-project.
- Corded: Provides unlimited runtime and typically more power for heavy-duty work. Downside: You need access to outlets and may need extension cords.
Many first-timers opt for cordless drills and oscillating tools, but choose corded circular saws or sanders for larger jobs.
4. Ergonomics and Comfort
Visit a local hardware store and handle the tools. The best tool for you is one that feels balanced, manageable, and comfortable for your grip. Features to check:
- Weight and handle size
- Trigger location and sensitivity
- Anti-vibration features
Fatigue leads to mistakes—especially on long projects.
5. Warranty and Support
Look for tools with at least a two-year warranty and accessible customer support. Well-known brands often offer online tutorials, replacement parts, and easy warranty registration.
Safety First: Essential Power Tool Safety Tips
- Read the Manual: Every tool is different. Always review the manufacturer’s safety instructions before first use.
- Wear PPE: Safety glasses, hearing protection, dust masks, and gloves are non-negotiable.
- Keep Workspaces Clean: Clear away clutter and keep cords organized to avoid trips and tangles.
- Disconnect Power: Always unplug or remove the battery before changing blades, bits, or attachments.
- Secure Materials: Use clamps or a sturdy workbench to hold workpieces steady.
- Good Lighting: Ensure your work area is well-lit to see markings and blades clearly.
- Don’t Rush: Take your time to avoid mistakes and injuries. Never bypass safety guards or disable features.
Maintenance and Storage
Protect your investment and ensure top performance by:
- Regular Cleaning: Wipe down tools after each use; blow out dust from vents with compressed air.
- Blade and Bit Care: Replace dull blades and bits promptly to avoid burning motors and poor results.
- Battery Storage: Store lithium-ion batteries in a cool, dry place and charge them periodically if not in regular use.
- Organized Storage: Invest in a tool chest or wall-mounted system to keep tools accessible and protected.
Check manuals for specific lubrication or calibration needs, and never store tools where they could get wet or overheated.
Building Your Toolkit Over Time
Remember, your first set of power tools is just the beginning. As you take on more complex projects, you’ll naturally discover gaps—maybe a rotary hammer for tile removal, or a finish nailer for custom trim. The right approach is to buy what you need when you need it, focusing on quality over quantity. Take advantage of tool libraries, rental centers, and friends’ collections to fill the occasional gap without overspending.
Conclusion: Start Strong, Renovate with Confidence
Embarking on your first home renovation is a rewarding journey—especially when you’re equipped with the right power tools and the know-how to use them safely. By focusing on a core set of versatile, high-quality tools, you’ll set yourself up for smoother projects, professional-looking results, and fewer frustrations. Take the time to learn each tool’s quirks, safety features, and maintenance needs. Don’t be swayed by flashy marketing or “all-in-one” kits that promise more than they deliver. Instead, build your toolkit thoughtfully, matching your purchases to your project goals and skill level.
Remember, confidence comes from practice and preparation. Start with the basics, respect the risks, and celebrate each milestone. As your experience grows, so will your toolkit—and your ability to tackle ambitious renovations with pride. Happy renovating!
Can you give examples of which specific projects around the house definitely require more than just the five foundational power tools covered here?
Projects like installing hardwood flooring, tiling a bathroom, or building custom cabinetry often require specialized tools such as a tile saw, flooring nailer, or router, beyond the five basic power tools. Removing walls or working with concrete may also call for a reciprocating saw or a hammer drill.
What are some common mistakes first-time renovators make when using a drill/driver combo, and any tips for avoiding them?
Common mistakes include using the wrong drill bit or driver bit, not adjusting the clutch correctly, and applying too much pressure. To avoid these, always match the bit to the job, set the clutch to prevent stripping screws, and let the tool do the work without forcing it.
I’m a little confused about the corded vs. cordless debate. For a beginner tackling simple room updates, is one type clearly safer or easier to use than the other?
For simple room updates, cordless tools are usually easier to use because they’re lighter and have no cords to trip over, which can be safer for beginners. Just make sure to keep batteries charged. Corded tools offer more power but require managing the cord, which can sometimes get in the way.
Could you share some tips on prioritizing which of these five core power tools to buy first if I’m on a tight budget and just starting small renovation projects?
If you’re on a tight budget, start with a cordless drill—it’s the most versatile and used for many basic tasks. Next, consider a circular saw for cutting wood. A jigsaw and an orbital sander are helpful but can come later, and a multi-tool rounds out the basics if your projects grow.
How much maintenance do these beginner-friendly power tools usually need, especially if I’m only using them for personal projects once in a while?
Most beginner-friendly power tools need only basic maintenance if you’re using them occasionally for personal projects. After each use, simply clean off dust, check for loose parts, and store them in a dry place. Periodically inspect cords and blades, and apply a little oil to moving parts if recommended by the manufacturer.
Do you have any tips on whether beginners should start with corded or cordless tools for their first toolkit? I get a little overwhelmed by all the battery options out there.
For beginners, cordless tools offer more flexibility and are easier to use in tight spaces, but managing batteries can be confusing. If you’ll mostly work near power outlets, starting with a few quality corded tools keeps things simple and generally costs less. As you gain experience, you can add cordless options based on your needs.
For first-time renovators on a tight budget, which of the core power tools would you recommend investing in first, and are there any safe ways to buy quality used tools?
For those on a budget, start with a cordless drill and a circular saw, as they’re very versatile for most home projects. When shopping for used tools, check local hardware stores, reputable online marketplaces, and inspect tools for wear or safety issues before buying.
You mention maintenance basics for power tools. Could you expand a bit on what routine maintenance looks like for someone who’s never owned any of these tools before?
Routine maintenance for power tools usually means cleaning dust off after each use, checking cords or batteries for damage, tightening any loose screws, and occasionally oiling moving parts if the manual suggests it. Always store tools in a dry place and follow the manufacturer’s instructions for sharpening or replacing blades and bits.
You listed a drill/driver combo as essential, but are there any specific features or brands beginners should avoid when shopping to prevent buying something too complicated or unnecessary?
When choosing a drill/driver combo, look for a model that’s lightweight, has simple controls, and includes basic speed settings. Avoid models with too many advanced features like hammer functions or brushless motors if you’re just starting out. Well-known brands like Black+Decker or Ryobi often make beginner-friendly options.
You mentioned maintenance basics—what are the main things I should regularly check or clean on a cordless drill/driver to make sure it lasts through multiple renovation projects?
To keep your cordless drill/driver in top shape, regularly check and clean the chuck, vents, and battery contacts. Make sure the battery is charged properly, remove dust and debris after each use, and occasionally inspect for loose screws or worn parts. Store it in a dry place to prevent rust.
You mention choosing between corded and cordless tools. For someone on a tight budget and doing projects around a small apartment, would corded tools make more sense, or is cordless still worth the investment?
If you’re working in a small apartment and plan to stay close to power outlets, corded tools are usually more affordable and offer unlimited run time, making them a practical choice on a budget. Cordless tools add convenience but can cost more. For basic home projects, corded tools should serve you well.
When you mention choosing between corded and cordless power tools, are there certain renovation projects where one type is clearly better than the other? I’m mainly planning indoor projects in an older home and don’t know which to prioritize.
For indoor projects in an older home, cordless tools are often more convenient since you won’t have to deal with limited outlets or extension cords. However, if you’ll be working for long stretches or need extra power, corded tools can be better for tasks like heavy drilling or cutting. Prioritize cordless for flexibility, unless your projects require sustained high power.
If my first renovation project is a small bathroom remodel, are all the ‘foundational five’ power tools necessary or can I get away with just one or two to start?
For a small bathroom remodel, you likely won’t need all five foundational power tools. A cordless drill and a jigsaw or circular saw should cover most tasks like installing shelves or cutting panels. You can always rent or borrow other tools if specific needs arise during your project.
I’m just starting out and working with a pretty tight budget. Out of the foundational five power tools you listed, is there one you think I could safely skip or substitute with a hand tool for early projects?
If you’re on a tight budget, you can often skip the power jigsaw at first. For many basic cuts, a good quality handsaw is a suitable substitute. As your projects get more complex, you can add the jigsaw later.
When deciding between corded and cordless power tools for a first renovation, are there situations where corded tools are clearly better, or is cordless almost always the way to go for beginners?
Corded tools can be a better choice if you need continuous power for long periods or are tackling heavy-duty tasks like cutting thick lumber. Cordless tools offer more flexibility and are great for most beginner projects, but you may need extra batteries for bigger jobs. For most first-time renovators, cordless is usually more convenient, unless your work demands constant, high power.
You mention maintenance basics—could you give an example of what regular upkeep looks like for a beginner’s cordless drill/driver?
For a beginner’s cordless drill/driver, regular upkeep means keeping the tool clean by wiping off dust after use, checking and tightening any loose screws, charging the battery after each job, and storing it in a dry place. Occasionally, inspect the chuck for debris and avoid overcharging the battery.
When building a starter toolkit on a tight budget, is it better to invest in fewer high-quality tools or get more affordable versions of the core power tools mentioned?
If you’re on a tight budget, starting with fewer high-quality power tools is usually the smarter choice. Quality tools last longer, perform better, and can handle multiple tasks. Over time, you can gradually add more tools as needed and as your budget allows.
When deciding between corded and cordless power tools for a starter kit, are there certain tasks during home renovations where one type is clearly better, especially for beginners?
Corded tools are usually better for tasks that need continuous power, like drilling into concrete or heavy-duty cutting, since you don’t have to worry about batteries running out. Cordless tools are more convenient for lighter tasks, quick jobs, or when you need mobility, like assembling furniture or hanging shelves. Beginners often find cordless drills and drivers easiest to start with.
When the article mentions choosing between corded and cordless power tools, are there certain projects where one is clearly better than the other for beginners?
Corded tools are usually better for projects that require continuous power, like cutting thick materials or sanding large surfaces, since you won’t need to worry about batteries running out. Cordless tools are best for lighter tasks or when working in areas without easy access to outlets, making them convenient for beginners tackling quick fixes or small projects.
Could you explain how to choose between corded and cordless power tools for someone on a tight budget? The article mentions this consideration but I’m not clear on when one is preferable over the other for typical beginner projects.
If you’re on a tight budget, corded tools are usually more affordable, deliver constant power, and don’t require battery replacements—great for longer tasks in areas with easy access to outlets. Cordless tools offer portability and convenience, but tend to cost more and may need spare batteries for bigger jobs. For typical beginner projects at home, a basic corded tool often gives the best value.
Can you give some advice on how to choose between corded and cordless power tools for someone who will mostly be doing small projects inside an older house?
For mostly small indoor projects in an older house, cordless tools are usually more convenient since you can move freely without worrying about outlets or tangled cords. However, if your house has limited or unreliable outlets, make sure to keep batteries charged, or keep a basic corded tool as backup for longer tasks.
I’m working with a pretty tight budget for my first renovation. If I have to start with just two of the foundational five power tools, which ones are the most essential to get started, and why?
If you need to pick just two power tools, a cordless drill and a circular saw are the best starting choices. The drill is versatile for assembling furniture and fastening hardware, while the circular saw handles most basic cutting tasks for wood and sheet materials.
The article talks about safety and maintenance basics for power tools. Could you give some real-life examples of common mistakes beginners should avoid when first using these tools for home projects?
Beginners often forget to wear safety goggles, which puts their eyes at risk. Another common mistake is not unplugging tools before changing blades or bits, leading to accidental starts. Some also use the wrong blade or accessory for the material, causing poor results or damage to the tool. Always read the tool’s manual and keep workspaces tidy to avoid tripping over cords.
You mention choosing between corded and cordless tools. For a first-time renovator on a budget, are cordless tools worth the extra cost, or would corded options work just as well for most home projects?
Corded tools are usually more affordable and provide consistent power, making them a solid choice for most home projects, especially if budget is a concern. Cordless tools offer convenience and portability, but unless you need that flexibility, corded options should work well for a first-time renovator.
Could you go into more detail about cordless vs corded drills for first-timers? I’m concerned about battery life on longer projects, but cord management can be a hassle too.
Cordless drills offer great flexibility since you aren’t tethered by a cord, but battery life can be limiting on extended jobs—having a spare battery helps. Corded drills provide constant power, making them ideal for longer projects, though you’ll need to manage cords and stay near outlets. For most first-timers, cordless drills are more convenient unless you expect to work for hours at a time.
When starting a project, is it better to go cordless for all the foundational power tools, or are there situations where corded ones are more reliable for beginners?
Cordless tools offer a lot of convenience and flexibility, especially for beginners moving around a space. However, corded tools are often more reliable for tasks that need continuous power or high performance, like heavy-duty drilling or cutting. For most basic home renovation tasks, cordless is fine, but having at least one corded tool for demanding jobs can be helpful.
When choosing between corded and cordless drills as a first-time renovator, are there situations where one is clearly better than the other for small home projects?
For small home projects, a cordless drill is often more convenient because it’s portable and easy to use in tight spaces without needing an outlet. However, if you’re working for long periods or with tougher materials, a corded drill’s constant power can be better. For most light jobs, cordless is usually the best choice.
Could you clarify what features actually matter most when comparing corded versus cordless drills for someone just starting out? There are so many options and it’s not clear when one is really better than the other for basic renovation projects.
For beginners, cordless drills offer more mobility and are easier to use in tight spaces, but corded drills provide continuous power and are usually lighter. If your projects are mostly light duty and you value convenience, go cordless. If you expect longer usage sessions or heavier tasks, a corded drill might be better. Look for comfortable grip, adjustable speed, and good battery life or cord length.
Could you explain a bit more about when it makes sense to choose corded power tools over cordless? For a first-time renovator, is cordless always the better option or are there specific situations where a corded tool would be better?
Cordless tools are great for mobility and convenience, especially for small projects or work in tight spaces. However, corded tools are better if you need constant power for longer periods or heavy-duty tasks, like drilling through concrete or sanding large areas. For bigger jobs or when you don’t want to worry about battery life, corded is often the better choice.
You mentioned choosing between corded and cordless tools—are there certain projects or tools where corded is better for a beginner, or should I just stick with cordless for my first toolkit?
Cordless tools offer great convenience and flexibility, making them a popular choice for beginners. However, for tasks that require continuous power—like using a circular saw for long cuts or sanding large surfaces—a corded tool won’t run out of battery and can be easier to manage. Consider starting mostly cordless, but add a corded tool for heavy-duty or prolonged jobs.
I noticed you mention both corded and cordless options when choosing power tools. For someone just starting out, are there specific projects where one is clearly better than the other, or should a beginner stick to cordless for versatility?
Cordless tools are great for versatility and ease of movement, especially for basic DIY tasks or working in areas without easy access to outlets. However, for projects needing extended power—like sanding large surfaces or cutting thick materials—corded tools can offer more consistent performance. Many beginners start with cordless for convenience, adding corded options later as needed.
If I’ve never really used power tools before, what’s the best way to safely practice before actually starting my renovation project?
Begin by reading the manuals for each power tool and watching safety tutorials online. Practice using the tools on scrap materials in a well-lit, clutter-free area. Start with simple tasks, always wear safety gear, and focus on mastering safe handling before moving on to your renovation project.
I’m just getting started with renovations and I’m not sure how to decide between corded and cordless power tools. Are there certain projects where one is definitely better than the other for beginners?
Corded tools are best for heavy-duty tasks like cutting thick wood or mixing concrete since they provide continuous power, but you’ll need to be near an outlet. Cordless tools offer more flexibility and are great for lighter jobs like assembling furniture or drilling holes, making them very beginner-friendly. For most first-time projects, cordless tools will likely be more convenient.
As someone with a tight schedule, do you have any advice for choosing between corded and cordless power tools when it comes to reliability and convenience during home renovations?
If you have limited time, cordless power tools usually offer greater convenience since you can move between tasks quickly without worrying about outlets or extension cords. However, corded tools are often more reliable for longer projects, as you won’t need to recharge batteries. For quick jobs, cordless is ideal; for extended use, consider corded.
The article talks about building a starter toolkit for first-time renovators. Could you give more advice on which brands or models are both reliable and affordable for beginners?
For beginners, brands like DeWalt, Makita, and Bosch are known for durability and user-friendly features without being overly expensive. Ryobi and Black+Decker also offer affordable starter options, especially for cordless drills and saws. Look for combo kits, as they often provide good value and the essential tools you’ll need to begin renovating.
When building out that core toolkit, is it better to invest in a single brand’s tool ecosystem for battery compatibility, or does mixing brands make sense for budget or performance reasons?
Sticking with one brand’s tool ecosystem is usually more convenient since batteries and chargers are interchangeable, which saves time and money. However, sometimes mixing brands can offer better performance or value on specific tools. If you’re starting out, building around one brand for core tools is often the simplest and most efficient choice.
If I only have the budget for one or two core power tools at first, which ones would you prioritize for general home renovation tasks?
If you can start with just one or two, a cordless drill/driver and a circular saw are the most versatile choices. The drill will handle assembling furniture, hanging shelves, and basic repairs, while the circular saw is great for most cutting tasks like shelving and trim.
You mention both corded and cordless options—could you elaborate on situations where a corded drill might be preferable for a beginner, or should first-time renovators just stick to cordless for flexibility?
A corded drill can be preferable if you’ll be working for long periods or on tough materials, since it doesn’t run out of battery and often has more consistent power. However, for most first-time renovators, a cordless drill is usually sufficient and offers greater flexibility, especially when moving around the house or working in areas without easy access to outlets.
You mention maintaining the tools—is there a basic maintenance routine beginners should follow to keep their drills or saws in good shape?
Absolutely! For drills and saws, keep them clean and dry after each use, check for loose screws or parts, and store them in a safe, dry place. Regularly inspect cords for damage and apply a little lubricant to moving parts if needed. Make sure to change or sharpen blades and bits as they wear out.
When you mention choosing between corded and cordless drills, do you have specific situations where one is clearly better than the other for a beginner who might not have a big budget for multiple tools?
Corded drills are often better for beginners on a budget because they’re usually less expensive and provide consistent power, especially for longer jobs. Cordless drills, however, offer more flexibility and are great for quick tasks or working in areas without easy access to outlets. If you expect to do a lot of work in one spot, a corded drill is a solid, economical choice.
When building that first toolkit, how much should I realistically expect to spend on decent quality versions of these five essential tools? Are there certain brands or features you recommend prioritizing on a budget?
For a starter set of decent-quality power tools, budget around $300–$500 total for the basics: drill, circular saw, sander, jigsaw, and oscillating tool. Prioritize brands like DeWalt, Makita, or Milwaukee for reliability, but Ryobi and Craftsman also offer great value. Look for tools with good warranties and comfortable grips, and consider buying combo kits to save money.
If I want to keep my initial investment low, which of the five core power tools is okay to skip for smaller apartment projects?
For smaller apartment projects, you can usually skip the circular saw at first, since most basic tasks like assembling furniture or hanging shelves can be handled with a drill and perhaps a jigsaw. Add the circular saw later if you take on bigger woodworking or remodeling jobs.
The article talks about buying essential tools instead of everything in the hardware store. Are there certain brands or features you recommend prioritizing for a beginner who wants to build a toolkit gradually?
For beginners, it’s wise to focus on reliable brands known for durability, like DeWalt, Makita, or Bosch. Look for tools with ergonomic grips, good warranties, and cordless options with interchangeable batteries, which make them easier to use and expand. Start with core tools and add others as your needs grow.
Can you give more detail on when it’s best to choose corded vs. cordless power tools for common renovation projects, especially for beginners tackling a mix of indoor and outdoor tasks?
Choose corded power tools when you need consistent power for longer periods, like drilling into concrete or using saws for extended cuts—especially indoors near outlets. Cordless tools offer great flexibility for quick jobs or outdoor tasks where outlets are scarce, but their batteries may need frequent charging during heavier use. Beginners often find cordless tools easier to handle for light to medium tasks.
You mention building a starter toolkit that will serve for years—what should be prioritized first if the budget only allows for two or three tools to start?
If you’re limited to just two or three tools, prioritize a cordless drill/driver, a circular saw, and a tape measure. These tools handle most basic tasks like drilling, driving screws, and making cuts, covering a wide range of renovation projects efficiently.
Could you provide some guidance on which features truly matter when comparing entry-level drill/driver combos, especially for someone watching their budget?
When comparing entry-level drill/driver combos, focus on features like variable speed control, a comfortable grip, battery life (look for lithium-ion), and included accessories. Also, check the torque settings and whether the tool has a keyless chuck for quick bit changes. These essentials offer the best balance of value and performance for budget-conscious beginners.
For budget-conscious beginners, which of the core power tools would you recommend buying first, and are there any options that work well for occasional use but don’t break the bank?
For beginners on a budget, a cordless drill/driver is the most versatile tool to start with, as it’s useful for many tasks. Look for reputable but affordable brands—many offer entry-level models that are reliable for occasional use without being expensive.
You mention essential power tools for beginners—are there any tools you suggest renting instead of buying if you’re on a tight budget and only renovating one room?
If you’re renovating just one room and want to save money, consider renting rarely used tools like a tile cutter, power sander, or miter saw. Basics like a drill or screwdriver are worth buying, but renting bigger or less frequently used items can help stick to your budget.
If I’m trying to stick to a tight budget, is there a particular order I should buy these foundational five tools, or can some wait until later projects?
If you’re on a budget, start with the tools needed for your immediate projects. For most beginners, a cordless drill and a circular saw are usually most useful upfront. Other tools like an orbital sander, jigsaw, or multi-tool can be added as you take on more specific tasks later.
Could you give more details on when it’s better to choose a corded tool over cordless, especially for bigger projects or older homes?
Corded tools are usually better for bigger projects or when working in older homes with tough materials, because they deliver consistent power and don’t require recharging. If you’ll be using a tool for extended periods—like sanding or drilling through dense walls—corded options prevent interruptions and are often more robust than cordless models.
The article talks about building a versatile starter toolkit. If I only have enough money for two out of the foundational five power tools, which ones should I prioritize for general home projects?
For general home projects, prioritizing a cordless drill and a circular saw is a smart choice. The drill handles a wide range of fastening and assembly tasks, while the circular saw is versatile for cutting wood and sheet materials. These two tools cover most basic renovation needs.
If someone is renovating just a single room to start, would all five core power tools still be necessary, or is there a way to prioritize which tools to get first based on the project?
You don’t need all five core power tools for a single room renovation. The essentials depend on your project. For basic jobs like installing shelves or fixing trim, a drill/driver and a circular saw are usually most important. If your project involves more detailed work, consider adding tools like a jigsaw or sander as needed.
I’m curious about tool maintenance basics for a first-timer. What are the essential steps to keep beginner power tools in good condition, especially if they might be stored for months between projects?
To keep beginner power tools in good shape, clean them after each use, remove sawdust or debris, and store them in a dry place. Regularly check for loose screws or worn cords. For long-term storage, unplug batteries or charge them to about 50%, and lightly oil any metal parts to prevent rust.
For someone budget-conscious and just starting out, which of the foundational five power tools would you recommend investing in first, and are there any brands or features I should specifically avoid as a beginner?
Starting out, a cordless drill is the most versatile and useful tool to invest in first. Look for one with adjustable torque and a comfortable grip. As a beginner, avoid unbranded tools or those with very low prices, as they may lack durability and safety features. Stick with reputable brands like DeWalt, Makita, or Black+Decker for reliability and warranty support.
When building a starter toolkit, what’s the best way to decide which tool brands are reliable for beginners? Should I stick to one brand for battery compatibility, or is it fine to mix and match?
It’s usually easier to stick to one brand for your cordless tools so batteries and chargers are compatible, saving money and hassle. When choosing a brand, look for good warranties, accessible customer service, and positive beginner reviews. Mixing brands is fine for corded tools or specialty items, but consistency helps with cordless sets.
You mention corded versus cordless tools—are there situations where you would recommend sticking with corded, even for beginners?
Corded tools are a good choice for tasks that need continuous power, like sanding large surfaces or using saws for long periods. If you’re working in one spot and have easy access to outlets, corded tools can save you from battery interruptions and often deliver more consistent performance.
For someone renovating just a single room, is it practical to buy all five core tools at once, or should I start with a couple and add more as needed?
If you’re only renovating one room, it’s often more practical to begin with the most essential tools for your specific tasks—usually a drill and a circular saw. As the project progresses, you can add other tools if you find you really need them. This approach helps save both money and storage space.
When building a starter toolkit as a first-time renovator, is it better to buy all the essential power tools at once or start with just the drill/driver combo and add more tools as specific projects come up?
Starting with a quality drill/driver combo is a smart move, as it’s the most versatile tool for beginners. You can add other power tools as your renovation needs grow, which helps you spread out costs and choose tools that truly fit your projects.
The guide emphasizes investing in essentials and not every gadget—if I’m on a tight budget, which two power tools would you prioritize first, and why?
If you’re on a tight budget, I’d recommend starting with a cordless drill and a circular saw. The drill is versatile for assembling furniture and hanging fixtures, while the circular saw handles most cutting tasks for wood and basic renovation projects.
When choosing between corded and cordless power tools as a first-time renovator, how do I decide which makes more sense for bigger projects versus smaller repairs around the house?
For bigger projects, corded tools usually offer more consistent power and don’t need recharging, making them great for long tasks. Cordless tools, on the other hand, are more convenient for quick, smaller repairs and places without easy access to outlets. Consider your typical project size and workspace to decide what fits your needs best.
When building a beginner toolkit on a tight budget, which of the foundational five power tools could I realistically skip at first without compromising most basic home renovation tasks?
If you need to save money, you can usually skip the power sander initially. Most basic home renovation tasks can be managed with a cordless drill, circular saw, jigsaw, and an oscillating multi-tool. Sanding can be done by hand until you’re ready to invest in a power sander.
When considering corded vs. cordless power tools as a first-time renovator, are there specific situations or projects where one is significantly better than the other in terms of performance or safety?
Corded power tools are best for tasks needing continuous power, like sanding large surfaces or using saws for extended periods, as they won’t run out of battery. Cordless tools offer flexibility and are safer for quick jobs or work in tight spaces without worrying about cords tripping you up. Choose based on project length, power needs, and workspace accessibility.
Could you expand on choosing a good starter kit within a reasonable budget? Are there particular brands or combo sets that offer quality without overspending for someone just beginning to renovate their own place?
For beginners, starter combo kits from brands like Ryobi, Craftsman, and Black+Decker offer a solid mix of quality and affordability. Look for kits that include essentials like a drill, circular saw, and impact driver. These sets usually provide good warranties and are widely available at major hardware stores.
If I’m just looking to do a simple room update, would you still recommend investing in all five of the core power tools, or could I get by with just a drill/driver for now?
For a simple room update, a drill/driver is usually enough for most basic tasks like hanging shelves or assembling furniture. You don’t need to invest in all five core power tools right away unless your project involves cutting, sanding, or more intensive work.
For first-timers, are there any specific safety risks with popular tools like the drill/driver combo that often get overlooked, and what precautions would you recommend beyond the basic manual instructions?
One risk that’s easy to miss is long hair, jewelry, or loose clothing getting caught in the spinning drill. Also, drills can slip and cause injury if you lose your grip or the bit catches suddenly. Always tie back hair, remove jewelry, wear snug clothing, and keep a firm grip with both hands when starting each hole.
You highlight building a versatile starter toolkit for home renovations. Are there specific brands or models you recommend for reliability and ease of use for someone tackling their first major project, or should beginners stick to entry-level options?
For beginners, brands like DeWalt, Makita, and Bosch are known for reliable, easy-to-use tools with good warranties. Their entry-level or mid-range lines often strike a nice balance between quality and affordability, making them great choices for first major projects. You don’t have to go for professional-grade models right away unless you’re tackling very heavy-duty tasks.
If I want to start with just two or three power tools instead of all five, which ones would you recommend for basic home updates like installing shelves or replacing trim?
For basic home updates like installing shelves or replacing trim, start with a cordless drill and a circular saw. If you can add a third tool, a multi-tool is very versatile and useful for detail work, cutting, or sanding in tight spots.
When you talk about building a starter toolkit, do you suggest buying all the foundational five power tools at once, or is there a recommended order to add them as projects come up?
It’s perfectly fine to build your toolkit gradually. Start with the power tool you need for your first project, then add others as your renovation tasks become more ambitious. This approach helps spread out costs and ensures each tool matches your immediate needs.
If I’m on a tight budget, should I focus on buying the foundational five tools separately, or are those all-in-one starter kits worth it for someone who plans occasional renovations?
For occasional renovations on a budget, an all-in-one starter kit is usually your best bet. These kits offer good value and cover most basic needs. If you find yourself renovating often later, you can always upgrade specific tools as needed.
Does the guide recommend any particular brands or models for drills or other starter power tools that are reliable but budget-friendly for beginners?
The guide highlights features to look for in beginner-friendly power tools but doesn’t mention specific brands or models. It suggests prioritizing reliability and affordability, and recommends looking for reputable brands known for their solid warranties and customer support when shopping for your first drill or set of tools.
You mention maintenance basics for power tools—can you give some examples of simple upkeep tasks a total beginner shouldn’t skip?
Absolutely! For beginners, always unplug or remove batteries before cleaning tools. Wipe down surfaces after use, check that vents are clear of dust, and inspect cords for damage. Regularly oil moving parts if recommended by the manual, and replace or clean blades and bits to keep them sharp and safe.
Could you share more on how to balance quality versus cost when buying these core power tools for the first time, especially if my budget is limited and I want reliable results?
Start by prioritizing the tools you’ll use most often and invest in mid-range brands that offer good warranties. Look for combo kits, sales, or refurbished models to maximize value. Avoid the cheapest options, as they tend to wear out quickly, but you don’t always need top-tier brands as a beginner.
What is a realistic budget range for a beginner to build this foundational set of five power tools without sacrificing too much on quality or safety?
For a solid starter set of five quality power tools, you can expect to spend between $300 and $600. This range covers reputable brands that balance performance and durability without compromising safety features. Look for combo kits, which often offer better value than buying each tool separately.
How do I know if I should go with corded or cordless power tools, especially if I’m on a tight budget and just starting out?
If you’re on a tight budget and just starting out, corded power tools are usually more affordable and offer continuous power, making them a solid choice for longer tasks. Cordless tools add convenience but can be pricier due to battery costs. Consider how often you’ll need portability versus constant power.
Can you share tips on how to prioritize which power tools to buy first if I have a really tight budget and only want to get the essentials?
Start with versatile tools: a cordless drill, circular saw, and a quality tape measure. These cover most basic tasks. Next, add a sander if you plan to refinish surfaces. Rent or borrow specialty tools as needed instead of buying everything at once.
When choosing between corded and cordless drill/drivers for a first home renovation, how much of a difference does battery life make in real projects? Are there situations where a corded model is actually better for beginners?
Battery life can matter if your renovation takes several hours at a time, but for most home projects, a modern cordless drill is powerful and convenient. However, if you expect to work for long stretches without interruption or only have one battery, a corded drill offers unlimited runtime and consistent power, which some beginners find reassuring.
If I’m pretty new to DIY and worried about using power tools safely, are there beginner-friendly brands or features I should look for to help prevent mistakes or injuries?
Look for power tools with safety features like automatic shut-off, blade guards, and ergonomic grips. Brands such as Ryobi and Black+Decker are known for beginner-friendly designs. Always choose tools with clear instructions and consider starting with battery-operated models, which are typically lighter and easier to handle.
Could you suggest a basic starter toolkit with cost in mind? I want to avoid overspending on power tools I might not need right away.
A practical starter toolkit could include a cordless drill, a circular saw, and a detail sander. Choose entry-level brands to keep costs down—expect to spend around $150–$250. You can expand later as you take on more projects, avoiding unnecessary upfront expenses.
When you mention investing in essentials rather than the entire hardware store, what would be a reasonable budget range for a quality starter kit of the five core power tools?
For a quality starter kit with the five core power tools—drill, circular saw, jigsaw, sander, and oscillating multi-tool—a reasonable budget is typically between $300 and $600. This range covers reputable brands and should provide reliable performance for most home renovation tasks.
For someone just starting out with renovations, how do you decide between corded and cordless power tools, especially when it comes to balancing budget and convenience?
Cordless tools offer great convenience and mobility, making them useful for quick jobs or tight spaces, but they’re usually more expensive and need battery charging. Corded tools are often more budget-friendly and provide consistent power for longer tasks. If you’re starting out and budget is tight, begin with corded versions of essential tools, then add cordless options as needed.
You mention investing in essentials rather than buying every tool—are there budget brands or used-tool sources you’d recommend for someone starting out without breaking the bank?
For affordable options, consider brands like Ryobi, Black+Decker, and Craftsman, which offer good quality at reasonable prices. Used tools can be found at local pawn shops, garage sales, or through online marketplaces like Facebook Marketplace and Craigslist. Always check tools for wear and test them if possible before buying used.
Could you give some advice on how to build a starter toolkit if I’m working with a tight budget? Are there certain features or brands I can compromise on without sacrificing safety or quality?
Focus on core tools like a cordless drill, circular saw, and a reliable tape measure. Opt for entry-level models from trusted brands—these often balance price and durability. Avoid no-name brands for power tools, but you can save on hand tools. Always prioritize safety features, even if you choose budget options.
The article mentions maintenance basics for power tools—could you share a few practical tips on caring for and storing tools so they last through multiple projects?
Absolutely! Keep your tools clean by wiping them down after each use, and regularly check for loose parts or frayed cords. Store them in a dry place to prevent rust—using cases or wall-mounted racks helps. Remember to oil moving parts as needed and always remove batteries or unplug tools before storing them.
You mention choosing between corded and cordless tools for new renovators. Is there a big difference in performance or reliability for beginners, and how do I decide which to get for most basic home projects?
Corded tools typically offer more consistent power and don’t require charging, making them reliable for longer tasks. Cordless tools are more convenient and portable, especially for quick jobs or places without easy access to outlets. For most basic home projects, cordless tools are usually sufficient and easier for beginners to handle.
Do you have any recommendations for keeping tool costs reasonable without sacrificing quality, especially for projects that might not require heavy-duty use?
For lighter home renovation projects, consider buying reliable mid-range brands instead of premium contractor-grade tools. Look for combo kits, which often bundle essentials at a better price. Renting or borrowing specialized tools you’ll only use once is also a smart way to save money without compromising on quality.
The guide mentions maintenance basics for power tools—are there any simple routines or products you recommend to help tools last longer if I’m mostly storing them in a garage?
To keep your power tools in good shape while stored in a garage, wipe them clean after each use, apply a light machine oil to metal parts to prevent rust, and store them in dry, dust-free containers or cases. Using silica gel packs in your toolbox can also help reduce moisture and prevent corrosion.
For someone tackling just one room at first, is it necessary to buy all five core power tools right away, or can some be rented depending on the project?
You don’t need to buy all five core power tools for a single-room project. It makes sense to purchase only what you’ll use often, like a drill or sander, and rent specialized tools such as a circular saw or jigsaw as needed. This approach saves money and storage space.
If I plan to renovate just one or two rooms this year, should I invest in all five foundational power tools right away, or would some be better to rent or borrow for occasional use? Curious what you’d prioritize in that case.
If you’re focusing on just one or two rooms, consider buying the tools you’ll use most often, like a drill/driver and a circular saw. Less frequently used tools, such as a reciprocating saw or orbital sander, can be rented or borrowed to save money and storage space.
Could you share some tips on how to maintain essential power tools like drills or sanders to make sure they last through multiple renovation projects?
To keep your drills and sanders in good shape, regularly clean them after use to remove dust and debris, check and replace worn parts like brushes or pads, keep moving parts lubricated, and store them in a dry place. Also, always follow the manufacturer’s maintenance instructions for best results.
You mentioned maintenance basics—could you share some tips on maintaining power tools so they last, particularly for someone who isn’t using them daily?
Keep your power tools clean by wiping them down after each use to remove dust and debris. Store them in a dry place to prevent rust. Check cords and batteries regularly for damage, and avoid leaving batteries on chargers once they’re full. Lubricate moving parts occasionally, and follow the manufacturer’s maintenance instructions for each tool.
When you mention ‘features that matter’ for beginner power tools, are there specific features you recommend prioritizing over others on a limited budget?
For beginners on a budget, prioritize safety features like blade guards and automatic shut-off, ergonomic grips for comfort, and variable speed controls for versatility. Also, look for reliable warranties and included accessories, which can save you money as you build your toolkit.
You mention using a drill/driver combo for mixing paint with the right attachment. Are there any safety tips or things to watch out for if I want to try that, especially as a beginner?
When using a drill/driver combo to mix paint, make sure you use a proper mixing attachment and secure the paint can. Start on a low speed to avoid splashing. Always wear eye protection, and make sure the drill is unplugged or the battery removed when attaching or removing the mixer.
You mention choosing between corded and cordless tools—are there situations where starting with a corded drill actually makes more sense for beginners, especially if I’m working mostly indoors?
Yes, starting with a corded drill can make sense for beginners working mainly indoors. Corded drills typically offer consistent power, don’t require charging, and are often more affordable. If you have easy access to outlets and won’t need portability, a corded option is very practical for indoor renovation tasks.
I’m curious about your thoughts on corded versus cordless for someone living in an older home with limited outlets. Are there situations where a corded drill/driver is actually the better option for a beginner?
With limited outlets in an older home, cordless tools are generally more convenient since you won’t need to hunt for plugs or deal with extension cords. However, if you’ll be doing long, continuous work (like mixing drywall mud) or need maximum power without worrying about battery life, a corded drill/driver can still be a practical choice.
If I’m only planning to do small projects like updating a single room, do I really need all five power tools listed, or could I get by with just a drill/driver for now?
For smaller projects like updating one room, a drill/driver is often enough, especially if you’re just assembling furniture or hanging shelves. The other tools become more useful for bigger renovations, so you can start with the drill/driver and add more tools as your needs grow.
You mention choosing between corded and cordless tools. For a beginner doing most projects inside an older home, is cordless always better, or are there situations where a corded drill would be safer or more reliable?
For most indoor home projects, a cordless drill is very convenient and usually powerful enough. However, a corded drill can be safer or more reliable if you’ll be drilling for long periods, working with dense materials, or if your home’s electrical outlets are limited and you don’t want to worry about battery life.
You mentioned safety quite a bit; are there any specific safety accessories or gear first-time renovators should prioritize when buying their first set of power tools?
Absolutely, first-time renovators should prioritize buying safety glasses or goggles, hearing protection (like earmuffs or plugs), sturdy work gloves, and a dust mask or respirator. A hard hat and steel-toed boots are also recommended if you’ll be working in riskier environments or with heavy materials.
The guide mentions essential power tools for first-time renovators, but what would you recommend for someone on a tight budget—are there any reliable brands or features to prioritize?
If you’re on a tight budget, start with versatile tools like a cordless drill, circular saw, and multi-tool. Look for brands like Ryobi, Black+Decker, or Craftsman, which offer good value and reliability. Prioritize tools with solid warranties, basic safety features, and enough power for typical home projects.
I noticed you mentioned comparing corded vs. cordless tools. For someone just starting out and planning to do renovations room by room over time, is it better to invest in cordless tools for flexibility, or are corded options still worth considering?
Cordless tools are ideal for flexibility, especially when moving between rooms and handling projects over time, since you won’t need to worry about outlets or cords. However, corded tools can offer consistent power for heavy-duty tasks. If your renovations are light to moderate, cordless tools are a great investment to start with.
The guide mentions corded vs. cordless tools. For someone on a tighter budget, is it usually better to start with all cordless power tools, or are there situations where corded versions make more sense for a beginner?
If you’re on a budget, starting with corded tools can actually be more cost-effective and they offer consistent power for longer tasks. Cordless tools are great for portability, but batteries and chargers add to the cost. For major stationary tasks, corded is often the better value; cordless is handy for quick jobs or places without outlets.
For someone just getting started, how do you recommend balancing quality and budget when choosing between corded and cordless power tools?
If you’re just starting out, consider buying high-quality corded tools for tasks you do often—they’re usually less expensive and provide reliable power. Cordless tools are great for convenience but cost more, especially with batteries. Start with a dependable corded drill or saw, then add cordless options as your needs and budget grow.
How important is it to learn basic maintenance for these tools right away, or can a beginner safely put that off until after some initial projects are done?
It’s best to learn basic maintenance right from the start. Proper care keeps your tools working safely and efficiently, and helps prevent breakdowns during your projects. Even just reading the manuals about cleaning, lubrication, and storage before your first use can make a real difference.
I noticed you talk about investing in just the essential tools rather than everything in the store. If I’m on a tight budget, which one or two power tools should I absolutely not skip when starting home renovations?
If you’re working with a tight budget, prioritize getting a cordless drill/driver and a circular saw. These two tools handle most basic renovation tasks like drilling, driving screws, and cutting wood, making them the most versatile and essential for beginners.
You mentioned choosing between corded and cordless tools. For someone who might only do a few renovation projects a year, is it worth investing in cordless tools, or will corded ones be more reliable and cost-effective in the long run?
If you’ll only use tools occasionally, corded options are often more cost-effective and reliable since you won’t have to worry about batteries losing charge or lifespan. Cordless tools offer portability, but for infrequent use, corded tools are usually the better long-term investment.
You talk about investing in the essentials rather than buying everything at the hardware store. If I’m on a tight budget, which one or two power tools would you prioritize first for basic renovations?
For basic renovations on a tight budget, I recommend starting with a cordless drill and a circular saw. These two tools cover a wide range of tasks, from assembling furniture and installing shelves to making straight cuts in wood or other materials.
For someone renovating on a budget, which one of the ‘foundational five’ power tools would you recommend investing in first if I can’t buy them all at once?
If you’re renovating on a budget, start with a cordless drill/driver. It’s the most versatile of the foundational five, handling tasks like drilling holes and driving screws for furniture assembly, shelves, or basic repairs. You can accomplish a lot with just this tool before adding others as your needs and budget allow.
I’m planning my first big remodel, and you mention the importance of starting with essentials rather than buying every tool. How do I decide between corded and cordless options when it comes to drills and saws? Are there specific scenarios where a corded tool is actually better for a beginner?
Cordless drills and saws are great for beginners because they’re portable and easy to handle, especially for most indoor home projects. However, corded tools are better if you need continuous power for long tasks or heavy-duty materials, like cutting thick lumber, since they won’t run out of battery. For most first-time renovators, cordless is more convenient, but keep a corded option in mind for bigger jobs.
The guide mentions corded vs. cordless tools, but for someone on a tight budget, is it better to start with all cordless or can I mix and match with some corded power tools?
Mixing corded and cordless tools is a smart budget-friendly approach. Corded tools often cost less and provide consistent power for tasks like drilling or sawing, while cordless tools offer convenience for jobs where outlets aren’t nearby. Start with corded for heavy-duty needs, and add cordless for portability as your budget allows.
When building a starter toolkit, how should I prioritize which power tool to buy first if I’m planning to renovate only one or two rooms in my home?
Start by considering the most common tasks in your renovation. For most projects, a cordless drill or driver is the most versatile first purchase, as it handles drilling and screwdriving. If you expect a lot of cutting, a circular saw or jigsaw could be next. Focus on tools you’ll use repeatedly in your specific rooms.
I’m on a tight budget as a new homeowner. If I can only buy two or three of the essential power tools right now, which ones would you suggest are the absolute priorities for most projects?
For most basic home renovation projects, a cordless drill and a circular saw are usually the top priorities—they handle everything from assembling furniture to cutting lumber. If you can stretch to a third tool, an orbital sander is very useful for finishing surfaces. These three will cover a wide range of beginner DIY tasks.
You mention maintenance basics for power tools—what should I be doing regularly to keep my drill/driver in good shape so it lasts through future projects?
To keep your drill/driver in top shape, regularly wipe it clean, check the battery contacts, and store it in a dry place. Periodically inspect the chuck for debris, keep moving parts lightly lubricated if recommended by the manufacturer, and make sure the battery is fully charged before storing.
You mention choosing between corded and cordless tools—are there certain tasks where corded is really a must, or can I stick with cordless for most home projects?
For most home projects, cordless tools offer plenty of power and convenience. However, corded tools are preferable for heavy-duty tasks like continuous drilling, cutting thicker materials, or when you need long, uninterrupted use. If your projects are mainly light renovations, cordless should be sufficient.
I’d like to know more about maintenance basics for first-time power tool owners. Are there simple steps or must-have products you recommend to keep a beginner’s toolkit in good condition?
Keeping your power tools in good shape is simple if you follow a few basics. Wipe tools clean after each use, store them in a dry place, and regularly check cords for damage. Lightly oil moving parts when needed, and use a can of compressed air to remove dust. A basic tool oil and a soft cloth are handy to have in your kit.
You mention choosing between corded and cordless power tools. For someone just getting started, is it worth investing in cordless options even if they’re usually more expensive, or do corded tools have advantages for beginners?
Cordless tools offer great convenience and portability, making them ideal for beginners working in different areas or without easy access to power outlets. However, corded tools are often more affordable and provide consistent power without worrying about batteries. If you’ll be working mainly in one place, corded might be a good starting option. Otherwise, cordless tools are worth the investment for their flexibility.
I’m just starting out and not sure whether to go for corded or cordless tools. Could you explain when a corded tool might actually be better than cordless for a first-time home renovator?
Corded tools can be a better choice if you need reliable, uninterrupted power for long tasks, like sanding or drilling into tough materials. They’re often less expensive and lighter, since they don’t use batteries. If you’ll mostly work near power outlets and need consistent performance over long periods, corded tools are a solid option for beginners.
I’m curious how you decide which features really matter when picking out your first power tools, especially for things like drills or saws. Are there any features that seem important but aren’t actually useful for most beginners?
When choosing your first power tools, focus on essentials like comfort, power, and battery life for cordless models. Features like lots of extra speed settings or built-in lights can sound impressive but aren’t always necessary for beginners. It’s most important that the tool feels good in your hand and covers basic functions well.
What features should I prioritize when picking my first power sander to avoid overspending, especially if I mostly plan to work on trim and doors?
For trim and doors, a basic palm or finishing sander should be enough. Look for a model that’s lightweight, offers variable speed control, and uses standard sandpaper sizes. You don’t need extra features like dust collection or heavy-duty motors unless you plan to tackle bigger projects later.
How much should I expect to budget for the foundational five power tools if I want decent quality but don’t need top-of-the-line models?
For decent-quality versions of the foundational five power tools—drill/driver, circular saw, jigsaw, orbital sander, and oscillating multi-tool—you should budget between $350 and $600 total. Pricing varies by brand and whether you buy tool-only or kits with batteries included.
When choosing a drill/driver combo as a beginner, are there specific safety features or user-friendly designs I should prioritize to avoid common mistakes or injuries?
When selecting a drill/driver combo as a beginner, look for features like automatic spindle lock, variable speed control, and a built-in LED light. An ergonomic grip and lightweight design help prevent fatigue and slipping. Also, a trigger lock can prevent accidental starts, making the tool safer to use.
How do you recommend beginners prioritize which of the five core power tools to buy first if they’re on a tight budget? Are there any that can wait if you’re mostly doing small projects to start with?
If you’re on a tight budget and working on small projects, start with a cordless drill and a circular saw, as they cover most basic tasks. A jigsaw and sander can usually wait until you need to tackle more detailed work or finishing. The fifth tool, like an impact driver, is useful but not essential for beginners.
Could you suggest what features are most important in a beginner drill/driver combo, especially for someone likely to take on small projects at first?
For a beginner drill/driver combo, look for lightweight models with adjustable clutch settings, variable speed control, and an ergonomic grip. A cordless design (ideally 18V or 20V) offers flexibility. Also, quick-change chucks and included batteries and charger are helpful for small home projects.
For someone on a really tight budget, which of the essential power tools would you recommend buying first, and is it okay to rent some of the others for occasional projects?
If your budget is tight, start by buying a cordless drill—it’s the most versatile and frequently used power tool for home renovation. For tools you’ll only need occasionally, like a circular saw or sander, renting is a smart and cost-effective option.
For a first-time renovator on a tight budget, which of the core five power tools would you recommend buying first, and which could realistically be borrowed or delayed?
A cordless drill is the best first purchase—it’s versatile for drilling and driving screws in many projects. Tools like a circular saw or jigsaw can often be borrowed or delayed unless you have immediate cutting tasks. Sanders and multitools are also handy, but not always essential right away.
Your guide mentions picking between corded and cordless tools. For a first-time renovator on a tight budget, is there a scenario where opting for corded makes more sense, or should I stick with cordless for all the core tools?
If you’re on a tight budget, corded tools can actually be a better choice for core tools like drills and saws. They’re usually less expensive, offer consistent power, and you don’t need to buy batteries or chargers. Cordless is great for portability, but corded tools give you solid value if you’re mainly working near outlets.
Can you give examples of specific features a first-time renovator should prioritize when choosing between corded versus cordless power tools?
When deciding between corded and cordless power tools, prioritize features like battery life, weight, and portability for cordless tools, and continuous power, reliability, and cost for corded options. For most beginners, cordless tools offer greater convenience, but if you’ll work for long periods in one spot, corded ones might be better.
How much should I realistically budget for all five of the foundational power tools if I’m just getting started and want decent quality?
For decent quality, budgeting around $400 to $700 for the five foundational power tools is a reasonable starting point. This range covers reliable brands and should get you a circular saw, drill/driver, jigsaw, sander, and an oscillating multi-tool suitable for most renovation projects.
If my budget is pretty limited, which of the five foundational power tools would you say I could skip or substitute with a hand tool at first without sacrificing too much efficiency?
If you’re on a tight budget, you can usually skip the power sander at first. For small projects, sanding blocks or manual sandpaper work well, though they require more effort. Prioritize a drill and a circular saw, as these tend to save the most time and effort.
I’m on a pretty tight budget—are there any power tools in your foundational five list that can be skipped or borrowed for smaller DIY renovations?
For smaller DIY projects, you can often skip or borrow tools like the circular saw and power sander, since they’re mainly needed for larger or finishing tasks. A cordless drill and a measuring tool are usually essential, but the rest can be borrowed or rented as needed.
If I want to invest in just a few high-quality tools to start, which of the five essentials do you think are truly non-negotiable for most beginner projects?
For most beginner projects, a cordless drill and a circular saw are truly non-negotiable. They cover a wide range of tasks like drilling, driving screws, and making straight cuts. If you have room for one more, a quality measuring tape is also essential for accuracy.
You mentioned essential features to look for in tools—are there any safety features you recommend prioritizing for someone who has never used power tools before?
For beginners, it’s smart to look for power tools with built-in safety features like blade guards, automatic shut-off, non-slip grips, and trigger locks. Tools with clear safety instructions, easy-to-reach emergency stops, and protective shields can also make your first projects much safer.
You mention both corded and cordless tools—do you recommend starting with cordless for most projects, or are there situations where corded is better for beginners?
Cordless tools are usually more convenient for beginners because they’re portable and easier to handle around the house. However, corded tools can be better if you’ll be working for long periods or need consistent power, like with heavy-duty saws. For most basic DIY projects, starting with cordless is a safe bet.
If I’m just planning a small room update right now, do I still need all the foundational five power tools, or can I get by with fewer to start?
For a small room update, you probably don’t need all five foundational power tools right away. A cordless drill and a circular saw usually cover most basic tasks. You can add other tools, like a sander or jigsaw, later if your project requires them.
When deciding between corded and cordless drill/drivers as a first-time renovator, what situations would really call for one over the other? Is battery life usually a big issue for beginner projects?
Cordless drill/drivers are more convenient and portable, making them great for most beginner projects. Go for corded if you need continuous power for long or demanding tasks, like drilling into concrete. For typical home projects, battery life on modern cordless drills is usually enough, especially with a spare battery on hand.
You mention weighing corded versus cordless options for essential tools. Are there certain renovation tasks where a corded drill/driver would actually be a better choice for a beginner than a cordless one?
Yes, for tasks that require extended use, like drilling into dense materials or mixing paint, a corded drill/driver is often better because it provides consistent power without worrying about battery life. Beginners tackling larger projects may appreciate not having to pause to recharge.
When choosing between corded and cordless power tools for smaller renovation projects, does the reliability of corded options generally outweigh the convenience of cordless, especially if I’m on a budget?
Corded power tools typically offer more consistent power and tend to be more affordable, making them a solid choice if reliability and budget are your main concerns. Cordless tools are convenient, but they often cost more and may require extra batteries for longer tasks.
When talking about corded versus cordless power tools, are there certain projects or scenarios where one is clearly better than the other for first-time renovators?
Corded tools are best for projects needing continuous power, like sanding large areas or cutting lots of lumber, since they won’t run out of battery. Cordless tools are great for smaller tasks or hard-to-reach places, offering more mobility—especially useful if outlets are limited or you’re working outdoors.
Can you suggest which specific features to prioritize in a cordless drill/driver if I’m mostly doing smaller projects like furniture assembly and hanging shelves? There are so many specs and I’m not sure what actually matters for a beginner.
For smaller projects, look for a cordless drill/driver that’s lightweight and comfortable to hold, with a variable speed trigger and at least two speed settings. A 12V model is usually powerful enough. Also, prioritize models with a keyless chuck for easy bit changes and a built-in LED work light for better visibility.
If I’m only planning to renovate one room this year, do I really need to get all five core power tools right away, or can I start with just a drill/driver and add others as I go?
You can absolutely start with just a drill/driver, especially for a single-room renovation. This tool covers many basic tasks. As you progress or encounter specific needs, you can add other power tools one at a time rather than buying everything upfront.
I’m new to DIY and noticed the article mentions corded vs. cordless tools. For a small apartment renovation, would it be better to go with corded power tools to save money, or is cordless really worth the investment?
For a small apartment renovation, cordless tools are usually a better investment despite the higher upfront cost. They’re easier to maneuver in tight spaces and don’t require nearby outlets, making them more convenient for most indoor projects. If your budget allows, starting with a cordless drill or driver can make DIY tasks much easier.
If I’m mainly doing smaller projects like hanging shelves or updating a single room, do I still need all five core power tools, or can I start with just one or two and add more as I go?
For smaller projects like hanging shelves or updating one room, you can definitely start with just a drill/driver and maybe a sander. These cover most basic tasks. You can add other tools like a circular saw or jigsaw later if your projects become more complex.
After buying these core tools, what basic maintenance should I do to keep them working reliably, and how often should I check or clean them?
Wipe down your tools after each use to remove dust and debris. Check cords, blades, and moving parts monthly for wear or damage. Lubricate moving parts as needed, and store everything in a dry place. Clean or replace filters on tools like sanders and vacuums regularly to maintain performance.
I’m starting my first renovation and want to be careful with my budget. Out of the five foundational power tools you suggest, is there one I can safely hold off on buying right away, or do they all get used in most beginner projects?
For most beginner projects, you can usually hold off on buying an orbital sander right away. The other tools—drill, circular saw, jigsaw, and multi-tool—tend to be used more often in initial renovation tasks. If sanding needs come up later, you can purchase or even rent a sander then.
How much should I expect to spend to get all of the foundational five power tools you list, without going overboard but still getting tools that will last for future projects?
For mid-range, reliable brands, you can expect to spend about $400 to $700 for the foundational five power tools. This covers a drill/driver, circular saw, jigsaw, orbital sander, and a shop vacuum. Look for combo kits, which often offer good value and quality for home renovators.
When building a starter toolkit on a tight budget, which core power tool would you recommend prioritizing if I can only afford one or two to start with?
For a starter toolkit on a limited budget, a cordless drill/driver is the most versatile power tool to prioritize. If you can afford a second tool, consider a circular saw, as it handles most basic cutting needs for home renovation projects.
If I’m taking on a simple room update and not a full remodel, are there any tools from your essential list that I could realistically skip or borrow instead of buying right away?
For a simple room update, you might skip buying larger tools like a power saw or a stud finder and consider borrowing them if needed. Focus on basics like a cordless drill and a measuring tape, which you’ll use more often. Renting or borrowing less frequently used tools can save you money and storage space.
You talked about safety and maintenance for new DIYers using power tools. What are some basic safety precautions or maintenance routines that beginners often overlook?
Beginners often overlook wearing proper eye and ear protection and making sure tools are unplugged before changing blades or bits. For maintenance, it’s common to forget to regularly clean dust from vents, check power cords for damage, and lubricate moving parts as recommended in the tool manual.
After I get the core five power tools, what would be the next most useful tool to add to my kit if I want to take on more advanced renovations down the road?
Once you have the core five power tools, a good next addition is a router. Routers are versatile for advanced projects like cabinetry, decorative edging, and joinery work, opening up many possibilities as you take on more complex renovations.
Can you explain how to safely maintain these starter power tools to make sure they last through multiple renovation projects?
To keep your starter power tools in good shape, clean them after each use and check for loose parts or frayed cords. Store them in a dry place, lubricate moving parts as recommended, and replace worn-out blades or bits. Regularly inspect and follow the manufacturer’s maintenance tips for each tool.
If I’m mostly planning smaller projects like room updates and not full remodels, are there any power tools from your foundational list that I could realistically skip for now to save money?
For smaller projects like simple room updates, you can likely skip larger tools such as a circular saw or miter saw for now. Instead, focus on basics like a cordless drill, a multi-tool, and perhaps a sander, since these are more versatile for light updates and repairs.
I see you mention both corded and cordless tools—do you recommend investing in cordless for everything, or are there scenarios where a corded option is better, especially for first-time renovators on a budget?
Cordless tools offer great convenience and portability, but corded tools often provide more consistent power and are usually less expensive. For a first-time renovator on a budget, sticking with corded options for heavy-duty or prolonged tasks—like saws or drills—can be cost-effective, while cordless tools work best for lighter, quick jobs or hard-to-reach areas.
When looking for my first set of power tools, how should I prioritize features versus price? Are there any essential features on basic models that I should not skip, even if I’m on a tight budget?
Focus on reliability and safety features first, like sturdy construction, comfortable grips, and built-in safety locks. For essentials such as drills or saws, variable speed control and good warranties are worth a little extra. While price is important, choosing tools that perform well and last will save money and frustration in the long run.