Introduction: Why Seasonal Exterior Caulking Matters
Every homeowner wants a comfortable, energy-efficient, and well-protected home. Yet, many overlook the simple but crucial task of inspecting and maintaining exterior caulking. Gaps and cracks around windows, doors, siding, and other exterior joints may seem minor, but they can allow water, air, and pests to enter—leading to costly repairs, mold growth, energy loss, and even structural damage. Seasonal caulking is a straightforward project that delivers huge returns by preventing leaks, drafts, and decay. This in-depth guide provides a practical, step-by-step exterior caulking checklist, covering the tools, materials, and best practices you need to keep your home secure through every season. Whether you’re a first-time DIYer or an experienced renovator, you’ll find detailed advice on identifying trouble spots, selecting the right caulk, applying it effectively, and maintaining your seals for long-term peace of mind.
Understanding Exterior Caulking: What, Where, and Why
What Is Exterior Caulking?
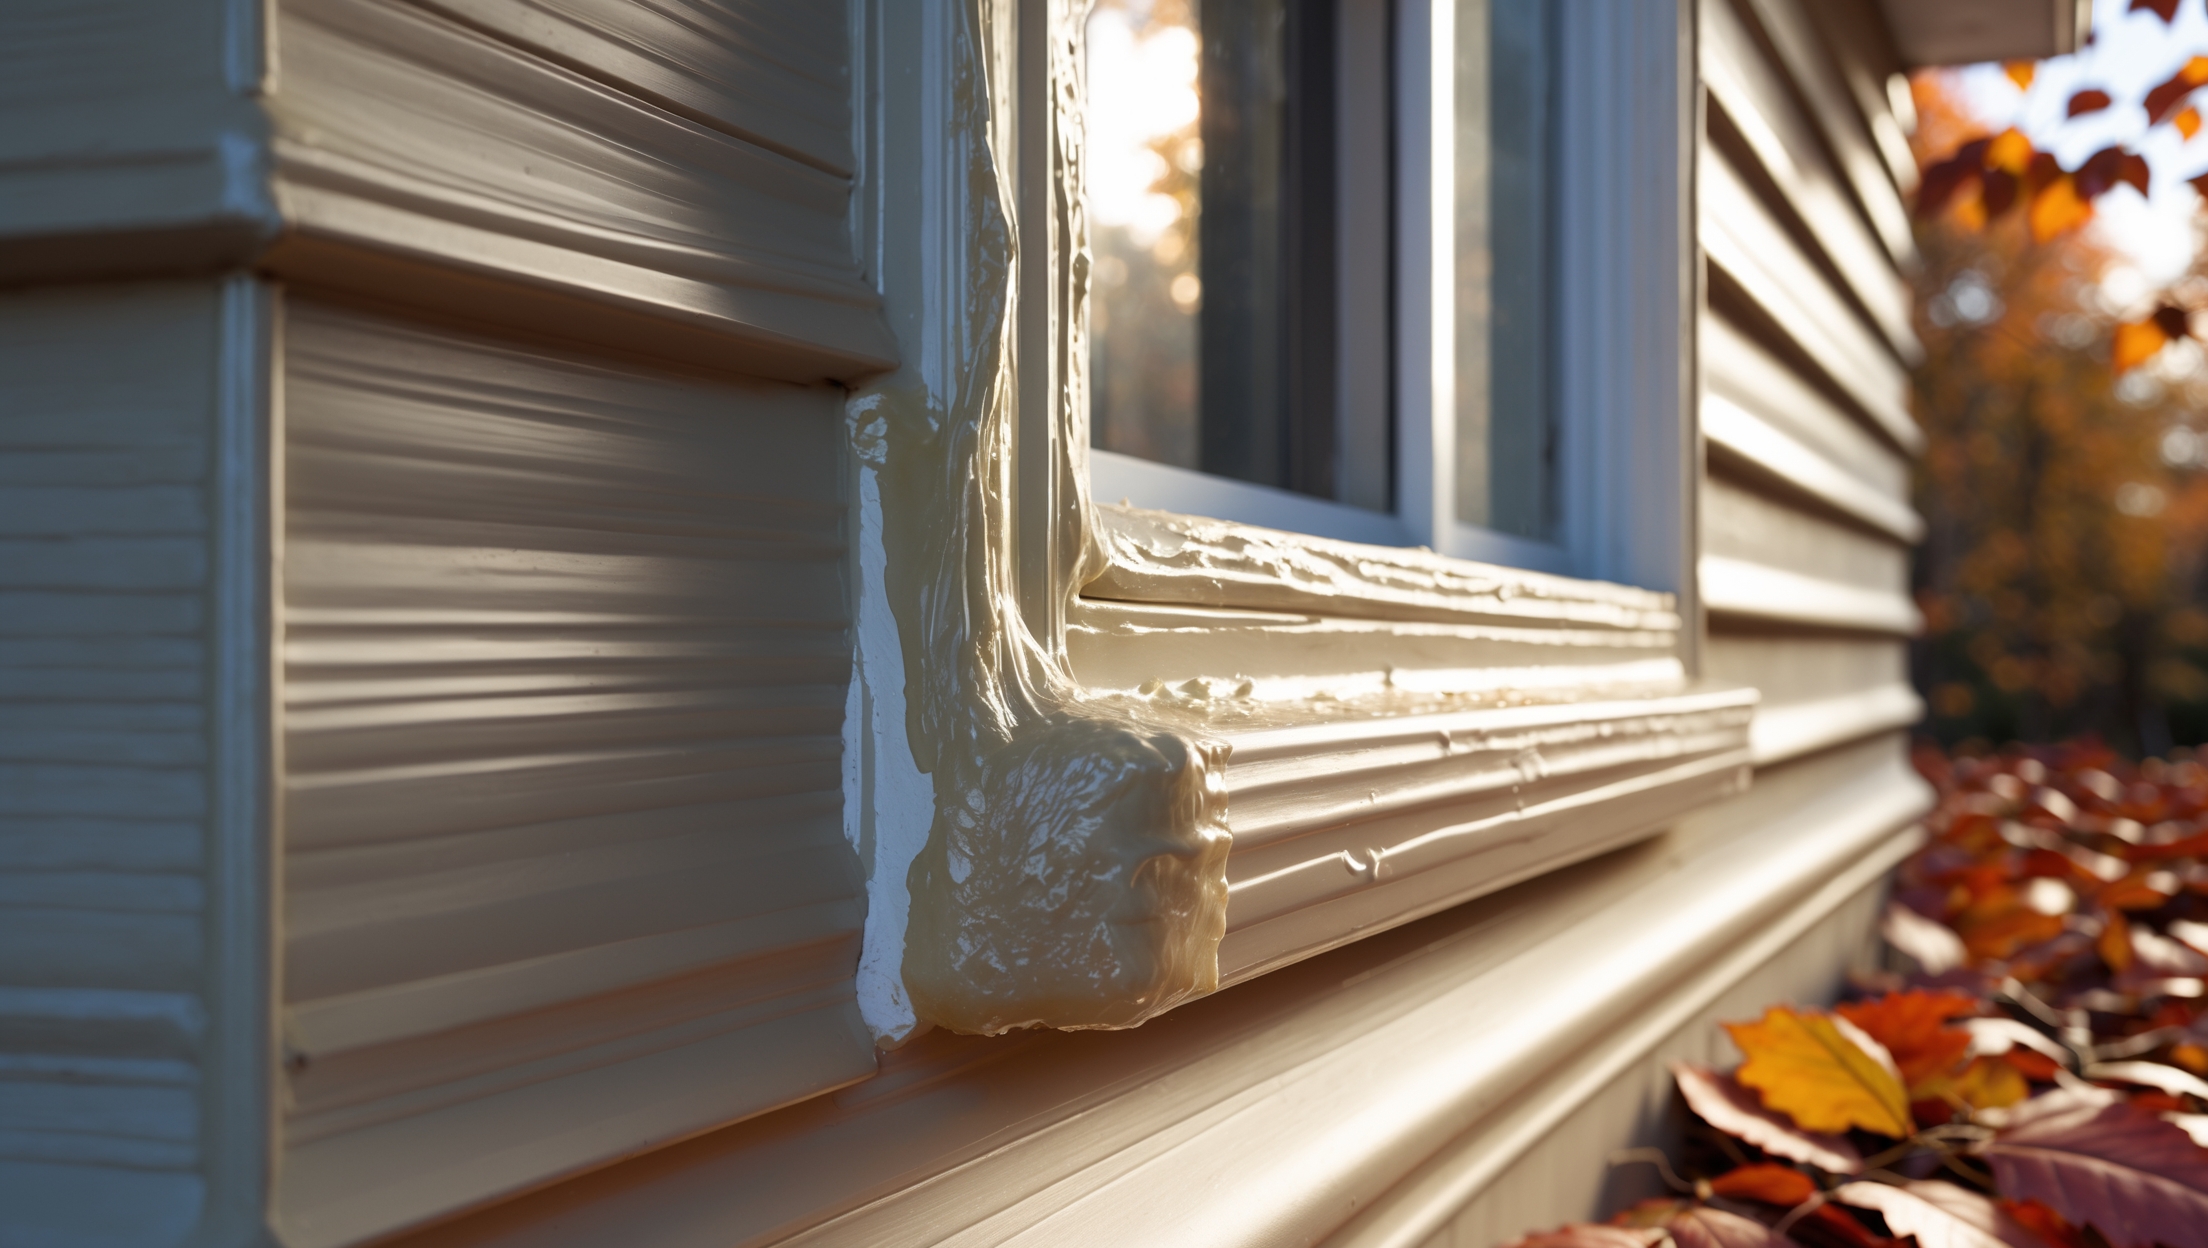
Caulking is a flexible material used to seal joints, seams, and gaps in a building’s exterior envelope. It prevents water, air, dust, and insects from entering through small openings where different materials meet—such as window frames and siding, or door jambs and brickwork. Modern caulks are formulated for specific uses and climates, providing a durable, weather-resistant barrier.
Critical Areas for Caulking
- Window and door frames
- Siding joints and trim
- Gaps between masonry and wood or metal
- Penetrations for pipes, vents, and cables
- Expansion joints
- Where different exterior materials meet
Why Seasonal Checks Are Essential
Caulking degrades over time due to temperature swings, moisture, and UV rays. Seasonal inspection—especially in spring and fall—ensures issues are caught before winter freezes or summer storms cause damage. Proactive maintenance keeps your home’s envelope tight, improving comfort and energy efficiency while protecting against rot, mold, and pests.
Tools and Materials: What You’ll Need
- Caulk Gun: Manual or dripless models for precision application.
- Exterior Caulk: Choose high-quality, paintable exterior-grade caulk (silicone, polyurethane, or advanced polymer blends for flexibility and weather resistance).
- Utility Knife or Scraper: For removing old, cracked caulk.
- Caulk Smoother or Finger: For finishing the bead.
- Painter’s Tape: To mask off areas for clean lines.
- Rags and Water (or Mineral Spirits): For cleanup, depending on caulk type.
- Ladder: For hard-to-reach areas—ensure it’s stable and appropriate for your home’s exterior.
- Gloves and Safety Glasses: To protect your hands and eyes from debris and chemicals.
- Wire Brush or Compressed Air: For cleaning out joints before caulking.
Step-by-Step Seasonal Exterior Caulking Checklist
1. Inspect All Exterior Joints Thoroughly
- Walk around your home, checking all windows, doors, siding seams, trim, and penetrations.
- Look for cracked, missing, or peeling caulk, as well as visible gaps or holes.
- Pay special attention to south-facing exposures, which often deteriorate faster due to sun exposure.
- Use a flashlight and a small mirror to inspect under sills and ledges.
- Mark areas needing attention with painter’s tape or a marker.
2. Remove Damaged or Failing Caulk
- Use a utility knife, scraper, or specialized caulk removal tool to carefully cut and pull away old caulk.
- Take care not to damage the underlying surfaces.
- Brush away debris and clean the joint with a wire brush, compressed air, or a damp rag.
- Allow surfaces to dry completely; caulk adheres best to clean, dry surfaces.
3. Select the Right Caulk
Exterior caulks must withstand temperature fluctuations, precipitation, and UV rays. Choose product types based on the job:
- Silicone Caulk: Superior flexibility and weather resistance; ideal for non-paintable applications.
- Polyurethane Caulk: Highly durable, paintable, and adheres to many surfaces.
- Advanced Polymer or Acrylic Latex Caulk: Easy to apply, paintable, and suitable for most trim and siding but less flexible than silicone or polyurethane.
Check labels for temperature application ranges and compatibility with your surfaces.
4. Mask and Prepare the Area
- Apply painter’s tape on both sides of the joint for crisp, professional lines.
- Insert backer rod (foam rope) into large gaps over 1/4 inch deep to provide a firm base for caulk.
- Lay drop cloths to protect landscaping and walkways from drips.
5. Apply Caulk Properly
- Cut the caulk tube tip at a 45-degree angle to match the joint width (usually 1/8 to 1/4 inch).
- Load the tube into your caulk gun and test flow.
- Apply a steady, continuous bead of caulk, moving the gun along the joint at a constant speed.
- Use a caulk smoother, dampened finger, or specialty tool to press and shape the bead, ensuring full contact and a neat finish.
- Remove painter’s tape before the caulk skins over for clean edges.
6. Allow Proper Curing Time
- Check manufacturer’s instructions for curing times. Most caulks require 24 hours to fully cure before painting or exposing to rain.
- Avoid disturbing the bead until fully set to ensure long-term adhesion.
7. Touch Up and Clean Up
- Inspect your work for gaps, missed spots, or messy lines. Reapply as needed.
- Wipe away excess caulk with a damp rag or mineral spirits, depending on the product used.
- Store leftover caulk tubes with the nozzle sealed to prevent drying out.
- Clean tools promptly for future use.
Seasonal Maintenance Schedule
- Spring: Inspect and repair caulking after winter freeze/thaw cycles. Look for shrinkage, cracks, or detachment.
- Fall: Re-check all seals before winter. Pay extra attention to weather-stripping and joints exposed to rain and snow.
- After Severe Weather: Inspect for storm damage and water infiltration.
Consistent attention each season keeps your home sealed and extends the lifespan of your exterior finishes.
Common Exterior Caulking Issues and Troubleshooting
- Cracking or Shrinking: Often caused by using the wrong caulk for the material or climate. Use flexible, high-quality exterior caulk for best results.
- Poor Adhesion: Surfaces may have been dirty, damp, or incompatible. Always clean thoroughly and ensure dryness before application.
- Mold or Mildew Growth: Occurs in damp, shaded areas or with non-mildew-resistant caulk. Use products with added mildewcide and improve ventilation.
- Peeling or Bubbling: Indicates moisture trapped beneath caulk or improper curing. Remove and reapply as needed.
Tips for a Long-Lasting Caulk Job
- Apply caulk on dry days with mild temperatures (50°F–80°F) for optimal adhesion.
- Don’t caulk over old, brittle, or mildewed caulk—always remove it first.
- Match caulk color to your siding or trim for a seamless look. Many caulks are available in a range of hues.
- Use backer rod in wide or deep joints to reduce caulk waste and improve flexibility.
- Store caulk in a cool, dry place and always check expiration dates before use.
Frequently Asked Questions About Exterior Caulking
How often should I re-caulk my home’s exterior?
Most exterior caulks last 5–10 years, but annual inspections are vital. Re-caulk areas showing wear, cracks, or separation right away to prevent water intrusion.
Can I caulk over old caulk?
It’s best to remove old, failing caulk completely. New caulk won’t adhere well to degraded or contaminated material, leading to premature failure.
Is there a difference between interior and exterior caulk?
Yes—exterior caulks are formulated for greater flexibility, weather resistance, and UV stability. Never use interior caulk outdoors.
What’s the best weather for exterior caulking?
Dry weather with temperatures between 50°F and 80°F is ideal. Avoid rainy, humid, or very cold/hot conditions, as they can affect curing and adhesion.
Conclusion: Make Exterior Caulking a Seasonal Priority
Regularly inspecting and maintaining your home’s exterior caulking is one of the most effective ways to prevent leaks, drafts, and costly repairs. By following the comprehensive checklist outlined above, you can easily identify vulnerable areas, remove old or damaged caulk, and apply a durable, weatherproof sealant. The result? Lower energy bills, enhanced comfort, and long-term protection against water damage, rot, and pests. While the job itself is straightforward, attention to detail—like choosing the right product for your climate and surfaces, applying caulk with care, and scheduling seasonal checks—makes all the difference in achieving lasting results. Don’t wait for visible leaks or damage to act; include exterior caulking in your spring and fall home maintenance routines for peace of mind year-round. With just a few hours of effort and minimal investment, you can safeguard your home’s value, comfort, and structural integrity for years to come.
After sealing gaps around pipes and vents, how often should those specific spots be re-checked compared to more sheltered spots like under siding trim?
Gaps around pipes and vents are more exposed to weather, so it’s best to check them twice a year, especially in spring and fall. Sheltered spots like under siding trim usually need inspection just once a year, as they’re less likely to degrade as quickly.
Could you clarify how to tell if old caulking around windows and doors really needs to be removed before adding new, or can I just apply a fresh layer over the existing caulk each season?
If the old caulk is cracked, peeling, missing, or pulling away from the surface, it should be fully removed before applying new caulk. If it’s still firmly attached, smooth, and intact, you can usually apply a fresh layer over it. Proper adhesion depends on a clean, stable base.
If I find some gaps around exterior pipes but don’t have time to caulk everything in one day, is it better to caulk just those spots, or should I wait until I can do all areas at once?
It’s best to caulk the gaps around exterior pipes as soon as you find them, especially if they could let in water or drafts. You can always come back and finish the rest later. Addressing urgent spots right away helps prevent potential damage.
I noticed the article talks about caulk types for different climates. How do you know which caulk is best if you get both really hot summers and freezing winters?
For areas with both hot summers and freezing winters, look for caulks labeled as ‘all-weather,’ ‘elastomeric,’ or ‘silicone.’ These types stay flexible and adhere well despite temperature swings. Always check the product label for its recommended temperature range and durability to ensure year-round protection.
How can I tell whether a gap is too big for caulk alone and might need a different repair method, especially around siding joints?
If the gap around your siding joints is wider than about 1/4 inch, caulk alone may not be enough. For larger gaps, use a backer rod (foam rope) to fill most of the space before caulking, or consider trim or siding repair if the opening is very wide or irregular.
If I’m a first-time DIYer, what are some common mistakes to avoid when applying new caulk to windows and doors, especially to make sure the seal lasts through the winter?
When caulking as a first-time DIYer, avoid applying caulk over dirt or old caulk—clean and remove old material first. Don’t skip using painter’s tape for clean lines. Apply caulk in steady, continuous beads and smooth it right away. Make sure the area is dry and wait for the recommended curing time before exposing it to moisture.
When inspecting caulking around window and door frames, how can I tell if the existing caulk actually needs to be replaced or if it’s still okay to leave it for another season?
Look for signs like cracks, gaps, peeling, or sections where the caulk has pulled away from the surface. If you can press it and it feels brittle or comes off easily, it’s time to replace it. If the caulk is still flexible, continuous, and firmly attached, you can usually leave it for another season.
How do I know if the old caulking around my windows and doors is still doing its job, or if it actually needs to be replaced during a seasonal check?
To check if your old caulking is still effective, look for cracks, gaps, or areas where it’s peeling or pulling away from the surface. If you feel drafts, notice water seeping in, or see visible deterioration, it’s time to replace the caulking during your seasonal check.
How do you know if the caulk around your windows or doors really needs to be replaced, or if it’s still okay for another season?
To check if your caulk needs replacing, look for signs like cracks, gaps, peeling, or if it feels dry and crumbly when you press it gently. If caulk is still smooth, flexible, and well-adhered without gaps, it should be fine for another season.
When checking caulking around siding joints and window frames, do you recommend removing all the old caulk every season or just addressing visibly damaged spots?
You only need to remove and replace caulk in areas where it’s visibly damaged, cracked, or missing. If the existing caulk is still adhering well and looks intact, you can leave it in place and just touch up the problem spots.
How much time should I budget to check and recaulk all the critical exterior areas you listed for a small storefront? I want to make sure I plan for this properly in my maintenance schedule.
For a small storefront, you should budget about 4 to 6 hours to thoroughly inspect and recaulk all critical exterior areas. This includes time for cleaning old caulk, applying new caulk, and allowing for any touch-ups. If you’re less experienced, consider allocating a full day.
The checklist mentions using specific tools and materials for caulking—can you elaborate on which tools are essential for a beginner who wants to tackle this as a DIY project?
For a beginner, the essential tools for exterior caulking are a quality caulking gun, a utility knife for removing old caulk, a putty knife for smoothing, and painter’s tape for clean lines. You’ll also need the right exterior-grade caulk and some rags for cleanup. These basics will help make your DIY project easier and more effective.
The article mentions different types of caulk for specific climates. How can I determine which type works best for my region if I experience both hot summers and freezing winters?
For regions with both hot summers and freezing winters, look for a high-quality, all-weather silicone or polyurethane caulk. These types remain flexible and provide strong adhesion despite temperature swings. Check the product label for temperature tolerance and suitability for exterior use to ensure long-lasting protection.
How can you tell if the caulking around your windows and doors actually needs to be replaced, or if a touch-up will be enough?
Check for cracks, gaps, or areas where the caulk is pulling away from the surface. If you see small cracks or minor peeling, a touch-up should do. If the caulk is missing, crumbling, or letting in water or drafts, it’s best to replace it entirely.
Do you recommend any particular type or brand of exterior caulk for people who live in areas with really harsh winters and lots of moisture? There are so many options at the hardware store, it’s a bit overwhelming.
For harsh winters and high moisture, look for exterior caulks labeled as 100% silicone or polyurethane, as they hold up well in extreme conditions. Brands like GE, DAP, and Sika have durable options. Be sure to choose products rated for flexibility and weather resistance to prevent cracking and leaks.
When inspecting old caulking around windows, what are some clear signs that it’s failing and should be replaced rather than just touched up?
Look for visible cracks, gaps, peeling, or areas where the caulking is pulling away from the window frame. If you notice sections that are brittle, missing, or allow moisture to seep in, it’s best to fully remove and replace the caulking instead of just touching up.
If I find gaps but I’m tight on time, is it better to do a quick patch or wait until I can remove and reapply all the old caulking properly?
If you’re short on time, a quick patch is better than leaving gaps exposed, as it helps prevent immediate leaks and drafts. When you have more time, remove the old caulk and reapply properly for a longer-lasting seal.
When inspecting caulking in the spring and fall, are there any signs besides visible cracks that might indicate the caulk has failed or needs to be replaced?
Absolutely. Besides visible cracks, look for caulk that is peeling, pulling away from surfaces, feels brittle or crumbly, or has gaps forming around it. Discoloration, mold, or moisture stains near the caulked area can also indicate it’s no longer sealing properly and should be replaced.
For older homes with mixed siding and brickwork, are there specific types of caulks you recommend to ensure a long-lasting seal where different materials meet?
For areas where siding meets brick, look for a high-quality polyurethane or silicone-based caulk. These types are flexible, durable, and adhere well to both wood and masonry. Make sure the caulk is labeled for exterior use and is paintable if you plan to match your home’s color.
You mention that caulks are formulated for specific climates. Is there a particular type you recommend for regions with both harsh winters and hot summers to ensure the longest-lasting seal?
For areas with extreme temperature swings, look for high-quality, paintable silicone or polyurethane caulks labeled as ‘all-weather’ or ‘flexible.’ These are designed to handle both freezing winters and hot summers without cracking or shrinking, giving you a long-lasting seal.
How do I tell if old caulking just needs a touch-up versus being completely removed and replaced? Is there a quick way to test its effectiveness?
Press gently along the caulked seam—if it feels brittle, cracked, or peels away, it should be fully removed and replaced. If it’s still flexible and well-adhered, a touch-up may be enough. You can also check for drafts or visible gaps as a quick effectiveness test.
After doing a seasonal caulking check, how soon should I repaint over fresh caulk if I want the best adhesion and weather protection? Does it depend on the type of caulk I use?
Yes, the drying time before painting does depend on the type of caulk. For latex or acrylic caulk, you typically need to wait about 2 hours, but some fast-dry formulas can be painted in 30 minutes. Silicone caulk may require 24 hours or more and often needs special paintable versions. Always check the manufacturer’s instructions on the caulk packaging for the best results.
As a small business owner trying to keep maintenance costs down, what tools or supplies from your checklist would you consider essential to get the job done without overspending?
To keep costs down, focus on the essentials: a caulking gun, quality exterior caulk (preferably silicone or polyurethane), a utility knife for removing old caulk, rags for cleanup, and a putty knife for smoothing. These basics are enough for most exterior caulking jobs without extra expenses.
If I re-caulk everything in the fall, should I still do another inspection in the spring, or does good-quality caulk usually last a full year or more before needing attention?
Even if you use high-quality caulk in the fall, it’s still wise to do a quick inspection each spring. Weather can cause unexpected wear or gaps, and early detection helps prevent leaks or drafts. Usually, good caulk lasts a year or more, but regular checks ensure your home stays protected.
When checking gaps around pipes and vents, is there a specific tool that makes applying caulk easier for tight spots, or is it just done by hand?
For tight spots around pipes and vents, a caulking gun with a narrow nozzle works well. You can also use a caulk finishing tool or even a plastic spoon to smooth the caulk in hard-to-reach areas. For very tight spaces, some people use their finger or a small spatula to press and shape the caulk.
You mention that caulk formulas are made for specific climates. Is there a particular type you recommend for homes in areas with hot, humid summers and cold winters like we have in the Midwest?
For Midwest climates with both hot, humid summers and cold winters, look for high-quality silicone or polyurethane caulk labeled as suitable for exterior use and designed for wide temperature ranges. These formulas are flexible, durable, and resist cracking and shrinking in extreme weather. Make sure the product mentions UV resistance and weatherproofing.
Can you recommend the best type of caulk for homes in areas with extreme temperature swings? I want to make sure the barrier lasts through our harsh winters and hot summers.
For areas with extreme temperature swings, a high-quality polyurethane or silicone caulk is your best bet. Both types remain flexible and adhere well in harsh winter and summer conditions, preventing cracks and leaks. Just be sure to choose an exterior-grade formula for maximum durability.
If I find small gaps that haven’t caused any leaks yet, is it better to repair them immediately or can they wait until the next season?
It’s best to repair small gaps as soon as you notice them, even if there aren’t any leaks yet. Early repairs prevent moisture, drafts, and pests from getting in, and help you avoid more costly damage later on.
How do you choose between silicone, acrylic, or hybrid caulks for different exterior areas mentioned, like between masonry and wood versus siding joints?
For joints between masonry and wood, silicone or hybrid caulks are best because they handle movement and resist weathering. For siding joints, acrylic latex caulks work well if they’re paintable and have some flexibility, but hybrids also offer added durability. Match the caulk to the materials and exposure to weather for the best results.
You mentioned caulking around penetrations for pipes, vents, and cables. Are there specific caulk types or application tips you recommend for these areas, since they’re often exposed to more movement and weather?
For areas around pipes, vents, and cables, use a high-quality exterior silicone or polyurethane caulk, as these types stay flexible and withstand movement and weather. Make sure surfaces are clean and dry, apply caulk in a continuous bead, and smooth it with a tool or your finger for a tight seal.
When inspecting my window frames for gaps, how can I tell if old caulk needs to be completely removed or if I can just apply new caulk over it?
Check the old caulk for signs of cracking, peeling, or separating from the surface. If it’s loose or deteriorating, remove it completely before applying new caulk. If the existing caulk is still well-adhered and intact, you can usually apply a fresh layer on top to seal minor gaps.
What’s the best way to spot trouble areas around pipe or cable penetrations? I’m worried I might miss small gaps, especially where different materials meet.
To spot trouble areas around pipe or cable penetrations, inspect closely where pipes enter siding or foundations, especially where materials like metal meet wood or masonry. Use a flashlight to highlight shadows in gaps, and gently run your finger around the seams to feel for uneven spots or air drafts. Look for signs of old, cracked, or missing caulk in those areas.
The article mentions selecting the right type of caulk for specific climates. How do I know which caulk formula is best for regions with frequent freeze-thaw cycles?
For areas with frequent freeze-thaw cycles, look for caulk labeled as silicone or polyurethane, as these formulas remain flexible in extreme temperatures and resist cracking. Avoid latex caulks since they may not handle temperature fluctuations as well. Check the product label to ensure it’s rated for exterior use and wide temperature ranges.
If I want to make this a DIY project, about how much time should I budget for caulking around all my windows and doors on a small house, and are there affordable tools you’d recommend for a first-timer?
For a small house, plan for about 4 to 6 hours to caulk around all windows and doors, depending on your pace and the number of openings. Affordable tools for beginners include a quality caulking gun, utility knife, painter’s tape, and a smoothing tool or even just a damp rag to tidy up the lines.
If I find gaps around cables or vents that have old, hardened caulk, do I need to remove it completely before applying new caulk, or can I just fill over it in a pinch?
It’s best to remove old, hardened caulk before applying new caulk, especially if it’s cracked or pulling away. This helps the new caulk adhere properly and ensures a better seal. If you just fill over old caulk, it may not last or protect as well.
You mention caulking degrades due to UV rays and temperature changes—are there specific types of caulk that hold up better in extreme climates, or should the product be replaced more frequently in those areas?
In extreme climates, look for caulks labeled as UV-resistant and designed for exterior use, such as high-quality silicone or polyurethane caulks. These types generally last longer under harsh conditions. However, even with better products, it’s wise to check and possibly refresh caulking annually in such environments.
How long does it usually take to do a thorough caulking inspection and touch-up on a typical single-family home? I want to plan a weekend project but I’m not sure how much time to set aside.
For a typical single-family home, a thorough caulking inspection and touch-up can take anywhere from 3 to 6 hours. This depends on the home’s size, the number of windows and doors, and whether you find areas that need more involved repairs. Most people can comfortably finish it in a day.
How do I know which type of exterior caulk is best for the different surfaces around my home, like brick versus wood? The article mentioned that modern caulks are formulated for specific uses, so I want to make sure I’m picking the right one.
To choose the right exterior caulk, look for labels specifying the surface: use polyurethane or silicone caulk for brick and masonry, as they handle movement and weather well. For wood, acrylic latex or paintable silicone blends are best. Always check the product label for recommended applications before buying.
You mention different types of caulk for specific climates and uses—how do I choose the best type for areas where wood meets brick, especially with big temperature swings in my region?
For joints where wood meets brick, especially with wide temperature swings, use a high-quality, paintable polyurethane or silicone caulk. These types remain flexible and adhere well to both surfaces, handling expansion and contraction without cracking or losing their seal.
If I find small gaps around my window frames, is it safe to just add new caulk over the old stuff, or should I remove everything first before reapplying?
It’s best to remove the old caulk before applying new caulk, especially if the existing caulk is cracked or peeling. This ensures a better seal and helps the new caulk adhere properly, which will provide better protection against leaks and drafts.
You mention using specific types of caulk for different areas and climates. Could you elaborate on what kind of caulk works best for homes in regions with harsh winters versus milder climates?
For harsh winter climates, a high-quality silicone or polyurethane caulk is best—they stay flexible and resist cracking in freezing temperatures. In milder climates, acrylic latex caulk is often sufficient, especially for exterior joints that aren’t exposed to extreme weather. Always check the label for weather resistance and application temperature ranges.
If I notice small gaps around siding joints but can’t address them right away, is there a temporary fix to keep out moisture until I have time to recaulk properly?
You can temporarily seal small gaps with weatherproof tape or plastic sheeting secured over the area. Make sure the surface is dry before applying the tape. This should help keep out moisture until you can properly recaulk the joints.
For someone who’s never done caulking before, how can I tell if the existing caulk around my windows or siding actually needs to be replaced or if it’s still doing its job?
Check the caulk for cracks, gaps, peeling, or areas where it has pulled away from surfaces. If it feels brittle, crumbly, or you notice drafts or water stains near windows or siding, it’s likely time to replace it. Good caulk should look smooth, intact, and be firmly bonded to both surfaces.
When inspecting exterior caulking in the spring and fall, how can I tell if the old caulk just needs spot repairs versus pulling it all out and starting fresh?
Look for cracks, gaps, or areas where the caulk is pulling away or missing. If damage is limited to small spots, spot repairs are fine. But if the caulk is brittle, crumbling, or failing along most of its length, it’s best to remove and replace it entirely for lasting protection.
When inspecting gaps around siding and trim, what should I do if I find old caulk that’s moldy or crumbly? Is there an easy way to remove it without damaging the surfaces?
If you find moldy or crumbly caulk, carefully remove it using a caulk removal tool or utility knife. Work gently to avoid scratching siding or trim. After removal, clean the area with a mild detergent and let it dry before applying fresh caulk for the best seal.
Do you have any tips for telling whether old caulk around windows is still performing well, or if it should all be replaced even if there are no visible cracks yet?
To check if old caulk is still effective, press gently on it—if it feels hard, brittle, or starts to pull away from the surface, it should be replaced. Also, look for signs of moisture or drafts near the window, even if there are no visible cracks, as these suggest the seal may be failing.
About how much time should I set aside to check and refresh exterior caulking on an average-sized house? I’m trying to fit this into a busy fall weekend.
For an average-sized house, you should set aside about 3 to 5 hours to inspect and refresh exterior caulking. This allows time to check all critical areas, clean surfaces, remove old caulk, and apply new caulk where needed. If you’re thorough but efficient, it’s very manageable in a single weekend afternoon.
If I skip a season or forget to check certain areas, what’s the most likely issue I’d run into first—energy loss, water leaks, or something else?
If you skip a season or miss some areas, the most common issue you’ll notice first is usually water leaks, especially after rain. Energy loss from drafts is also likely, but water intrusion can cause quicker and more visible problems like staining or damage to walls and trim.
You mention choosing the right caulk for specific uses and climates. For someone in a region with harsh winters and hot summers, is there a particular type or brand you recommend for exterior caulking?
For areas with both harsh winters and hot summers, a high-quality, paintable silicone or polyurethane caulk is ideal. These types remain flexible through temperature swings and resist cracking. Brands like GE, DAP, and Sashco offer reliable exterior caulks designed for extreme weather conditions.
How can I tell if old caulk is still doing its job, or if it definitely needs to be replaced during seasonal checks?
Check for cracks, gaps, or peeling in the caulk. If it feels brittle, crumbly, or is pulling away from surfaces, it’s time to replace it. Caulk should be flexible and firmly adhered. Water intrusion or drafts near the caulked area also indicate replacement is needed.
How much time does a typical seasonal exterior caulking inspection and touch-up take for an average-sized home? I want to plan it into my weekend schedule.
For an average-sized home, a seasonal exterior caulking inspection and touch-up usually takes about 2 to 4 hours. If you need to do more extensive repairs or re-caulk several areas, it could take a bit longer. It’s a good idea to set aside half a day so you don’t feel rushed.
For a first-time DIYer, about how long should I expect a full exterior caulking inspection and touch-up to take on an average-sized home? Trying to plan around my weekend schedule.
For a first-time DIYer, a full exterior caulking inspection and touch-up usually takes about 4 to 8 hours for an average-sized home. This depends on how thorough you are and the number of areas needing attention, so setting aside a full day should give you enough time to work comfortably.
You mention that caulking breaks down from UV rays and temperature changes. How can I tell if it’s time to replace caulking, or is there a general rule for how often I should check it?
You should inspect exterior caulking at least once a year, ideally in spring or fall. Signs that it needs replacing include cracking, peeling, gaps, or if it feels brittle when touched. If you notice any of these issues, it’s time to replace the caulking to keep your home protected.
If I find gaps around my exterior vents and pipes in the fall, is it okay to caulk them right away, or should I wait for certain weather conditions?
You can caulk gaps around exterior vents and pipes in the fall, but for the best results, make sure the weather is dry and the temperature is between 40°F and 80°F. Avoid caulking right before it rains or when surfaces are damp, so the caulk adheres properly.
For someone living in a region with harsh winters, is there a specific type of caulk that holds up better against freezing temperatures and snow, or will any outdoor caulk work as long as it’s labeled weather-resistant?
For harsh winter conditions, it’s best to use a high-quality silicone or polyurethane caulk specifically rated for extreme temperatures. While general weather-resistant caulk helps, these types remain flexible and adhere well in freezing temperatures and resist cracking from snow and ice exposure.
Is there a certain type of caulk you recommend for areas that get a lot of sunlight, since UV rays are mentioned as a cause of caulking breakdown?
For areas exposed to a lot of sunlight, a high-quality exterior silicone or polyurethane caulk is best. These types are highly resistant to UV rays and weathering, so they last much longer without cracking or shrinking compared to standard latex caulks.
The article mentions choosing the right caulk for different materials and climates. Could you give a few examples of which types of caulk work best for wood versus masonry or metal surfaces?
For wood surfaces, acrylic latex caulk or paintable silicone is a good choice because it adheres well and can be painted over. For masonry, like brick or stone, look for a specialized masonry silicone or polyurethane caulk that resists weathering. For metal, a pure silicone caulk works best as it remains flexible and bonds well to smooth surfaces.
The checklist covers a lot of exterior trouble spots, but how do I know when professional help is needed versus a DIY fix, especially if I spot mildew or signs of decay while inspecting?
If you notice mildew or decay, it often means there’s moisture getting in. Minor mildew can usually be cleaned and recaulked yourself, but if you see wood rot, soft spots, or extensive damage, it’s best to call a professional to assess and repair before caulking.
The article mentions using specific types of caulk for different climates. How do I select the best caulk for a wet, coastal region, and are there ingredients I should avoid for exterior applications?
For wet, coastal regions, choose a high-quality, exterior-grade silicone or polyurethane caulk, as they resist moisture and UV damage. Avoid latex or acrylic caulks for exteriors in these climates, since they may break down or shrink. Look for formulas labeled specifically for exterior or marine use for the best durability.
You mention different types of caulk for specific uses and climates. Is there a particular type you’d recommend for homes in places that get really cold winters and hot summers?
For regions with both very cold winters and hot summers, a high-quality, paintable silicone or polyurethane caulk is ideal. These types remain flexible and adhere well despite temperature swings, helping prevent cracks and leaks throughout the year. Make sure it’s labeled for exterior, all-weather use.
When inspecting existing caulking between different materials, like brick and wood, how can I tell if it really needs to be replaced or just touched up? Sometimes it just looks a bit weathered but isn’t cracking.
If the caulking looks weathered but isn’t cracked, separating, or pulling away from either surface, you likely only need to touch it up with a fresh layer. Replace caulk if you see gaps, brittleness, or if it’s losing adhesion. Always check for softness or crumbling too, which means it’s time for a full replacement.
When you mention that modern caulks are formulated for specific climates, do you have any recommendations for types that perform best in areas with really cold winters and lots of freeze-thaw cycles?
For regions with cold winters and frequent freeze-thaw cycles, look for high-quality polyurethane or silicone-based caulks labeled as ‘flexible’ or ‘weatherproof.’ These types maintain flexibility and strong adhesion in extreme temperatures, which helps prevent cracking or shrinking during temperature changes.
You mentioned that caulking is formulated for specific climates—are there particular types you recommend for regions with harsh winters, like the Midwest? I want to make sure my home’s seals hold up through freezing temps.
For regions with harsh winters like the Midwest, it’s best to use silicone or polyurethane caulk rated for exterior use and flexibility in freezing temperatures. These types stay flexible and resist cracking, even with temperature swings and moisture. Look for products labeled for extreme weather or cold-weather application.
You mention that modern caulks are formulated for specific uses and climates. How do I know which type is best for areas exposed to a lot of direct sunlight and frequent rain?
For areas with lots of direct sunlight and frequent rain, choose a high-quality silicone or polyurethane caulk labeled as UV-resistant and exterior-grade. These types are designed to withstand weather extremes, resist cracking, and maintain flexibility. Always check the product label for weatherproof or all-weather suitability to ensure the best protection.
You mention that modern caulks are formulated for specific climates. How do I know which type to pick if I live in an area with both hot summers and freezing winters?
For areas with both hot summers and freezing winters, look for caulks labeled as “all-weather” or “weatherproof.” These are specifically designed to flex and seal in extreme temperature changes. Polyurethane and high-quality silicone caulks are good choices, as they remain flexible and durable throughout seasonal shifts.
When checking caulking around windows and door frames each season, how can I tell if it’s just surface cracking or if the seal is actually letting water in?
Surface cracks in caulking are usually shallow and don’t go all the way through. If you gently press or probe the caulk and see gaps, movement, or feel a draft, it’s likely the seal is compromised. Also, look for signs of moisture or staining around the area, which suggests water intrusion.
If I miss a crack around a vent or pipe during my inspection, could that lead to major problems, or are those smaller gaps less of a concern?
Even small cracks around vents or pipes can let in moisture and drafts, which may cause bigger issues like water damage or higher energy bills over time. It’s important to seal all gaps, no matter the size, to fully protect your home.
When checking caulking around windows and doors, how can I tell if the old caulk just needs a touch-up or if it should be fully removed and replaced?
If the caulk is cracked, peeling, or pulling away from the surface, it should be fully removed and replaced. If it’s still flexible and well-adhered but has minor gaps, a touch-up may be enough. Press gently on the caulk—if it crumbles or separates, it’s time for replacement.
I noticed you mention that modern caulks are formulated for specific uses and climates. How can I tell which type is best for my region’s harsh winters without having to consult a contractor every season?
To choose the right caulk for harsh winters, check the product label for temperature ranges and weather resistance, like ‘cold weather,’ ‘freeze/thaw resistant,’ or ‘all-weather.’ Urethane and silicone caulks generally perform best in extreme cold. Store staff can also help if you share your climate concerns.
How do I tell if old caulking around windows just needs patching or if I should remove and replace all of it as part of my seasonal check?
Inspect the caulking for cracks, gaps, or areas where it’s peeling or pulling away from the surface. If most of the caulk is still well-adhered and only a few small areas are damaged, patching those spots should be fine. If the caulk is brittle, crumbling, or loose in multiple sections, it’s best to remove and replace it entirely.
The article mentions different caulk formulas for various climates. Could you give examples of what type of caulk would be best for areas with lots of rain versus really hot summers?
For areas with lots of rain, a silicone or polyurethane caulk is best since they are waterproof and flexible. In regions with really hot summers, look for high-temperature silicone caulk, which can withstand heat and sunlight without cracking or losing adhesion.
How do I know if old caulking just needs a touch-up versus being completely removed and replaced, especially around windows and doors?
Check the condition of the caulking: if it’s cracked, peeling, missing in spots, or pulling away from the surface, it’s best to remove and replace it. If it’s mostly intact with only small gaps, a touch-up or re-caulking over the top may work. Always clean the area before adding new caulk.
Could you give an idea of how much time a typical DIY exterior caulking project around windows and doors would take for someone new to this process?
For someone new to exterior caulking, expect to spend about 2 to 4 hours caulking around all the windows and doors of a typical single-story home. This includes time for preparation, applying the caulk, smoothing it, and clean-up. Larger homes or more openings may take longer.
If I discover old, cracking caulk around my door frames during the fall, should I remove all of it before applying new caulk, or can I just patch over the problem areas?
It’s best to remove all old, cracking caulk before applying new caulk. This ensures a proper seal and helps the new caulk adhere better, providing better protection against leaks and drafts. Patching over damaged caulk can lead to further issues over time.
You mentioned different caulks are formulated for specific uses and climates—could you elaborate on how to choose the right type if my home is in a region with large temperature swings between seasons?
For regions with big temperature swings, look for caulks labeled as ‘flexible’ or ‘elastomeric.’ These are designed to expand and contract without cracking. Silicone and high-quality polyurethane caulks work well in extreme climates because they maintain their seal during freeze-thaw cycles and resist UV damage.
Once I apply new caulk, how often should I expect to redo it, and are there signs I should watch out for between seasonal checks?
After applying new exterior caulk, you typically need to redo it every 3 to 5 years. Between seasonal checks, look for cracks, peeling, gaps, or discoloration in the caulk. If you notice drafts or moisture near sealed areas, those are signs the caulk may need attention sooner.
If I find gaps around some expansion joints during my seasonal inspection but it’s already late fall, is it still okay to caulk, or should I wait until spring for better adhesion?
You can still caulk in late fall as long as the temperature is above the minimum recommended by your caulk manufacturer, usually around 40°F (4°C). Make sure surfaces are dry and clean before applying for best adhesion. Sealing now helps prevent winter water intrusion.
You mention that there are different types of caulk for specific climates—can you recommend one that holds up best in areas with both freezing winters and hot, humid summers?
For regions with both freezing winters and hot, humid summers, a high-quality polyurethane caulk is a strong choice. It remains flexible, resists cracking, and handles temperature extremes well. Make sure the product is labeled for exterior use and suitable for wide thermal ranges.
Is there a big difference in performance between silicone and acrylic caulks for areas that get a lot of rain, like around door frames?
Silicone caulk outperforms acrylic in areas exposed to heavy rain, like around door frames. It’s more flexible, waterproof, and resists cracking or shrinking, making it ideal for long-lasting weather protection. Acrylic caulk is easier to clean and paint over, but it doesn’t hold up as well in wet conditions.
I noticed the article says modern caulks are made for specific climates. How do I know which type to pick if I live somewhere with really cold winters and hot summers?
In areas with both cold winters and hot summers, look for caulks labeled as ‘weatherproof,’ ‘all-weather,’ or ‘high movement.’ Polyurethane or silicone-based caulks usually perform well in extreme temperatures. Always check the product label for its temperature range and flexibility before choosing.
What kind of caulk would you recommend for sealing around exterior pipes and vents, especially in areas with a lot of temperature swings? I want to make sure I’m picking the right type for those specific spots.
For sealing around exterior pipes and vents, a high-quality exterior-grade silicone or polyurethane caulk works best. These types remain flexible, resist cracking, and handle temperature swings and moisture well. Make sure it’s labeled for outdoor use and compatible with the materials you’re sealing.
When inspecting siding joints and trim for seasonal caulking, what are some subtle warning signs of failure that people often overlook before leaks or drafts actually occur?
Some subtle warning signs of caulking failure at siding joints and trim include small cracks or hairline splits in the caulk, slight separation between caulk and surfaces, hardened or brittle texture, and discoloration or mildew forming along seams. These can easily be missed but often signal that the caulk is no longer sealing effectively and should be addressed before bigger issues develop.
You mentioned that modern caulks are formulated for specific uses and climates. How do I know which type is best for the Midwest, where it gets really cold and then hot again in summer?
In the Midwest, you’ll want a caulk labeled as suitable for wide temperature fluctuations—typically silicone or high-quality polyurethane. Look for products marked for exterior use, freeze-thaw resistance, and flexibility. Always check the label for temperature ratings and ensure it’s designed to handle both cold winters and hot summers.
When inspecting the caulking on my windows and doors, how can I tell if the old caulk really needs to be replaced, or if it will still last another season?
Check for cracks, gaps, or areas where the caulk is pulling away from the surface. If the caulk feels hard, brittle, or is flaking and missing in spots, it’s time to replace it. If it’s still flexible, smooth, and fully attached, it should last another season.
If I already have older caulking around my windows and doors, do I need to remove all of it before applying new caulk, or can I just touch up the visible cracks?
It’s best to remove any loose, cracked, or deteriorating old caulk before applying new caulk. If the existing caulk is still in good shape and firmly attached, you can clean the area and apply new caulk over any gaps or cracks. This ensures a better seal and a longer-lasting result.
I noticed you mention different caulk formulations for specific uses and climates. How do I know which type is best for really cold winters versus hot, humid summers? Are there labels I should look for?
For really cold winters, look for caulk labeled as suitable for low temperatures or ‘weatherproof’—silicone-based caulks perform well in cold. For hot, humid summers, pick caulks labeled ‘UV resistant’ or ‘flexible’ in heat, like polyurethane or advanced acrylic. Always check the label for recommended temperature ranges and weather resistance.
You mention seasonal inspection is especially important before winter and summer. About how long should a typical caulking job last before it needs to be redone, assuming average weather conditions?
Under average weather conditions, exterior caulking typically lasts about 5 to 10 years. However, regular seasonal inspections are important because factors like sun exposure, moisture, and temperature changes can cause it to degrade sooner in some spots. If you notice cracking, shrinking, or gaps during your checks, it’s a good idea to recaulk those areas.
For a first-time DIYer, how do I know if I should remove the old caulk completely before applying new exterior caulking, or can I just add a fresh layer on top?
If the old caulk is cracked, peeling, or coming loose, you should remove it completely before applying new caulk. Adding new caulk over unsound material won’t seal well. If the old caulk is still in good shape—firm and well-adhered—you can usually apply a new layer on top for added protection.
You mention that different caulks are made for certain climates. How do I know which type is best for areas with both hot summers and freezing winters?
For regions with both hot summers and freezing winters, look for a high-quality, paintable exterior caulk labeled as ‘siliconeized acrylic’ or ‘polyurethane.’ These types remain flexible in temperature extremes and resist cracking. Always check the product label for temperature range and weather resistance before purchasing.
You mention that modern caulks are formulated for specific uses and climates. How can I tell which type of exterior caulk is best for my region, especially if I live somewhere with both hot summers and harsh winters?
To choose the best exterior caulk for areas with both hot summers and harsh winters, look for products labeled as ‘weatherproof’ or ‘all-weather.’ Polyurethane and high-quality silicone caulks generally perform well in wide temperature ranges. Always check the label for temperature flexibility and UV resistance to ensure durability in your region.
You mention seasonal inspections, but how often should I actually replace exterior caulking if it still looks intact? Is there a typical lifespan to watch for before it starts to fail?
Even if exterior caulking looks intact, it’s wise to plan on replacing it every 5 to 10 years, depending on the product and exposure to weather. However, if you notice cracking, shrinking, or separation before then, it’s best to replace it sooner to maintain a proper seal.
When checking all those critical joints like window frames and siding, how do you tell the difference between caulk that just looks old and caulk that actually needs replacing? Are there particular signs beyond cracks to watch for?
Besides visible cracks, look for caulk that’s pulling away from surfaces, feels brittle or crumbly to the touch, or has gaps where it used to seal. Discoloration, mold, or areas that feel soft or sticky can also mean the caulk isn’t performing well and should be replaced.
What’s the best type of caulk to use if my house has both wood and brick siding in the same area? Should I use the same product for both materials or are there different recommendations?
For areas where wood and brick meet, a high-quality exterior-grade polyurethane or silicone caulk works best. These types adhere well to both surfaces and offer flexibility for movement. You can use the same product across the joint, just ensure it’s labeled for exterior use and compatible with both wood and masonry.
If I find cracks in the caulking after a harsh winter, is it okay to just patch those spots in spring, or should I plan to recaulk the whole section for a longer-lasting fix?
If the cracks are small and limited, patching just those spots in spring should work fine. However, if you notice widespread cracking or gaps, it’s best to recaulk the whole section to ensure a lasting, weatherproof seal.
You mention that different caulks are formulated for specific climates. How can I figure out which type is best for my area that gets really hot summers and cold winters?
For areas with both hot summers and cold winters, look for caulk labeled as ‘weather-resistant’ or ‘all-weather.’ Polyurethane or silicone caulks often perform well in temperature extremes because they stay flexible and adhere strongly, reducing the risk of cracking or shrinking.
The article mentions inspecting caulk around window and door frames as well as spots where different materials meet. Are there particular types of caulk you recommend for really humid or rainy climates?
For humid or rainy climates, using 100% silicone or a high-quality polyurethane caulk is best. These types resist moisture well and remain flexible, which helps prevent cracking and leaks around windows, doors, and material joints. Make sure to choose a caulk labeled for exterior use and specifically designed for weather resistance.
When choosing caulk for areas where different materials meet, like masonry and wood, is there a specific type you recommend that holds up best through harsh winters?
For spots where different materials like masonry and wood meet, a high-quality polyurethane or silicone caulk works best. These types remain flexible in extreme temperatures and can expand or contract with the materials, making them ideal for areas exposed to harsh winters.
When checking around pipe penetrations and vents, are there particular signs beyond visible gaps that might indicate a caulking issue I should watch for?
Yes, aside from visible gaps, look for cracked or peeling caulk, moisture stains or discoloration around the area, and any signs of mold or mildew. You might also notice drafts or feel cool air coming through on windy days. These can all suggest the caulking needs attention.
Can you recommend which type of caulk works best for sealing around older wood siding versus modern vinyl siding? I want to make sure I get the right product for my building materials.
For older wood siding, a high-quality paintable acrylic latex caulk is ideal since it offers flexibility and can be painted to match the wood. For modern vinyl siding, 100% silicone or a siliconized latex caulk works well because it adheres strongly and resists weathering. Always check the label to make sure the caulk is rated for exterior use.
When inspecting exterior caulking in the spring, how can I tell if the old caulk is just weathered or actually needs to be removed and replaced?
When checking exterior caulking in the spring, look for cracks, gaps, or areas where the caulk is pulling away from surfaces. If you see peeling, crumbling, or missing sections, it should be removed and replaced. Weathered but still flexible and well-adhered caulk may not need replacement just yet.
For a small business building with frequent foot traffic and deliveries, are there extra steps I should take when sealing around doors and vents?
For a busy small business, use a high-durability, commercial-grade caulk around doors and vents. Check seals more often for wear or cracking, especially at thresholds where carts or deliveries may hit. Consider installing protective door sweeps and kick plates to reduce physical damage and help maintain the integrity of your sealing work.
Can you recommend the best type of caulk to use for joints between different exterior materials, like where brick meets wood? I want to make sure the seal lasts through our temperature swings here.
For joints between different exterior materials such as brick and wood, a high-quality polyurethane or hybrid polymer caulk is a reliable choice. These caulks stay flexible, adhere well to various surfaces, and perform well through wide temperature changes, helping to maintain a long-lasting seal.
You mentioned that modern caulks are formulated for specific climates. How should a homeowner in a region with both harsh winters and humid summers choose the right type of caulk for exterior use?
For areas with extreme temperature swings and high humidity, look for high-quality polyurethane or silicone caulks labeled as all-weather or flexible. These types resist cracking and shrinking, and they maintain their seal through freeze-thaw cycles and moisture. Make sure the caulk is rated for exterior use and check the product label for your climate conditions.
When checking caulking around window and door frames as you suggest, how can I tell the difference between caulk that just looks weathered and caulk that actually needs to be replaced?
Look for caulk that’s cracked, peeling, or pulling away from the surface—these are signs it needs replacing. If the caulk only appears a bit discolored or rough but is still flexible and well-adhered, it’s likely still effective. Test by gently pressing; if it crumbles or feels brittle, it’s time to re-caulk.
How often should I expect to fully recaulk versus just touching up trouble spots if I follow your seasonal checklist every spring and fall?
If you follow the seasonal checklist each spring and fall, you’ll usually only need to fully recaulk every 5 to 10 years. Touch-ups on trouble spots should be done as needed—often yearly—since regular checks help you catch small cracks before they become bigger issues.
When inspecting caulking around exterior penetrations like vents and pipes, how can I tell the difference between normal weathering and an actual problem area that needs to be redone?
Look for gaps, cracks, peeling, or missing caulk—these are signs it needs to be redone. Normal weathering may cause slight discoloration or surface roughness, but intact caulk should still be flexible, well-adhered, and continuous without breaks or pulling away from surfaces.
If I notice caulking around my windows is starting to crack but it’s supposed to rain for the next few days, should I wait until the weather is dry, or is there a type of caulk that can be applied in damp conditions?
It’s best to wait until the surfaces are dry before applying new caulk, as most exterior caulks require dry conditions to adhere properly. Applying caulk to damp surfaces can lead to poor sealing and early failure.
If I notice small gaps reappearing shortly after applying caulk around my windows, does that point to a problem with my technique or could it be due to the type of caulk I’m using?
Small gaps reappearing quickly could be due to either your caulking technique or the type of caulk. Make sure surfaces are clean and dry before applying, and use a high-quality, exterior-grade caulk. Also, apply the caulk smoothly and allow it to fully cure as recommended.
If I find gaps during my seasonal check but it’s supposed to rain in a day or two, should I wait for a stretch of dry weather before applying new caulk, or is there a quick solution for wet conditions?
It’s best to wait for a stretch of dry weather before applying new caulk, as caulk needs a clean, dry surface to adhere properly. Applying it in wet conditions can lead to poor bonding and early failure.
If I spot gaps in the caulking during my spring inspection, is it okay to patch those spots only, or should I remove and replace all the caulking on that joint?
If the existing caulking is still flexible and well-adhered except for a few gaps, you can patch those spots. However, if you notice cracking, peeling, or loss of adhesion along the joint, it’s best to remove and replace all the caulking for lasting protection.
Could you recommend the best type of caulk to use in areas that get a lot of direct sunlight? I’m concerned about UV damage causing early breakdown.
For areas exposed to a lot of direct sunlight, a high-quality polyurethane or silicone caulk is the best choice. Both are highly resistant to UV rays and weathering, so they won’t crack or degrade quickly from sun exposure. Look for formulations specifically labeled as UV-resistant for extra durability.
When inspecting my windows and door frames, how can I tell if the existing caulk is actually failing or just looks a bit weathered? Are there any specific signs to watch for before I start removing it?
Look for cracks, gaps, or sections where the caulk is pulling away from the surface—these are signs it’s failing, not just weathered. If the caulk feels brittle, crumbly, or you notice any moisture getting through, it’s time to replace it. Discoloration alone doesn’t always mean removal is needed unless it’s paired with these issues.
Is there a specific type of caulk you recommend for areas where metal and masonry meet? I noticed you mentioned different formulations for different materials, and I want something that will last through harsh winters.
For joints where metal meets masonry, a high-quality polyurethane caulk is an excellent choice. It’s flexible, durable, and adheres well to both surfaces, making it ideal for withstanding temperature changes and harsh winters. Be sure the area is clean and dry before application for the best results.
For someone trying to stick to a tight budget, which areas around the exterior should take priority if I can’t caulk everything at once?
Focus first on caulking areas where water is most likely to get in, such as around windows, doors, and where siding meets masonry or trim. Gaps near the foundation and roofline should also take priority, since they can let in drafts and moisture.
Could you clarify how often siding joints typically need to be recaulked? I’m trying to budget both time and money for my home’s exterior maintenance each year.
Siding joints usually need to be recaulked every 5 to 10 years, but it’s wise to inspect them annually for cracks or gaps. Weather conditions and caulk quality can affect how soon you’ll need to recaulk. Adding a yearly inspection to your routine helps you plan and budget more accurately.
For homes with older wood siding, do you recommend a specific type of exterior caulk that holds up best against extreme temperature swings? I’ve noticed some caulks crack after only a year or two.
For older wood siding exposed to extreme temperature swings, a high-quality, paintable polyurethane or hybrid polymer caulk is highly recommended. These types are flexible, adhere well to wood, and are much less likely to crack or shrink compared to standard acrylic caulks. Make sure the surface is clean and dry before applying for the best results.
If I find gaps around pipes or vents that have never been caulked before, is there anything special I should do to prepare those surfaces before applying caulk for the first time?
Yes, before applying caulk for the first time, clean the surfaces thoroughly to remove dust, dirt, and debris. Make sure the area is dry, and if there are any old paint chips or rough edges, scrape or sand them smooth so the caulk adheres well. This helps create a strong, lasting seal.
When inspecting existing caulk in the spring and fall, how can I tell if it just needs a touch-up versus a complete removal and reapplication? Are there signs of failure I should specifically look for?
When inspecting caulk, look for cracks, gaps, or sections pulling away from surfaces—these mean you may need complete removal and reapplication. If you just see small areas with minor surface wear or pinholes, a touch-up is usually enough. Soft, sticky, or moldy caulk also signals it should be replaced entirely.
Can you recommend a specific type of caulk that holds up best in areas with lots of temperature swings, like the Midwest? I see there are different formulations for certain climates.
For areas with significant temperature swings like the Midwest, a high-quality silicone or polyurethane caulk is ideal. These types stay flexible through freezing winters and hot summers, resisting cracking and shrinking better than acrylic caulks in extreme climates.
When you’re checking caulk around windows and doors each season, how can you tell if it just needs patching or if the whole bead should be removed and replaced?
Look for cracks, gaps, or peeling in the caulk. If the caulk is mostly intact with only small cracks, patching those areas is fine. If the caulk is loose, crumbling, or pulling away from surfaces along most of its length, it’s best to remove and replace the whole bead for proper sealing.
How do you recommend removing old or failing caulk from exterior joints without damaging the underlying surfaces, especially around older windows and doors?
To remove old caulk safely, use a plastic putty knife or a caulk removal tool to gently scrape it away. For stubborn spots, apply a caulk softener and let it sit before scraping. Be careful not to use metal tools that could scratch or damage older window and door frames.
If I find old caulking around my windows that’s cracked or missing in places, do I need to remove all of it before reapplying, or can I just fill the gaps with new caulk? Not sure how thorough I need to be as a beginner.
It’s best to remove any cracked or loose old caulking before applying new caulk. This helps the new caulk adhere properly and ensures a better seal. Use a putty knife or scraper to take out the damaged sections, then clean the area before reapplying.