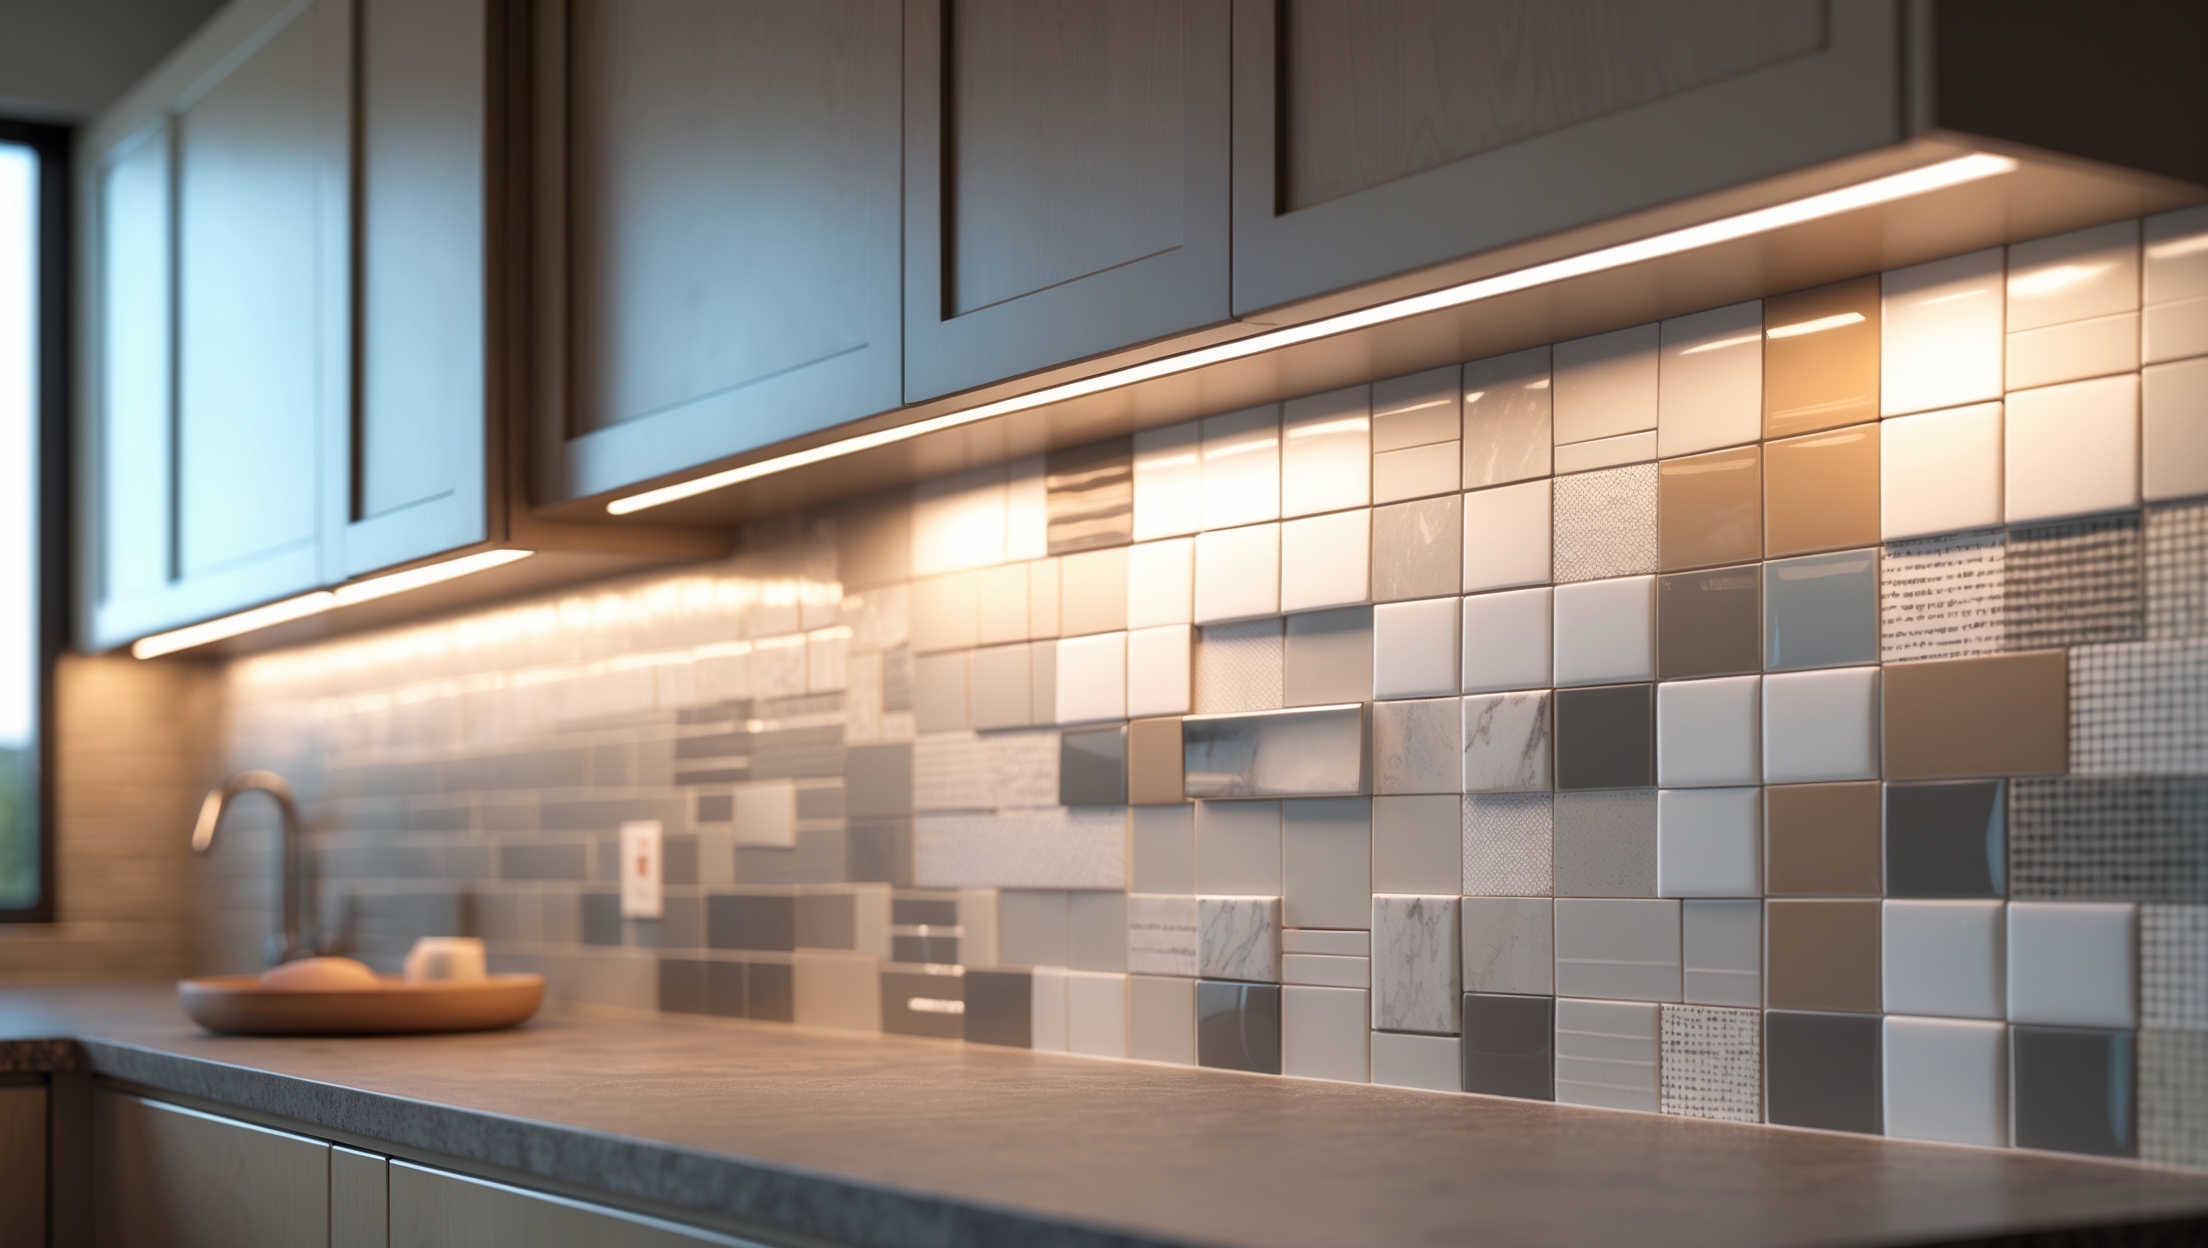
Introduction: Why Tile Backsplashes Deserve Special Attention
Upgrading your kitchen or bathroom with a tile backsplash is one of the smartest ways to add value, style, and easy-to-clean protection to your home. But while the project seems straightforward, installing a tile backsplash comes with pitfalls that can cost you time, money, and frustration if not handled properly. Many homeowners jump in enthusiastically, only to find themselves facing crooked lines, uneven tiles, crumbling grout, or budget overruns. The good news? With a little planning, careful execution, and practical know-how, you can sidestep these common mistakes and achieve a professional-looking result—without breaking the bank. In this in-depth guide, you’ll learn which missteps to avoid, how to budget realistically for materials and tools, and the exact steps needed for a flawless tile backsplash installation. Whether you’re a DIY beginner or a seasoned renovator, these insights will help you create a durable, beautiful backsplash that enhances your home for years to come.
Understanding the Most Common Backsplash Installation Mistakes
1. Skipping Surface Preparation
The foundation of any successful tile job is a properly prepared surface. Failing to clean, smooth, and prime the wall leads to poor tile adhesion and premature failure. Always remove grease, old adhesive, and loose paint; patch holes and sand uneven spots. For glossy paint or stubborn residues, consider using a degreaser and light sanding.
2. Not Measuring or Planning the Layout
Many homeowners make the mistake of starting to tile without mapping out their layout. This often results in awkward, thin tile slivers at corners or visible edges. Take time to measure the space, dry-lay tiles beforehand, and plan your starting point. Use a level and a chalk line to mark reference lines for straight, even rows.
3. Using the Wrong Adhesive or Grout
Not all adhesives or grouts are created equal. Using pre-mixed mastic in areas exposed to high moisture—or selecting sanded grout for glass tiles—can cause staining, poor bonding, or cracking. Always choose products recommended by the tile manufacturer, and opt for waterproof or mold-resistant options in kitchens and baths.
4. Ignoring Expansion Gaps and Movement Joints
Tiles need room to expand and contract with temperature changes. Failing to leave a small gap at edges, corners, and where the backsplash meets countertops or cabinets can lead to cracked tiles or popped grout. Use spacers and finish edges with caulk instead of grout in these areas.
5. Rushing the Grouting Process
Applying grout too soon, using excess water, or failing to pack joints properly can result in weak, crumbly lines and even mold growth. Let adhesive cure fully, mix grout to the right consistency, and work in small sections, wiping excess promptly with a damp sponge.
6. Underestimating Material Waste
Tile jobs always involve some level of cutting and breakage. Not accounting for 10-15% extra tile for waste, mistakes, or future repairs can leave you short—and matching tiles later is often impossible due to lot differences. Order extra upfront to ensure a seamless finish.
Cost Breakdown: Budgeting for a Backsplash Project
Material Costs
- Tile: Prices range from $3 to $40 per square foot, depending on material (ceramic, porcelain, glass, stone, or specialty).
- Adhesive (Thinset or Mastic): Expect $10–$30 per bag or bucket.
- Grout: $10–$25 per bag or tube.
- Tile Spacers and Leveling Systems: $5–$15.
- Edge Trim/Finishing Pieces: $15–$40 for metal or ceramic profiles.
- Caulk (for edges and corners): $5–$10.
Tool Costs
- Tile Cutter or Wet Saw Rental: $30–$60 per day; manual cutters $25–$100 to buy.
- Trowels (notched and grout): $10–$30.
- Sponge, Buckets, and Cleaning Supplies: $10–$20.
- Level and Measuring Tools: $15–$40.
Labor (If Hiring Out)
Professional installation typically adds $40–$80 per square foot, depending on region and complexity. This means a DIYer can save hundreds or even thousands, but only if the job is done right.
Hidden and Unexpected Costs
- Wall repairs or priming if the substrate is damaged.
- Electrical outlet extenders or box adjustments (tiles add thickness).
- Custom cuts or specialty shapes for intricate layouts.
- Sealers for porous stone or grout (if required).
Step-by-Step Tutorial: Installing a Tile Backsplash Like a Pro
1. Measure and Plan
- Measure the length and height of your backsplash area. Multiply to get square footage, then add 10–15% for waste.
- Mark reference lines with a level and pencil or chalk to keep rows perfectly straight.
- Lay out tile sheets or pieces on the counter to visualize the pattern and adjust as needed.
2. Prep the Wall
- Turn off power to outlets and remove plates.
- Clean wall thoroughly; repair holes or uneven areas.
- Apply primer if recommended by adhesive manufacturer.
3. Cut Tiles
- Mark tiles for cuts around outlets, edges, or corners.
- Use a manual cutter for straight cuts or a wet saw for intricate shapes or glass tile.
- Always wear safety glasses and gloves when cutting.
4. Apply Adhesive
- Mix thinset or use ready-mixed mastic as specified for your tile type.
- Spread adhesive with a notched trowel, working in small sections to prevent drying before tiles are set.
- Press tiles firmly into place, using spacers for even joints.
5. Tile Around Obstacles
- Cut tiles to fit around electrical outlets. Use outlet extenders to bring devices flush with the new surface.
- Leave a 1/8″ gap at countertops and cabinets for caulk.
6. Let Adhesive Cure
- Wait 24 hours (or as recommended) before grouting to ensure a solid bond.
7. Grout the Tiles
- Mix grout to peanut butter consistency.
- Apply diagonally across joints with a rubber float, pressing firmly.
- Wipe excess grout with a damp sponge; rinse frequently.
- Let cure, then buff haze off tile faces with a dry cloth.
8. Seal and Finish
- If using porous tile or grout, apply sealer as needed once fully dry.
- Apply color-matched caulk at all corners and where tile meets countertop for flexibility and waterproofing.
- Replace outlet covers and turn power back on.
Best Practices for Durable, Low-Maintenance Backsplashes
Choose the Right Materials
Ceramic and porcelain tiles are durable and easy to clean, making them ideal for most kitchens and baths. Glass tiles add modern flair but require special care during installation. Natural stone offers unique beauty but must be sealed regularly.
Maintain Cleanliness
- Wipe backsplash daily to prevent grease and food buildup.
- Clean grout lines with a soft brush and mild detergent; avoid harsh chemicals that can erode grout and sealer.
- Inspect caulk annually and replace if cracking or pulling away from surfaces.
Seal as Needed
Some grout and natural stone types require periodic sealing to resist stains and moisture. Check manufacturer recommendations and set a reminder for annual checks.
Safety and Compliance Tips
Electrical Safety
- Always turn off power at the breaker before working near outlets or switches.
- Use GFCI outlets in kitchen and bathroom backsplashes for code compliance and safety.
- Consult a licensed electrician if relocating outlets or working in older homes with non-standard wiring.
Permits and Local Code
Most simple backsplash installations do not require a permit, but electrical modifications might. Check with your local building department, especially if you’re updating wiring or making structural changes.
Expert Tips for a Flawless Finish
- Order all materials at once to ensure color consistency; dye lots can vary between shipments.
- Work in good lighting to spot alignment errors before adhesive dries.
- Use a laser level for long runs or intricate patterns.
- Practice on a small section or scrap piece if you’re new to tiling.
Conclusion: Enjoy Your Upgraded Space with Confidence
Installing a tile backsplash may seem like a minor improvement, but its impact on your kitchen or bathroom’s appearance, hygiene, and value is major. By avoiding common mistakes—like skipping prep, mismeasuring, or choosing the wrong materials—you’ll set yourself up for lasting satisfaction and fewer headaches down the road. Careful budgeting prevents unpleasant surprises, and investing in the right tools ensures a smooth, professional finish you can be proud of. Remember, attention to detail matters at every step, from planning the layout to sealing the final grout line. And if you take the time to maintain your backsplash properly, it will keep your space looking fresh and functional for years to come. Whether you’re a DIY enthusiast looking to hone your skills or a homeowner wanting to stretch your renovation dollars, following these expert tips will help you avoid pitfalls and create a beautiful, enduring feature in your home. Your new backsplash isn’t just an upgrade—it’s a testament to your care and craftsmanship. Enjoy the transformation!
When planning out the layout to avoid awkward slivers at the edges, do you recommend starting from the center or from one side, especially in a kitchen with uneven walls?
In kitchens with uneven walls, it’s usually best to start tiling from the center of the main focal area, like behind the stove or sink. This helps balance any small cuts or slivers at the edges and keeps the most visible sections looking even, even if the walls aren’t perfectly straight.
Can you suggest some specific budgeting tips for choosing backsplash materials that look nice but won’t cause the project to go over budget?
Look for ceramic or porcelain tiles, which often mimic pricier materials but are budget-friendly. Consider buying from clearance sections or overstock sales. Also, choosing standard tile sizes and limiting decorative accents to smaller areas can help keep costs down while still achieving a stylish look.
If I want to save time, is it okay to use pre-mixed mastic everywhere in my kitchen or are there areas I really need to use a different adhesive?
You can use pre-mixed mastic for most of your backsplash, but avoid areas exposed to direct water like behind the sink or near a stove top. For those spots, use a thin-set mortar since it’s more water-resistant and durable.
Could you clarify what type of primer or wall sealer is best for preparing a wall that has some leftover grease and glossy paint before tiling?
For walls with leftover grease and glossy paint, first clean thoroughly with a degreaser, then lightly sand to dull the gloss. Use a high-quality bonding primer, such as an acrylic-based or multipurpose primer designed for glossy surfaces, to ensure proper tile adhesion.
Can you give more specific advice on how to realistically budget for both materials and tools? I sometimes end up spending way more than planned because of unexpected needs.
To budget more accurately, make a detailed list of all required materials and tools before starting. Add about 10–15% extra for waste, mistakes, or last-minute needs. Visit stores or check prices online to estimate costs, and consider renting expensive tools you’ll rarely use. Set aside a small contingency fund to cover unexpected purchases.
I noticed you mentioned that failing to prep the surface can cause the tiles to fall off later. Should I always use a primer even if my kitchen wall is already painted, or are there certain cases where it’s not necessary?
If your kitchen wall is already painted, using a primer is generally recommended, especially if the paint is glossy or semi-gloss. It helps the adhesive bond better. If the paint is flat and firmly attached, you might be able to skip primer after cleaning and lightly sanding, but priming adds extra assurance against future tile issues.
If I accidentally start tiling before fully planning my layout, is there a way to fix awkward tile placements or thin slivers without tearing everything down and starting over?
You can often fix awkward placements or thin slivers by carefully removing just the affected tiles with a chisel or putty knife, then adjusting your layout. Try using larger tiles or shifting the pattern slightly to avoid thin cuts. Touch up grout lines to blend any changes for a seamless finish.
I noticed you mentioned budget overruns—could you break down which material or tool costs are most often underestimated by first-time DIYers?
First-time DIYers often underestimate the costs of setting materials like thinset mortar, grout, and quality sealant. Specialized tools—such as tile cutters, spacers, and trowels—can also add up quickly. Additionally, waste from cutting mistakes or miscalculations in tile quantity can lead to unexpected extra purchases.
You mentioned planning the tile layout carefully to avoid thin tile pieces at the edges. Are there any tips for making that process easier for beginners?
To make planning easier, measure your wall and lay out the tiles on the floor first. Use tile spacers between each tile to account for grout lines. Adjust your starting point so you have even cuts on both ends, which helps avoid thin slivers at the edges.
When budgeting for a backsplash project, what are some hidden costs that parents should watch out for beyond just the basic materials?
Parents should consider costs like hiring a professional installer, extra tiles for mistakes or future repairs, specialty tools, grout sealant, disposal of old materials, and possible wall repairs before installation. Unexpected expenses can also come from moving outlets or plumbing fixtures to fit the new backsplash.
About budgeting for materials and tools, could you give a ballpark estimate for a small kitchen backsplash project, including any often-overlooked costs like spacers or grout sealer?
For a small kitchen backsplash (about 20 sq. ft.), expect to spend $150–$400 on tiles, $20–$50 on thin-set, $10–$40 on grout, $5–$15 on spacers, $15–$30 on grout sealer, and $30–$100 on tools if you don’t already own them. Don’t forget extras like caulk and cleaning sponges.
Do you have suggestions for estimating how much extra material to buy in case of tile breakage or last-minute layout changes?
It’s wise to buy about 10-15% extra tile beyond your measured area to cover breakage, cutting errors, or layout changes. For more complex patterns or if you’re using smaller tiles, consider 15% extra. This cushion helps ensure you won’t run short mid-project.
If my kitchen walls have a bit of old adhesive left even after cleaning and sanding, should I install a new backer board or is there a way to make the tiles stick reliably?
If there’s still old adhesive that you can’t remove, installing a new backer board is the safest option for a reliable, long-lasting installation. Tiles need a smooth, clean surface to adhere properly, and leftover adhesive could cause them to loosen or fall off over time.
You mention budget overruns as a common problem—do you have advice on how to estimate costs for materials and tools more accurately before starting the backsplash project?
To estimate costs accurately, measure your backsplash area carefully, then calculate how many tiles you’ll need, adding about 10% extra for waste. Check local store prices for both tiles and essential tools like spacers, adhesive, grout, and a tile cutter. Also, consider costs for prep materials like backer board or sealant if needed.
When you mention removing grease and old adhesive before installing the tile backsplash, do you have any product recommendations or methods for thoroughly prepping surfaces, especially in older kitchens with years of buildup?
For older kitchens with heavy buildup, start by cleaning with a degreaser like TSP (trisodium phosphate) or a citrus-based cleaner. Scrape off any loose adhesive with a putty knife. After cleaning, lightly sand the surface to promote adhesion, then wipe it down with a damp cloth before tiling.
When mapping out the tile layout, are there recommended tools or apps that can help visualize the design before installation begins?
Yes, there are helpful tools for visualizing your tile layout. Tile layout apps like TilePlanner or RoomSketcher let you experiment with patterns and colors virtually. You can also use free online grid generators or even graph paper to sketch your design before you start installing.
If a wall has stubborn grease stains that don’t come off easily, what’s the best way to prepare that surface before installing the tiles? Is sanding alone enough, or should I use a specific type of degreaser?
Before installing tiles, it’s essential to remove all grease stains since adhesives won’t bond well to oily surfaces. Use a strong degreaser designed for kitchen use and scrub thoroughly. After cleaning, rinse and let the wall dry. Sanding alone may not remove grease completely, so always degrease first before lightly sanding to create a suitable surface for tiling.
When prepping the wall, is it okay to tile directly over glossy paint after using a degreaser and sanding, or do you recommend a primer as well for better adhesion?
It’s best to apply a primer after using a degreaser and sanding glossy paint. The primer will help ensure proper adhesion and prevent tiles from loosening over time. Choose a bonding primer specifically designed for tile preparation for the most reliable results.
If the wall behind the backsplash has some minor bumps or imperfections, how smooth does it really need to be before starting, and what’s the best way to prep it without taking too much time?
The wall should be fairly smooth so the tiles adhere properly, but it doesn’t need to be perfect. For minor bumps, lightly sand or scrape them down, then wipe away dust. You can use a thin layer of setting compound to fill small imperfections. Just let it dry and sand smooth before tiling.
You mentioned the importance of prepping the wall surface before tiling. How do I know if my wall is too uneven or damaged for a successful backsplash install, and when would I need to call in a pro?
Check your wall by running a straightedge or level across it; if you notice gaps larger than 1/8 inch or see crumbling, peeling, or water damage, the surface needs repair. Minor imperfections can be fixed with patching compound, but extensive unevenness or structural issues are best handled by a professional to ensure good tile adhesion and a lasting finish.
Can you share any tips for estimating how much extra tile to buy in case of mistakes or irregular cuts? I want to make sure I budget enough for materials without buying too much.
It’s smart to plan for extra tile. A common rule is to buy about 10% more tile than your measured area to cover mistakes and tricky cuts. For complex patterns or oddly shaped spaces, consider increasing that to 15%. This helps ensure you have enough without overbuying.
When budgeting for a tile backsplash, is it more cost effective to use pre-mixed adhesive or to mix it yourself, especially for beginners?
For beginners, pre-mixed adhesive is typically more convenient and helps avoid mistakes, though it’s a bit more expensive. Mixing adhesive yourself can save money, but it takes more time and skill. If ease and reducing errors are priorities, pre-mixed is usually worth the extra cost.
After measuring and dry-laying my tiles as suggested, is there a best way to handle tricky corners so I can avoid those thin tile slivers you mentioned?
To avoid thin tile slivers in tricky corners, try shifting your layout so both ends have wider, more even tile cuts. Center the tiles on the main wall or start with a half-tile at the corners. This way, you’ll finish with larger, sturdier pieces instead of narrow slivers.
Could you give a ballpark estimate of what I should expect to spend on tools and materials for a standard kitchen backsplash, including any budget-friendly options that still look good?
For a standard kitchen backsplash (about 20 square feet), expect to spend $200–$500 on materials and tools. Simple ceramic tiles are usually the most budget-friendly and still look great. Essential tools like a tile cutter, spacers, and adhesive can often be found in starter kits for under $50. Shopping sales and considering peel-and-stick tiles can save even more.
If I accidentally start tiling without mapping out the layout first, is there a way to fix awkward tile slivers at the edges without redoing the whole installation?
You can often fix awkward tile slivers by carefully removing just the affected edge tiles with a chisel or oscillating tool, then recutting and replacing them with larger pieces. Use edge trim or border tiles to help blend the repair if needed, so a full redo isn’t always required.
I’m curious about budgeting—can you give a ballpark estimate of what a typical backsplash installation costs, including both materials and essential tools, for an average-sized kitchen?
For an average-sized kitchen, expect to spend roughly $600 to $1,200 for a typical backsplash project. This includes materials like tiles, adhesive, grout, and essential tools such as a tile cutter and spacers. Labor costs can add more if you hire a professional, so DIY can help save money.
Are there ways to keep costs down on materials or tools without sacrificing quality, especially if it’s my first time installing a backsplash and I’m trying to stick to a tight budget?
To keep costs down, consider buying tiles during sales or from overstock stores, and look for multi-purpose tools that can be used for future projects. Borrowing specialty tools from friends or a tool library can save money too. Always invest in good adhesive and grout—these are worth the quality for a lasting backsplash.
Can you elaborate on how to accurately budget for materials and tools before starting a backsplash project, especially if I want to avoid mid-project surprises?
Start by measuring the backsplash area to calculate the square footage. List all materials needed: tiles, adhesive, grout, spacers, and edging. Include 10-15% extra tile for mistakes. Don’t forget tools like a tile cutter, trowels, and safety gear. Check prices at local stores or online, and add a small buffer for unexpected expenses to keep your budget realistic.
If I have glossy paint behind my stove area, is sanding enough to prep the wall, or would you recommend using something extra before tiling?
Sanding the glossy paint will help, but it’s best to also apply a high-quality tile primer afterwards. This ensures the adhesive bonds well to the wall and reduces the chance of tiles slipping or coming loose over time, especially in high-moisture areas like behind a stove.
You mentioned budget overruns as a common pitfall. Could you give an estimate of typical material costs per square foot, including grout and adhesive, for a standard kitchen backsplash?
For a standard kitchen backsplash, material costs typically range from $5 to $15 per square foot, including tiles, grout, and adhesive. The exact amount depends on your tile choice—ceramic is usually on the lower end, while glass or natural stone tiles cost more.
The article mentions budgeting for materials and tools, but could you give a rough estimate of how much a DIY backsplash project typically costs for a small kitchen wall?
For a small kitchen wall, expect to spend about $150 to $400 on materials like tiles, adhesive, grout, and basic tools. Costs can vary based on tile type and whether you already own some tools. Glass or mosaic tiles and specialty tools may increase the total.
Could you clarify whether surface preparation steps like degreasing and sanding are necessary for newly painted or drywall surfaces, or are those mainly for older walls?
Surface preparation is important for both new and older walls. Even newly painted or drywall surfaces should be cleaned to remove dust and any possible residue. Degreasing is mainly critical for kitchen areas, while light sanding helps the adhesive bond better, especially if the paint is glossy.
If my kitchen walls still have some old adhesive that won’t come off completely, is there a way to prep the surface well enough or is replacement drywall the only option?
If small amounts of old adhesive remain, you can often skim-coat the area with a patching compound to create a smooth surface before tiling. However, if large patches are uneven or crumbling, replacement drywall may be best for a long-lasting result.
You mention the importance of surface preparation before installing a backsplash. Could you clarify if there are any specific primers or products you recommend for walls that have previously been painted with semi-gloss paint?
For walls previously painted with semi-gloss paint, lightly sanding the surface to scuff it up is important for better adhesion. After sanding and cleaning, use a bonding primer labeled for tile or glossy surfaces. Zinsser Bulls Eye 1-2-3 or KILZ Adhesion are commonly used options for this situation.
When budgeting for materials, how much extra tile should you buy to account for mistakes or future repairs? Is there a general percentage rule you recommend?
It’s wise to purchase about 10% extra tile beyond your calculated area. This covers accidental breakage, cutting errors, and leaves you with spare tiles for future repairs, ensuring a good color match later on.
When you mention removing grease and old adhesive during wall prep, do you have a specific product or method you recommend for kitchens where there’s heavy buildup?
For heavy grease buildup in kitchens, use a degreaser like TSP (trisodium phosphate) or a strong kitchen cleaner. Scrub thoroughly, rinse well, and let the wall dry. For old adhesive, a putty knife and an adhesive remover help remove residue. Always ensure the surface is clean, smooth, and dry before tiling.
If I accidentally end up with crooked tile lines after starting, is there a way to fix it without redoing the whole backsplash?
If you notice crooked tile lines early, you can usually remove and reset just those tiles before the adhesive fully dries. Carefully pry up the misaligned tiles, clean off excess adhesive, and reposition them. If the adhesive has set, you may need to chisel out only the affected tiles rather than redoing the entire backsplash.
Could you give a rough estimate of how much extra I should budget for mistakes or unexpected issues during a DIY backsplash installation?
It’s wise to set aside an extra 10% to 20% of your total project budget to cover mistakes or surprises, like broken tiles or extra supplies. For a $500 project, plan for an additional $50 to $100 just in case.
Could you explain more about how to handle uneven walls before installing a tile backsplash? I’m worried that sanding alone might not be enough in some older kitchens.
When dealing with uneven walls, especially in older kitchens, sanding might not be sufficient. You can use a patching compound or joint compound to fill in dips or low spots, and if needed, skim-coat the area for a smoother surface. For larger uneven sections, consider installing a backer board to create a flat base before tiling.
You mentioned planning out the tile layout to avoid awkward slivers at the edges. Do you have tips for dealing with outlets or switches that interrupt the backsplash pattern?
When tiling around outlets or switches, remove the cover plates first and plan your tile cuts so seams don’t align right at the edges of the openings. Cut tiles carefully to fit snugly around the boxes, and use outlet extenders to ensure the covers sit flush against the finished surface.
If I accidentally buy the wrong type of adhesive, is there a way to salvage the project or should I start over before tiling?
If you haven’t applied the adhesive yet, it’s best to switch to the correct type before starting. If the wrong adhesive is already on the wall, remove it thoroughly so it doesn’t affect tile adhesion. Using the right adhesive from the start helps prevent problems like tiles not sticking or future water damage.
I noticed the article talks about budget overruns. Could you provide a rough estimate of what a typical backsplash installation costs per square foot, including both materials and tools for a DIYer?
For a DIY backsplash installation, you can expect to spend roughly $10 to $25 per square foot. This estimate includes mid-range tile, adhesive, grout, and essential tools like spacers and a tile cutter. Specialty tiles or premium materials can increase costs, while basic subway tiles may fall at the lower end.
You mentioned the importance of patching holes and sanding uneven spots before tiling. How smooth does the wall need to be, and are there specific primers you recommend for kitchens versus bathrooms?
Aim for a wall that’s as smooth as possible—free from bumps, holes, or ridges. Small imperfections under 1/16 inch are usually acceptable. For primers, use a mold- and mildew-resistant primer for both kitchens and bathrooms, but especially in bathrooms or areas exposed to moisture. A high-quality acrylic primer is a good choice for most situations.
When mapping out a backsplash layout to avoid awkward tile slivers at edges, what’s the best method for dry-laying and adjusting the starting point, especially if there are outlets in the way?
To avoid awkward slivers, measure the wall and mark the center point. Dry-lay tiles on a countertop, starting from center, and adjust so any cuts at the edges are wider than a half tile. Account for outlets by placing spacers where they fall and trimming tiles as needed to fit neatly around them.
If a wall has some old, stubborn adhesive that won’t come off easily, what is the best approach to preparing that surface before installing new tiles?
If old adhesive remains on the wall, try gently scraping off as much as possible using a putty knife or scraper. For really stubborn spots, a heat gun or adhesive remover can help soften the residue. Make sure the surface is smooth, clean, and level before tiling—consider applying a skim coat of thinset mortar if needed to create an even base.
How much should I realistically budget for tools if I’m a first-timer with none on hand? I want to avoid overspending, but don’t want to cut corners on quality either.
For a first-time tile backsplash project, budgeting $75 to $150 for tools is reasonable. This should cover essentials like a tile cutter, notched trowel, spacers, level, grout float, and safety gear. Choosing mid-range brands will give you reliable quality without unnecessary expense.
For surface prep, is priming absolutely necessary if I’m tiling over a freshly painted wall, or is it enough to just sand and clean it thoroughly?
Priming is strongly recommended even if you’ve sanded and cleaned a freshly painted wall. Paint creates a slick surface that can prevent proper tile adhesion. Using a primer designed for tiling helps ensure the thinset bonds securely, reducing the risk of tiles loosening over time.
If the wall behind my stove is already a bit uneven, what’s the best way to prep it before tiling to avoid crooked tiles or poor adhesion like you mentioned?
To prep an uneven wall behind your stove, start by filling low spots with a patching compound and sanding down any high spots. Use a long level to check for flatness as you work. Once the surface is even and smooth, clean it thoroughly before applying your tile adhesive.
If my kitchen walls are painted with a glossy paint, is sanding and degreasing usually enough, or should I consider applying an additional primer before starting the tile work?
Sanding and degreasing your glossy painted walls is a solid start, but applying a high-quality primer is also recommended. Primer helps the tile adhesive bond better, reducing the risk of tiles slipping or coming loose over time, especially on glossy surfaces.
When prepping a wall that has some leftover grease and stubborn paint, would you recommend a specific degreaser brand or just any household one? Also, is sanding always necessary after cleaning, or can I skip it if the wall feels smooth?
For leftover grease, a dedicated kitchen degreaser like Krud Kutter or Zep works well, but any strong household degreaser should do the trick. As for sanding, if the wall feels smooth and there’s no gloss or loose paint, you can usually skip it—just make sure it’s clean and dry before tiling.
If my kitchen walls have some old adhesive and glossy paint spots, do I need to completely remove everything before installing new tiles, or is light sanding and priming enough?
For the best tile adhesion, it’s important to remove as much old adhesive as possible and dull glossy paint with sanding. After sanding, use a suitable primer to help the new adhesive stick. If any areas remain uneven or loose, address those spots before tiling for a secure, long-lasting installation.
If my kitchen wall has a glossy paint finish and some old adhesive left over, would sanding be enough, or do I need a special primer before I start tiling?
Sanding the glossy paint and removing old adhesive will help, but a high-quality primer designed for tile or masonry is still recommended. This ensures better adhesion and reduces the risk of tiles coming loose over time.
If tiles end up slightly uneven after installation, is it better to try redoing that section or can minor differences be disguised with grout or caulk?
If the unevenness is very minor, grout or caulk might help disguise it, especially with a matching color. However, if the tiles are noticeably uneven, it’s usually better to carefully remove and reset them before the grout sets, for the best long-term results.
For a first-time DIYer, how much time should I realistically set aside for prepping the wall and measuring the layout before starting to actually set tiles?
For your first backsplash project, set aside at least 2 to 3 hours for wall prep and careful measuring. This includes cleaning, repairing any surface issues, and double-checking your layout lines so your tiles go up smoothly and evenly.
If my kitchen walls have some slightly uneven spots even after patching, is it better to keep sanding or should I use a special type of primer to help the tiles stick properly?
For slightly uneven spots after patching, it’s best to sand until the surface feels mostly smooth, but you don’t need perfection. Using a quality tile adhesive or mortar made for uneven surfaces can help tiles stick well. Primers aren’t usually necessary unless the wall is very porous or dusty.
You mention budget overruns as a common issue—could you give a rough estimate of how much unexpected expenses might add to a typical kitchen backsplash project?
Unexpected expenses for a typical kitchen backsplash project can add about 10 to 20 percent to your planned budget. This could range from $100 to $400 extra, depending on the kitchen size and tile choice. Unforeseen costs usually come from extra materials, repairs to the wall, or last-minute changes.
When you mention patching holes and sanding uneven spots as part of surface prep, how smooth does the wall actually need to be before starting to tile? Can minor bumps really cause problems down the line?
The wall should be as smooth and flat as possible before tiling. Even small bumps or uneven areas can prevent tiles from sticking properly or cause tiles to look uneven after installation. It’s best to sand down and patch imperfections so the surface is consistently smooth and level for lasting results.
You mention budget overruns as a common issue. Can you give some examples of unexpected costs that small business owners like myself should watch out for when planning a backsplash installation in a commercial kitchen?
Unexpected costs can include needing extra tiles due to breakage, discovering uneven or damaged walls that need repair, or upgrading to more durable grout for a commercial kitchen. Labor costs may also be higher if work must be done outside normal hours. It’s wise to set aside a contingency fund to cover these potential surprises.
The article mentions budget overruns—can you give a rough estimate of how much extra material I should buy to account for mistakes or breakage, especially as a first-timer?
For first-time installers, it’s wise to buy about 10–15% more tile than your measured area. This extra accounts for mistakes, breakage, and future repairs. Double-check your measurements, and if your tile pattern is complex, lean toward the higher end of that range.
Could you explain how to estimate a realistic budget for a backsplash project, including hidden costs like surface prep and tool rentals that are often overlooked?
To estimate a realistic backsplash budget, add up the cost of tiles, grout, and adhesive, then factor in hidden expenses like surface preparation (cleaning, patching, or priming the wall), tool rentals (tile cutter, spacers, trowels), and possible waste or mistakes. Set aside an extra 10–15% for unexpected costs to avoid surprises.
If the wall has some old adhesive that’s really hard to scrape off, is it enough to just sand it down or do I need to replace any part of the drywall before tiling?
If the old adhesive is stubborn but the drywall underneath is sound and flat, sanding it down until smooth is usually fine. However, if the drywall is damaged, crumbling, or uneven after scraping and sanding, it’s better to replace that section for a solid tile installation.
Can you give a rough idea of how much I should budget for tools as a first-timer who doesn’t already own things like tile cutters or levels? I don’t want to underestimate the cost.
If you’re starting from scratch, expect to budget around $100 to $200 for essential tools like a tile cutter, level, notched trowel, spacers, grout float, and safety gear. Prices vary by quality and brand, so shopping around or considering tool kits can help keep costs reasonable.
Do you have any tips for making sure the reference lines stay straight and visible throughout the tiling process, especially when working in a kitchen with uneven walls?
To keep your reference lines straight and visible, use a good quality chalk line and snap it firmly. Reapply the line if it gets smudged during installation. For uneven walls, measure and start from the center, and always use spacers and a level to check alignment as you go.
Could you explain more about how to choose the right grout type for areas exposed to moisture? The article mentions that not all adhesives or grouts are created equal, so I’m wondering what specifically to look for.
For areas exposed to moisture, like kitchens or bathrooms, look for grout labeled as ‘water-resistant’ or ‘epoxy grout.’ Epoxy grout is highly durable and resists stains, mold, and water much better than traditional cement-based grouts. Always check that the grout is suitable for wet environments, and consider sealing cement-based grout for extra protection.
Could you give a rough estimate of how much extra budget I should plan for mistakes or unexpected issues with materials when tackling a backsplash as a DIY project?
It’s wise to set aside an extra 10% to 20% of your total material budget for a DIY backsplash project. This cushion covers tile breakage, cutting errors, or discovering you need more adhesive or grout than expected.
If I accidentally get uneven tile lines, is there any way to fix them before the adhesive dries, or do I have to start over?
If you notice uneven tile lines before the adhesive dries, gently adjust the tiles into place using spacers to even out the gaps. As long as the adhesive is still wet, you don’t have to start over—just realign the tiles carefully before it sets.
If my kitchen walls have some older glossy paint that’s hard to remove, is degreasing and light sanding usually enough for good tile adhesion, or do I need to completely strip the paint?
Degreasing and light sanding are often enough if the paint is well adhered and not peeling. The goal is to dull the glossy surface so the tile adhesive can grip. Complete stripping isn’t usually necessary, but make sure the wall is clean, smooth, and free of any loose paint before tiling.
If my backsplash wall isn’t perfectly even after patching and sanding, will using a thicker adhesive help, or could that lead to more problems down the line?
Using a thicker layer of adhesive might seem like a quick fix, but it can actually create uneven tiles and future adhesion problems. It’s better to address wall unevenness with proper patching and sanding, or use a tile backer board for really uneven surfaces before tiling.
When budgeting for a backsplash, what are some hidden costs that often surprise homeowners beyond just tiles and adhesive?
Homeowners are often surprised by hidden costs like specialty trim pieces, grout and sealant, tools or rental equipment, and possible wall repairs before installation. Labor charges, disposal of old materials, and unexpected issues like uneven walls can also add to the total budget.
I noticed you recommend prepping the wall and using the right adhesive. How do I know if my painted wall needs extra sanding or priming before tiling, and what signs should I look for?
If your painted wall feels glossy or slick, it definitely needs extra sanding to help tile adhesive stick. Look for peeling paint, cracks, or uneven spots—these areas should be sanded and repaired. If the paint is old or seems likely to peel, applying a primer after sanding adds extra security for a long-lasting tile installation.
If our kitchen walls have a glossy finish and some stubborn grease, is it better to use a specific type of primer or just rely on sanding and degreasing as mentioned?
In your case, it’s best to thoroughly degrease and lightly sand the glossy walls first. After that, apply a good-quality bonding primer specifically designed for glossy or hard-to-adhere surfaces. This will ensure the tile adhesive sticks properly and your backsplash lasts longer.
You mention the importance of proper surface preparation before installing a backsplash. If my wall has some minor cracks, do I need to repair those entirely, or can the adhesive compensate for small imperfections?
It’s best to repair even minor cracks before installing your backsplash. Tile adhesive can handle very slight imperfections, but cracks may lead to uneven tiles or future issues. Use a patching compound or filler to smooth out cracks, then let it dry completely before proceeding.
How can I realistically estimate the cost of materials and tools for a medium-sized backsplash so I avoid budget overruns like the article mentioned?
To estimate costs accurately, measure your backsplash area to calculate square footage, then check local prices for tiles, adhesive, grout, and spacers. Don’t forget to include tools like a tile cutter and trowel. Add about 10% extra for tile waste and unexpected needs, and compare prices across stores to stay within budget.
When budgeting for a backsplash project, are there particular materials or tools that often end up costing more than expected? I’d like to avoid surprises if possible.
Yes, some materials like specialty tiles (glass, mosaic, or natural stone) and high-quality adhesives or grout can be pricier than expected. Tools such as tile cutters, spacers, or a wet saw—especially if you need to buy rather than rent—can also add up. Factoring in these items ahead of time helps you avoid unexpected costs.
Can you explain a little more about what kind of degreaser is best for prepping a painted wall before tiling? I want to make sure I don’t mess up the surface.
For prepping a painted wall before tiling, use a non-abrasive, residue-free degreaser like TSP (trisodium phosphate) or a citrus-based cleaner. These effectively remove grease without damaging paint. Just wipe the wall thoroughly, rinse with clean water, and let it dry before starting your tile project.
When prepping the wall for a backsplash, is there a specific type of primer you recommend, especially if the wall has a glossy paint finish?
For walls with a glossy paint finish, it’s best to lightly sand the surface first, then use a high-quality bonding primer designed for glossy or hard-to-paint surfaces. This helps ensure proper adhesion of the tile adhesive to the wall.
I noticed you mention measuring and dry-laying tiles before installation to avoid thin slivers at the edges. Do you have any tips for laying out a herringbone or other patterned backsplash, since those seem a lot trickier to plan?
Patterned layouts like herringbone do require extra planning. Start by marking the center of your backsplash area and dry-lay tiles from that point outward. Use spacers for consistent gaps, and cut partial tiles at the edges for a balanced look. Double-check alignment as you work, since small errors can become noticeable in patterns.
When you mention budget overruns, do you have a ballpark estimate for the typical cost range of materials and tools for a standard kitchen backsplash?
For a standard kitchen backsplash, material costs (like tile, grout, and adhesive) usually range from $200 to $600, depending on tile choice. Basic tools add another $50 to $100 if you don’t already own them. Specialty or premium tiles will push the budget higher.
You mention the importance of using the right adhesive or grout. How can I tell which specific products are best for kitchens versus bathrooms to make sure the tiles stay put?
For kitchens, use a high-quality thinset mortar adhesive, which resists moisture and heat well. For bathrooms, especially in areas exposed to water, choose a waterproof adhesive or epoxy thinset. Always select grout labeled as water- and stain-resistant. Check the product labels for suitability for wet or dry areas and follow manufacturer recommendations.
Could you give a ballpark figure for how much I should budget per square foot for both materials and tools if I want a professional-looking backsplash but don’t want to overspend?
You can expect to budget around $10 to $25 per square foot for materials and basic tools if you’re aiming for a quality, professional-looking backsplash without overspending. This range covers mid-range tile, adhesive, grout, spacers, and necessary hand tools.
If the wall behind my stove has a lot of old adhesive and stubborn grease stains, what’s the best way to make sure the surface is properly prepped before tiling?
First, remove as much old adhesive as possible using a scraper or putty knife. For grease stains, wash the wall thoroughly with a degreaser or warm, soapy water. Once clean and dry, sand any rough spots, then wipe down the surface. Make sure the wall is smooth and free of residue before applying any tile adhesive.
When planning the layout and dry-laying tiles, what’s the best approach for handling outlets or switches that interrupt the backsplash area? Is there a trick to minimizing awkward cuts around them?
To handle outlets and switches, start by dry-laying tiles and marking their positions on the wall. Try to center tiles around the outlets or align grout lines with the edges, which reduces small, awkward cuts. Use a tile nipper or rotary tool for precise shaping, and always turn off power before working near electrical boxes.
How much should I realistically budget for tools and prep materials if I’m just doing a small backsplash in a college apartment kitchen? I want to avoid overspending, but not cut corners.
For a small college apartment backsplash, budgeting around $50–$100 for tools and prep materials is reasonable. This should cover essentials like a tile cutter, adhesive, grout, spacers, a trowel, sponge, and protective gear. You can save more by borrowing or renting tools instead of buying new ones.
If the wall surface has old adhesive that won’t come off completely even after degreasing and sanding, is there a recommended primer or additional prep step before tiling?
If old adhesive remains, use a high-quality bonding primer designed for tiling over difficult surfaces. This will help the new tile adhesive stick better. Make sure the surface is as smooth and clean as possible before priming, and follow the primer’s drying instructions before installing your tiles.
If my wall has some minor uneven spots I can’t completely sand flat, will that affect the finished look, or can grout help hide those imperfections?
Minor uneven spots on your wall can affect how flat the tiles sit, and grout usually won’t hide these imperfections. It’s best to level the wall as much as possible before tiling for the best finished look. Small gaps behind tiles can sometimes be masked with thicker adhesive, but larger uneven areas may remain noticeable.
When you mention surface prep, do you recommend using a specific kind of primer for painted drywall, or is sanding and cleaning usually enough before tiling?
For painted drywall, it’s best to lightly sand the surface to remove gloss and roughen it up, then clean off dust. If the paint is glossy or if you’re concerned about adhesion, using a bonding primer can give extra security, but it’s not always required if the wall is properly sanded and cleaned.
When budgeting for a tile backsplash, do you have any tips for estimating how much extra tile to buy in case of mistakes or breakage during installation?
It’s wise to buy about 10-15% more tile than your measured area to cover for mistakes, breakage, and future repairs. For complex patterns or angled cuts, consider upping this to 15%. This extra ensures you can complete the job without unexpected delays.
When planning the layout, do you have any tips for dealing with tricky areas like outlets or corners so you don’t end up with those awkward tiny tile pieces?
To avoid awkward small tile pieces around outlets or in corners, start by laying out your tiles with a dry fit before applying adhesive. Try to center your tiles so that cuts at the edges are as large as possible, and adjust the layout slightly if needed. You can also use trim pieces to create a cleaner finish around outlets or inside corners.
When budgeting for a backsplash project, how much extra should I plan for unexpected expenses like needing more tiles due to mistakes or having to buy additional tools?
It’s a good idea to budget an extra 10-15% for materials like tiles to cover breakage or cutting errors. For tools or supplies you didn’t anticipate, adding another 5-10% to your initial estimate should help manage unexpected costs without surprises.
If the wall has some stubborn grease stains that don’t come off easily, do you recommend any specific degreasers or additional prep steps before tiling?
For tough grease stains, use a heavy-duty degreaser labeled safe for kitchen surfaces. Apply it thoroughly and scrub the area well, then rinse with clean water and let the wall dry completely. If stains persist, lightly sand the spot to ensure the adhesive will bond properly. Proper prep ensures your tiles adhere securely.
You mention planning the layout to avoid awkward slivers of tile at the edges. Do you have tips for laying out tricky areas like around outlets and corners so the tiles line up nicely?
For outlets and corners, dry-fit your tiles before applying adhesive. Start from the center or a focal point and work outward, adjusting as needed so cuts at outlets or corners are larger and less noticeable. Use spacers to keep lines straight and try to align grout lines with outlets when possible for a cleaner look.
When you mention needing to properly prepare the surface before tiling, how can I tell if my kitchen wall is ready? Are there quick ways to check for grease or old residues beyond just wiping it down?
To check if your kitchen wall is ready for tiling, run your hand over the surface to feel for any slick or sticky spots, which may indicate grease. You can also press a piece of masking tape onto the wall—if it doesn’t stick well, there may be residue present that needs cleaning.
I’m curious about the cost breakdown you mentioned—are there certain steps or materials where it’s most common to go over budget during a backsplash installation?
It’s most common to go over budget on backsplash installations during the preparation and material selection phases. Unexpected wall repairs, choosing premium tiles, or underestimating grout and adhesive amounts can all add extra costs. Labor can also increase if intricate designs or patterns are chosen, so it’s wise to factor in these variables when planning your budget.
You mentioned planning the layout to avoid awkward tile slivers. Is there a general rule for determining the best starting point when tiling a backsplash with a window in the middle?
When tiling a backsplash with a window in the middle, it’s often best to center your layout on the window or sink area. This way, you can ensure that any cut tiles at the edges are of similar size, creating a balanced look. Always dry-lay tiles first to visualize and adjust before setting them.
If I accidentally end up with thin tile slivers at the corner despite planning, is there a way to fix it without redoing the whole backsplash?
You can replace just the thin slivers by carefully removing them and cutting slightly wider tiles to fit the space. This takes patience and may involve re-grouting only that section, but it avoids redoing the entire backsplash.
I noticed you mention the importance of surface preparation, like cleaning and sanding. Is there a particular type of primer or degreaser you recommend for kitchen backsplashes that deal with a lot of grease?
For greasy kitchen backsplashes, a citrus-based degreaser or a TSP (trisodium phosphate) solution works well to remove stubborn residues. After degreasing, use a bonding primer specifically designed for tile or glossy surfaces to help the tiles adhere properly. Just make sure the wall is completely dry between steps.
When prepping a painted wall for a backsplash, is there ever a situation where you need to use a special primer, or is sanding and degreasing usually enough for proper tile adhesion?
Sanding and degreasing are usually enough if the wall paint is in good condition and not glossy. However, if the paint is glossy, peeling, or oil-based, using a bonding primer can help ensure proper tile adhesion. For glossy surfaces, a primer specifically for tile or difficult surfaces is a good extra step.
How much extra should I budget for possible mistakes, like needing extra tiles or having to redo some sections if things go wrong during a DIY install?
It’s wise to budget about 10-15% extra for tiles to cover breakage, cutting errors, or pattern matching. For unexpected mistakes that require redoing sections, an additional buffer of 5-10% of your total project cost is sensible. This way, you’ll have some financial flexibility if things don’t go perfectly on your first try.
If the wall surface is slightly uneven after patching and sanding, is it still possible to get straight, even tile lines, or are there additional steps you recommend?
You can still achieve straight, even tile lines on a slightly uneven wall, but using a tile leveling system or spacers will help a lot. For larger uneven areas, consider applying a skim coat of setting compound to smooth out the surface before tiling for the best results.
If the wall has a lot of grease or old paint that’s hard to remove, what’s the best way to prep it so the adhesive sticks properly? Would a primer alone be enough after cleaning?
For greasy or painted walls, thoroughly degrease the surface first using a strong cleaner. Scrape off any loose or flaking paint. Sand glossy paint lightly to create a rough texture. After cleaning and sanding, a good quality primer helps the adhesive bond, but prepping the surface is just as important as priming—it’s not enough to rely on primer alone.
If my wall has a slight bow or uneven areas even after patching and sanding, is it okay to use extra adhesive to compensate, or would you suggest a different approach before starting the backsplash?
It’s best not to rely solely on extra adhesive to make up for uneven spots, as this can cause tiles to shift or look uneven. Use a quality wall leveling compound to smooth out the surface as much as possible before tiling for a more professional and lasting result.
The article mentions budget overruns as a common issue. Could you provide some guidance on how to accurately estimate total costs for both materials and tools, especially for someone new to DIY tiling projects?
To estimate your costs, measure the backsplash area to determine how many tiles you’ll need, then check tile prices and add 10% extra for waste. Don’t forget adhesives, grout, spacers, and sealer. For tools, list what you don’t have—like a tile cutter, trowels, and a level—and factor in their purchase or rental cost.
When preparing the wall, is there a certain type of primer or cleaning solution you would recommend for surfaces that have stubborn grease or old adhesive?
For stubborn grease, use a degreaser or a mix of warm water and a small amount of dish soap, then rinse thoroughly. If old adhesive is present, scrape it off and lightly sand the area. After cleaning and drying, apply a bonding primer designed for tile or glossy surfaces to help the new tiles adhere properly.
What’s the best way to figure out where to start the tile layout so I don’t end up with tiny slivers in the corners, especially in an odd-shaped kitchen?
To avoid ending up with small tile slivers, measure the area and dry-lay a row of tiles with spacers along the wall. Center the layout on the most visible area, then adjust so that cut tiles at the edges are as wide as possible. For odd shapes, sketch the space and use a chalk line or laser level to plan balanced cuts.
You mention budgeting for materials and tools—could you provide average cost ranges for adhesives and grout types, especially for someone doing a standard-size kitchen backsplash?
For a standard-size kitchen backsplash, expect to spend about $20–$40 for tile adhesive and $15–$30 for grout, depending on the type and quality. Epoxy grout tends to be pricier than sanded or unsanded options. Buying in smaller quantities for a backsplash helps keep costs manageable.
Could you give more details on how to handle corners and edges to avoid ending up with those awkward thin tile slivers you mentioned?
To avoid thin slivers at corners and edges, plan your tile layout before starting. Measure and mark the center, then work outwards, adjusting the layout so that cuts at the edges are as wide as possible. You can also shift the starting point slightly to balance out tile sizes at both ends, ensuring a more professional look.
I noticed you recommend dry-laying tiles before starting. How much extra time should I plan for the layout and preparation phase compared to the actual tiling itself?
For most backsplash projects, you should plan to spend about 25–40% of your total project time on layout and preparation, including dry-laying the tiles. For example, if tiling takes 4 hours, expect the layout phase to take 1–1.5 hours. This extra time helps ensure a more professional-looking result and avoids costly mistakes.
If my wall has glossy paint that’s tough to sand off, is there a particular type of degreaser or primer you recommend before tiling, or should I consider other wall prep methods?
If the glossy paint is hard to remove, try using a heavy-duty degreaser first to clean the surface, then use a bonding primer specifically made for slick surfaces. If the wall still feels too smooth, lightly scuff it with sandpaper or consider installing a tile backer board for better adhesion.
When budgeting for this project, do you have any advice on estimating costs for unexpected repairs, like fixing damaged drywall before tiling?
A good approach is to set aside a contingency fund—typically 10–20% of your total project budget—to cover unexpected repairs like fixing damaged drywall. Get a quick inspection before starting, so you’re aware of any obvious issues that might affect your tiling budget.
Could you clarify what type of primer is best for prepping a painted wall before tiling, especially if the existing paint is glossy?
For prepping a painted wall, especially one with glossy paint, use a high-quality bonding primer formulated for glossy or non-porous surfaces. Be sure to lightly sand the wall first to dull the sheen, clean off any dust, then apply the primer before tiling.
Could you clarify what kind of wall primer works best before tiling, especially if the wall has a glossy paint finish? The article mentions priming but doesn’t specify products or primer types.
For glossy painted walls, it’s best to use a bonding primer designed for hard-to-adhere surfaces. Look for primers labeled as ‘bonding’ or ‘adhesion-promoting.’ These help tile adhesive stick properly to glossy finishes. Make sure the wall is clean and sand lightly before applying the primer for best results.
If I mess up the tile layout and end up with those thin slivers at the ends, is it better to readjust everything or can I camouflage the edges somehow?
Thin slivers at the ends can be tricky to hide and often stand out. If possible, it’s best to readjust the layout and start with a wider cut tile at each end. If that’s not an option, you can sometimes use trim pieces or edging to help camouflage the edges, but the overall look may not be as clean.
I’d like to avoid budget overruns—about how much extra material should I buy to cover mistakes or unexpected issues when installing a tile backsplash?
It’s wise to buy about 10% extra tile than your measured area to cover mistakes, cuts, or unexpected issues. This small surplus helps ensure consistency in pattern or color if you need replacements later and helps avoid costly project delays.
If I’m installing a backsplash in a bathroom instead of a kitchen, are there any extra steps I should take in terms of surface preparation or adhesive to prevent moisture issues?
For a bathroom backsplash, it’s important to use a water-resistant backer board instead of standard drywall, and make sure all surfaces are completely dry and free of dust. Choose a waterproof adhesive and grout, and consider applying a grout sealer after installation to protect against moisture.
If I want to avoid awkward tile sizes at the edges, how do I adjust my layout plan without wasting too many tiles?
To avoid awkward edge cuts, start by dry-laying a row of tiles and centering them on your focal point—like the stove or sink. This way, you’ll have more even cuts at both ends. Adjust the grout lines or slightly shift the layout to minimize waste when possible.
If my kitchen wall has a few dents and some leftover paint, how much prep work do I actually need to do before tiling? Could I get by with just sanding it lightly, or do I need to patch everything perfectly for the tiles to stay in place?
For the best results, you’ll want to patch dents so the surface is as flat as possible. Light sanding can help remove leftover paint, but tiles adhere properly only to a smooth, even surface. Skipping patching might cause tiles to loosen or crack over time, so it’s worth taking the extra prep steps.
You mention using a degreaser and sanding glossy paint. Is it always necessary to do both, or just one depending on the condition of the wall?
You may only need to do one step, depending on the wall’s condition. Use a degreaser if the wall is greasy or dirty. Sanding is needed if the paint is glossy, to help the adhesive stick. If your wall is clean and not glossy, you might not need to do both.
The article mentions budget overruns—do you have any tips on how much extra tile or materials to buy to avoid coming up short or overspending?
A good rule of thumb is to buy 10–15% more tile than your measured area to cover cuts, mistakes, and future repairs. For other materials like adhesive and grout, check the packaging for coverage estimates and round up to avoid shortages.
I noticed you mentioned budget overruns as a common pitfall. Are there any tips for estimating material costs more accurately, especially when dealing with tricky layouts or patterned tiles?
To estimate material costs more accurately, always measure your backsplash area carefully and add at least 10-15% extra tile for cuts or errors, especially with patterns or complex layouts. Layout your tile plan on paper first to spot tricky areas, and consult with your tile supplier for precise quantity recommendations based on your design.
If I notice minor uneven spots on my wall after sanding, is it better to keep sanding or should I switch to using a patch compound before tiling to avoid problems later on?
If you still see minor uneven spots after sanding, it’s best to switch to a patch compound. This will help smooth out imperfections and create an even surface, which is important for proper tile adhesion and a professional-looking finish.
What’s a reasonable weekend timeline for a DIYer tackling their first backsplash, especially when it comes to drying times between steps like priming, tiling, and grouting?
For a weekend project, you can usually prime on Friday evening, let it dry overnight, start tiling Saturday morning, and allow the adhesive to set for 24 hours. Grout on Sunday, then wait another 24 hours before using the area. Always check your product labels for exact drying times, as they can vary.
Could you give some ballpark figures on how much I should expect to spend on materials versus tools for a standard-size kitchen backsplash?
For a standard kitchen backsplash, materials like tiles, adhesive, and grout usually range from $200 to $600, depending on tile choice. Tools—such as a tile cutter, spacers, trowel, and level—might add $50 to $150 if you don’t have them already. Materials generally make up the larger portion of the cost.
You mention budgeting realistically for materials and tools. Could you provide any tips on where it makes sense to save versus where it’s worth investing a bit more for quality?
It’s smart to invest in quality tiles and adhesives, since they impact both the look and durability of your backsplash. You can save on tools by renting specialty items or opting for mid-range options if you won’t use them often. Grout and spacers don’t need to be top-tier, but don’t cut corners on surface prep materials.
When preparing the wall, is there a specific type of primer you recommend for surfaces that previously had glossy paint?
For walls with glossy paint, it’s best to use a bonding primer designed for difficult surfaces. Look for a primer labeled “bonding” or “adhesion,” as these will help the thinset or tile adhesive grip the slick surface effectively after you’ve cleaned and lightly sanded the area.
For budgeting, how much extra tile and grout do you recommend buying to cover mistakes or future repairs? I always worry about running short mid-project.
It’s wise to buy about 10–15% more tile than your measured area to cover mistakes, cuts, and any future repairs. For grout, one extra small container is usually enough, depending on your project’s size, so you’re covered if you need touch-ups later.
How should I budget for adhesive and grout, especially if I’m not sure which types are best for a kitchen backsplash versus a bathroom?
For budgeting, estimate adhesive and grout costs by measuring your backsplash area and adding 10% for waste. Kitchen backsplashes usually need water-resistant, but not fully waterproof, products—while bathrooms require stronger waterproof adhesive and mildew-resistant grout. Choose based on location, then compare prices at your local hardware store to finalize your budget.
The article mentions prepping the wall surface, but how do I know if old paint needs to be removed completely, or is light sanding usually enough before tiling?
You generally only need to remove old paint if it’s peeling or flaking. If the paint is sound and firmly attached, light sanding to roughen the surface should be enough to help the tile adhesive stick well. Make sure the wall is clean and free of dust after sanding.
If my kitchen wall has a bit of unevenness after sanding and patching, does that mean I should hire a pro, or can I still get a flawless result as a DIYer? What are some fixes for slightly wavy surfaces?
You can still achieve a great DIY result if the unevenness is minor. Use a quality tile adhesive to help level out small waves and consider using larger tiles, which can be more forgiving. For bigger dips or bumps, apply a self-leveling compound or extra patching before tiling. Take your time with prep and check tile alignment as you go.
If the wall has existing minor cracks or is slightly uneven, should I re-drywall that section or are there repair products that can create a solid foundation without a full replacement?
You don’t always need to re-drywall for minor cracks or slight unevenness. You can use patching compounds or joint compound to fill cracks, and a skim coat to smooth out uneven areas. Just make sure the wall is clean, dry, and flat before tiling for the best results.
The article mentions budget overruns as a common issue. How much extra should I realistically set aside for unexpected costs when planning a DIY backsplash project?
It’s wise to set aside an extra 10–20% of your total budget for unexpected expenses when tackling a DIY backsplash project. This cushion helps cover things like extra materials, broken tiles, or last-minute tool needs.
When budgeting for this project, are there any hidden costs with tools or prepping the wall surface that first-timers like me often miss?
First-timers often overlook the costs of tools like tile cutters, spacers, and trowels, as well as materials for prepping the wall, such as primer or backer board. You might also need extra adhesive, grout, or sealant. Don’t forget cleanup supplies and possibly a level or stud finder.
Can you give an idea of a realistic budget range for materials and basic tools for a modest-size backsplash project, assuming it’s my first time?
For a modest-size backsplash, expect to spend $100–$300 on materials like tiles, adhesive, and grout. Basic tools such as a tile cutter, spacers, trowel, and level can cost another $50–$100. These estimates cover most beginner projects and allow for some flexibility in tile choice.
For budgeting, could you elaborate on typical price ranges for materials and tools when installing a backsplash yourself versus hiring a professional?
For a DIY backsplash project, materials and tools usually cost between $8 and $20 per square foot, depending on tile type and quality. If you hire a professional, total costs typically range from $25 to $50 per square foot, which includes labor. Doing it yourself can save significantly on labor costs.
I see you mention using a degreaser and sanding for glossy or stubborn residues. Is there a specific type of degreaser that’s best for prepping kitchen walls before tiling, or will any household cleaner do the trick?
For prepping kitchen walls before tiling, it’s best to use a heavy-duty degreaser designed for kitchen use, such as one formulated to cut through grease and oil. Regular household cleaners might not remove all residues, so opt for a product labeled as a degreaser for best results.
For someone who hasn’t tiled before, about how long should it take to prep the wall and map out the tile layout in a medium-sized kitchen?
For a beginner, prepping the wall and mapping out the tile layout in a medium-sized kitchen usually takes about 3 to 5 hours. This includes cleaning the wall, making any repairs, and carefully planning the tile pattern before beginning installation.
Can you give more details on how to budget for both materials and tools before starting a backsplash project, especially for someone new to DIY?
Start by measuring your backsplash area to calculate how many tiles you’ll need, then add 10% extra for mistakes. List all essential materials like tiles, adhesive, grout, spacers, and sealant. For tools, include a tile cutter, trowel, level, and safety gear. Check local prices or online retailers and total up your estimated costs before buying anything.
For someone with limited DIY experience, how much time should I realistically set aside to plan the layout and dry-lay tiles before installing a backsplash in a standard-size kitchen?
For a standard-size kitchen and limited DIY experience, plan on spending about 2–4 hours to measure, map out your layout, and dry-lay the tiles. Take your time during this step to ensure everything fits well and aligns properly before starting installation.
The article mentions budget overruns being common. Are there hidden costs in the backsplash installation process I should be aware of when estimating my total expenses as a small business owner remodeling a commercial kitchen?
Yes, there can be hidden costs such as unexpected wall repairs, extra tile purchases due to breakage or pattern matching, specialized tools, or higher labor charges for intricate designs. Also, disposal fees for old materials and potential downtime during installation may add to your overall expenses.
You mentioned budget overruns—do you have any tips for estimating tool and material costs more accurately up front, especially for those of us doing this the first time?
To estimate costs more accurately, measure your backsplash area carefully and add 10% to cover errors or waste. Make a list of all tools and materials you’ll need, then check prices at local stores or online. Ask staff for advice or look up beginner kits, which often bundle essentials at a lower price.
You mentioned budget overruns—what unexpected costs should I watch out for as a first-timer, especially when buying materials and tools for a backsplash?
When buying materials and tools, unexpected costs can include extra tiles for waste or breakage, specialty adhesives or grout, tile spacers, and proper cutting tools. You might also need sealant or backer board, depending on your wall. Double-check measurements and factor in about 10% extra materials to avoid last-minute purchases.
What’s a reasonable budget range for the materials and tools needed for a small kitchen backsplash, assuming I want to avoid those unexpected cost overruns you mentioned?
For a small kitchen backsplash, budgeting $200 to $500 for materials and basic tools is reasonable. Tile type affects cost; ceramic is more affordable than glass or stone. Include grout, adhesive, spacers, a trowel, and a tile cutter. Setting aside an extra 10–15% for unexpected needs can help prevent surprise expenses.
The article mentions budget overruns—what are some unexpected costs I should watch out for when buying materials or tools for a backsplash project?
Some unexpected costs can include extra tiles for mistakes or breakage, specialty tools like tile cutters, adhesives or grout not included with tiles, sealants, and underlayment materials. Delivery fees for bulky tile orders and disposal costs for old materials can also add up, so it’s smart to budget for these from the start.
If our kitchen walls have old glossy paint that just won’t come off, is sanding enough for prep or should I prime with something specific before tiling?
Sanding the glossy paint will help roughen the surface, but for best results, apply a high-quality bonding primer after sanding. This ensures the tile adhesive sticks well and reduces the risk of tiles coming loose over time.
You mentioned that using the wrong adhesive or grout can be an issue. For a kitchen backsplash above a stove, what type of adhesive do you recommend to handle heat and moisture?
For a kitchen backsplash above a stove, it’s best to use a high-quality polymer-modified thinset mortar as your adhesive. This type is designed to withstand both heat and moisture, ensuring your tiles stay secure even in demanding kitchen conditions.
When you mention priming the wall before tiling, do you recommend a specific type of primer or just any standard wall primer for best adhesion?
For best adhesion when tiling, it’s recommended to use a primer specifically designed for tile or masonry surfaces, not just any standard wall primer. Look for primers labeled as suitable for non-porous or glossy surfaces, or those intended as a tile adhesive primer. This ensures better bonding and reduces the risk of tiles loosening over time.
You mentioned budget overruns being common—could you give a ballpark figure of how much extra material I should buy just in case, especially for complex layouts?
For complex tile backsplash layouts, it’s wise to purchase about 15% extra material beyond your measured area. This covers unexpected cuts, breakage, and pattern adjustments, helping you avoid costly delays or mismatched tiles if you run short during installation.
If the wall behind my sink has some old adhesive that won’t come off even after sanding, what’s the best way to prep it for new tiles?
If old adhesive won’t come off after sanding, try using a putty knife or scraper to remove as much as possible. For stubborn spots, apply a skim coat of drywall compound to create a smooth, even surface, then let it dry and sand lightly before tiling.