Introduction: Why Every Home Improver Needs a Dedicated Workshop
For any homeowner embarking on DIY projects, renovations, or simple repairs, having a dedicated home workshop is a game-changer. Not only does it streamline your workflow by keeping essential tools and materials organized, but it also establishes a safe, controlled environment for creativity and productivity. Whether you’re a beginner learning the ropes or a passionate home improvement enthusiast, setting up a functional workshop can seem daunting. What tools are truly essential? How should you configure your workspace for efficiency and safety? What storage solutions will prevent chaos and clutter? This comprehensive guide walks you step-by-step through planning, equipping, and organizing your first home workshop. We’ll cover smart layout strategies for different spaces, essential tools for diverse home projects, effective storage and organization hacks, safety musts, and practical tips for maintaining your workshop long-term. By the end, you’ll have a clear blueprint for transforming a corner of your garage, basement, or spare room into a hub of productivity and DIY inspiration.
Step 1: Choosing the Right Location for Your Workshop
Assess Your Space Options
The ideal workshop location depends on your home’s layout and the type of projects you plan to tackle. Common candidates include garages, basements, sheds, spare rooms, or even large closets. Start by evaluating these areas for size, accessibility, ventilation, lighting, and proximity to power outlets.
- Garage: Offers space and ventilation, but may require insulation for year-round use.
- Basement: Usually quiet and spacious, but check for moisture and adequate lighting.
- Shed: Great for noisy or dusty work, but may need electrical upgrades and climate control.
- Spare Room: Convenient for small-scale projects; focus on dust control and noise mitigation.
Critical Considerations
- Noise: Will your work disturb household members or neighbors?
- Ventilation: Essential for projects generating dust or fumes.
- Flooring: Concrete is ideal for heavy-duty work, but mats or tiles can improve comfort.
- Security: Protect valuable tools with solid locks and, if possible, a security system.
Step 2: Plan Your Workshop Layout for Efficiency and Safety
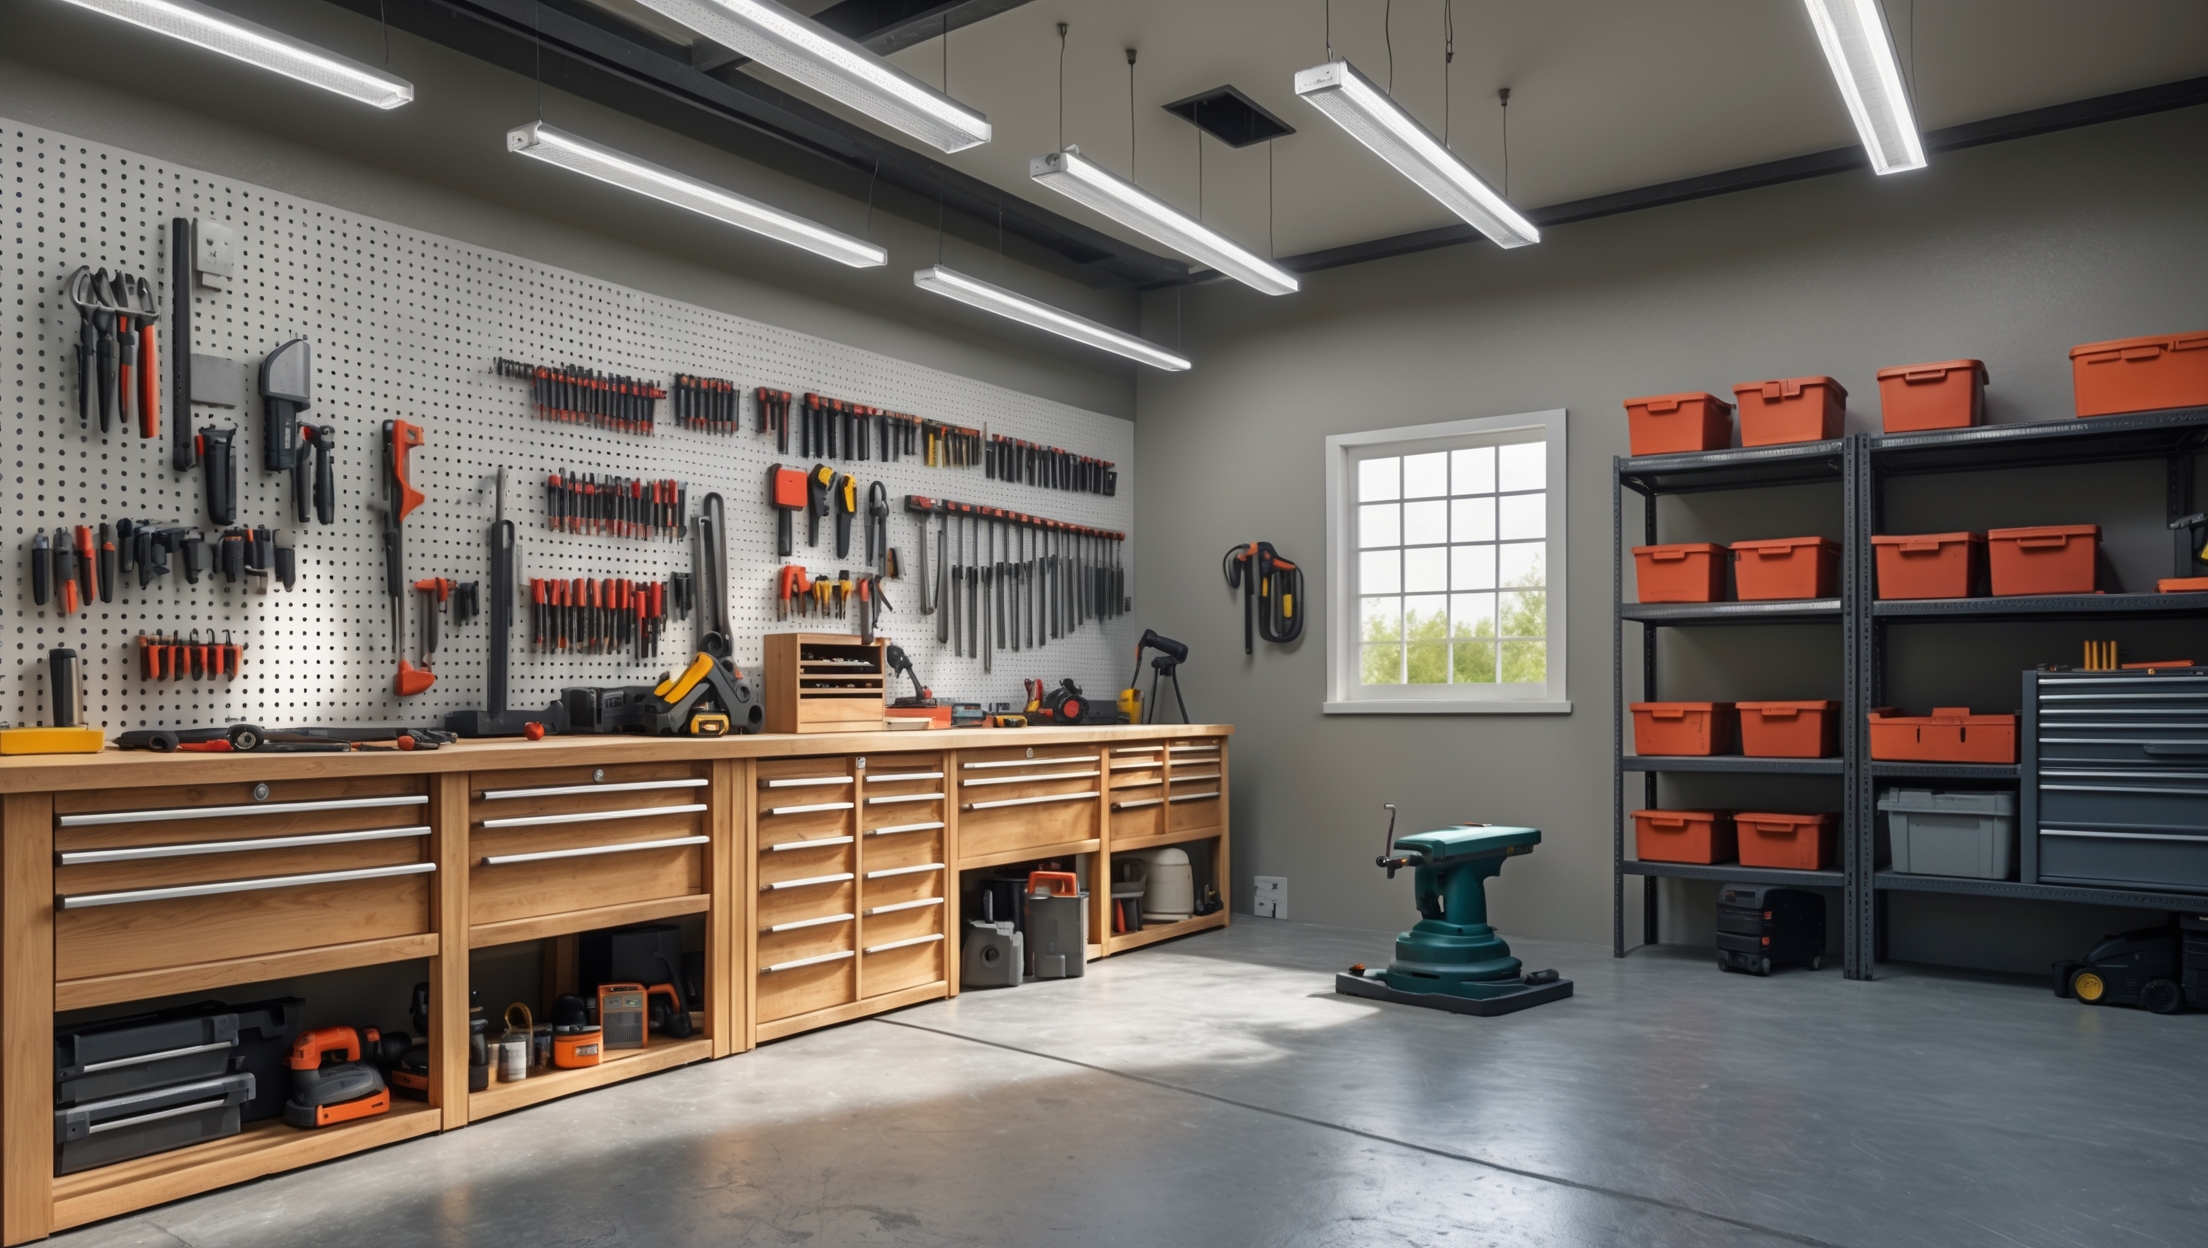
Work Zones: The Heart of Workshop Organization
Divide your workshop into distinct zones based on activity. This approach streamlines workflow and minimizes safety hazards:
- Work Area: The central space with your main workbench.
- Tool Storage: Wall-mounted racks, pegboards, or tool chests for quick access.
- Material Storage: Shelves or bins for lumber, fasteners, paints, and consumables.
- Assembly/Finishing: A clean surface for putting projects together or applying finishes.
- Power Tool Station: Dedicated space for saws, sanders, or drill presses, with wired outlets.
Optimizing Workflow
Arrange your zones to mirror the typical sequence of your projects. For example, raw materials might be stored near the entrance, then move to cutting/power tools, then assembly, and finally storage or finishing. Avoid cramming too much into one area; leave ample room to move safely around work surfaces.
Lighting and Electrical Setup
- Lighting: Overhead LED fixtures provide general illumination; supplement with adjustable task lights over benches.
- Outlets: Install GFCI-protected outlets every 6-8 feet along the walls. Use retractable extension cords for flexibility.
- Surge Protection: Protect sensitive tools with surge-protected power strips.
Step 3: Essential Tools and Equipment for Beginners
The Must-Have Starter Kit
- Workbench: Sturdy, flat, and ideally height-adjustable. Consider DIY options to suit your space.
- Tool Storage System: Pegboard, wall rails, or modular cabinets to keep items visible and accessible.
- Hand Tools:
- Hammer (16oz claw)
- Screwdriver set (flathead and Phillips)
- Tape measure (25ft)
- Utility knife
- Level (24” or 48”)
- Pliers (needle-nose and combination)
- Adjustable wrench
- Handsaw
- Power Tools:
- Cordless drill/driver and bit set
- Random orbital sander
- Jigsaw or circular saw
- Shop vacuum (wet/dry)
- Safety Gear:
- Safety glasses/goggles
- Hearing protection (earmuffs or plugs)
- Respirator or dust mask
- Work gloves
Expanding Your Arsenal (As Your Skills Grow)
- Table saw (for advanced woodworking)
- Drill press
- Router
- Compressor and pneumatic tools
- Bench grinder
Start with the essentials, then invest in more specialized tools as your projects demand.
Step 4: Smart Storage Solutions for a Clutter-Free Workshop
Wall-Mounted Storage
- Pegboards with hooks and bins for hand tools
- Magnetic strips for metal tools
- Wall-mounted cabinets for paint, adhesives, or hazardous materials
Freestanding Storage
- Mobile tool chests for frequently used items
- Open shelving for bulky materials
- Stackable bins for screws, fasteners, and small parts (label everything clearly)
- Rolling carts for project-specific supplies
Work Surface Organization
- Drawer organizers for measuring tools, pencils, and hardware
- Bench-mounted vises or clamps for hands-free work
Keep your primary workbench as clear as possible to allow flexibility for any project.
Step 5: Workshop Safety—Non-Negotiable Essentials
Personal Protective Equipment (PPE)
- Always wear eye and hearing protection when operating power tools.
- Use dust masks or respirators when sanding, painting, or working with chemicals.
- Steel-toed boots and gloves protect against dropped tools and sharp objects.
Fire Safety
- Install a multipurpose (ABC) fire extinguisher within reach.
- Keep flammable liquids in approved safety containers, away from heat sources.
- Ensure adequate ventilation, especially when using solvents or paints.
Electrical Safety
- Inspect cords and plugs regularly for damage.
- Never overload circuits; use surge protectors and GFCI outlets.
- Disconnect power tools before changing blades or bits.
General Best Practices
- Maintain a tidy workspace to prevent slips, trips, and falls.
- Store sharp or heavy tools securely when not in use.
- Post emergency contact numbers and first-aid instructions in a visible spot.
Step 6: Workshop Maintenance and Upkeep
Daily and Weekly Routines
- Wipe down surfaces and sweep floors after each session.
- Return tools to their designated storage spots immediately after use.
- Inspect safety gear for wear and replace as needed.
Monthly and Annual Tasks
- Lubricate moving parts on tools and equipment.
- Check for rust or corrosion and address promptly.
- Test power outlets, lighting, and fire extinguishers.
- Review and reorganize storage as your collection grows.
Establishing a maintenance routine extends the lifespan of your tools and keeps your workshop a pleasant, productive environment.
Step 7: Bonus Tips for Small Spaces and Budget Workshops
Making the Most of Limited Square Footage
- Use fold-down benches or wall-mounted work surfaces.
- Install ceiling-mounted storage racks for infrequently used items.
- Opt for compact, multi-function tools when possible.
Budget-Friendly Hacks
- Repurpose old cabinets or bookshelves for storage.
- Build your own tool racks with scrap lumber.
- Shop for used tools at estate sales, auctions, or online marketplaces.
Remember: A well-organized, efficient workshop is a product of thoughtful planning, not necessarily a big budget.
Conclusion: Your Workshop, Your DIY Launchpad
Setting up your first home workshop is an investment in your skills, your home, and your peace of mind. By carefully selecting your location, planning your layout, acquiring essential tools, and prioritizing safety, you create a space that empowers you to tackle projects confidently and efficiently. Organizing your workshop isn’t just about aesthetics—it’s about working smarter, minimizing frustration, and keeping your tools and materials in top condition. Safety is not an afterthought; it’s the foundation that lets you enjoy your DIY pursuits while protecting yourself and your loved ones. Maintenance, both of your tools and your space, ensures your workshop remains functional and inviting for years to come.
Whether your ambitions are modest repairs or ambitious home renovations, your workshop is the beating heart of your home improvement journey. Start small, stay organized, and upgrade as your skills and projects grow. With the right setup, every new idea becomes just a project away from reality.
When setting up a workshop in a basement, you mention checking for adequate lighting and moisture. What are some practical ways to improve lighting and deal with possible dampness if these are issues?
To improve basement lighting, consider installing bright LED shop lights or portable work lights. For moisture, use a dehumidifier, seal any cracks in walls or floors, and store tools off the ground. Good ventilation also helps manage both light and dampness for a safer workshop.
I’m deciding between setting up my workshop in the garage or a shed. Are there specific projects or tools that work better in one space versus the other, especially for someone just starting out?
A garage usually offers more space and sturdier power sources, making it better for larger tools like table saws or projects that need more room. Sheds can be great for quieter hand tool work or smaller projects, but might need electrical upgrades for power tools. If you’re just starting out, consider what you want to build most and which space is more comfortable year-round.
If I only have a small spare room available, how can I handle dust control and noise so it doesn’t bother the rest of the house?
In a small spare room, use a shop vacuum with HEPA filters on tools and consider a portable air purifier to help with dust. Keep the door closed and use weatherstripping to seal gaps. For noise, add rugs or foam panels on walls and always work during reasonable hours to minimize disturbance.
With little kids around, safety is my top concern. What do you suggest for dust control and noise reduction if I’m using a spare room as my workshop?
For dust control, use a shop vacuum with HEPA filters and keep tools with built-in dust collection. Seal gaps around doors and windows to contain dust. For noise, add weatherstripping, use rubber mats on the floor, and hang heavy curtains to absorb sound. Always store sharp or dangerous tools out of reach.
If I plan to use my basement for a workshop but it’s a bit damp sometimes, do you have any tips for managing moisture and protecting my tools from rust?
To manage moisture in your basement workshop, use a dehumidifier to keep humidity low and consider sealing any leaks or exposed concrete. Store tools in airtight containers or use silica gel packs to reduce rust risk. Regularly wipe down metal surfaces with light oil for added protection.
For someone with limited garage space, which essential tools would you prioritize in the initial setup to avoid clutter but still cover basic DIY projects?
For a small garage workshop, start with a cordless drill, a circular saw, a set of screwdrivers, a hammer, a tape measure, and a few clamps. Add a compact workbench or folding table for workspace. These basics will let you tackle most DIY projects without taking up much room.
If I only have a small spare room available, do you have tips for minimizing dust and noise, especially since the article mentioned focusing on those for indoor setups?
For a small indoor workshop, use a portable dust extractor or shop vacuum with your tools, and add a box fan with a furnace filter to help trap airborne particles. To reduce noise, place rubber mats under machines and keep the door closed. Sound-absorbing panels or curtains can also help dampen noise for the rest of your home.
If my only available space is a basement with some moisture issues, what specific steps should I take to make it safe and suitable for a workshop?
To make your basement workshop safe, start by addressing moisture: use a dehumidifier, seal any cracks in the walls or floor, and consider waterproof paint. Elevate tools and materials off the ground, and install good ventilation. Check that electrical outlets are protected from dampness, and always store flammable materials safely away from heat sources.
Do you have any budget-friendly suggestions for adding extra power outlets or improving lighting in a basement workshop without hiring an electrician?
For extra power, consider using heavy-duty power strips or extension cords with surge protection—just avoid overloading them. For lighting, plug-in LED shop lights are bright, energy-efficient, and easy to install: simply hang them and plug them into an outlet. These solutions are affordable and don’t require any electrical work.
You mentioned that garages might need extra insulation for year-round use. Could you recommend specific insulation materials or techniques that work well in a typical garage workshop?
For garage workshops, rigid foam boards (like polyisocyanurate or extruded polystyrene) work well on walls for their high R-value and moisture resistance. For ceilings, consider fiberglass batts if you have attic access. Sealing gaps around doors and windows with weatherstripping or spray foam also helps maintain temperature.
How do you recommend dealing with moisture issues if the basement is the only viable option for a workshop, especially for storing power tools and wood?
To manage moisture in a basement workshop, use a dehumidifier to keep humidity low, and store wood and tools off the ground on shelves or pallets. Seal any cracks in walls or floors, and consider using a moisture barrier on the floor. Regularly check for leaks or dampness to protect your equipment and materials.
If I’m setting up a workshop in my basement, what’s the best way to handle moisture issues so tools and materials don’t get damaged over time?
To protect your tools and materials from moisture in a basement workshop, use a dehumidifier to keep humidity low, store items off the floor on shelves or racks, and consider moisture barriers like sealed concrete floor paint. Also, keep good airflow by installing vents or using fans to further reduce dampness.
If space is tight and I’m considering converting a large closet into a mini workshop, what are some practical tips for ventilation and dust control in such a confined area?
For a closet workshop, use a portable air purifier with a HEPA filter to help capture fine dust. Install a small exhaust fan or vent to the outside if possible, or keep the door open when working. Also, use hand tools or low-dust power tools, and regularly vacuum surfaces to keep dust levels down.
If I want to convert a spare room into a small workshop, what are some practical ways to control dust and noise without investing in expensive renovations?
To control dust, use a portable shop vacuum and regularly clean surfaces. Hanging plastic sheeting or heavy curtains can help contain dust and reduce noise. Try placing foam mats or rugs on the floor to muffle sounds. Weatherstripping around the door also helps limit both noise and dust escape.
Are there any tips for controlling dust and noise if I only have space in a spare room for my workshop?
For dust control in a spare room workshop, use a shop vacuum with your tools, keep a window open if possible, and consider an air purifier. To reduce noise, lay down rugs or mats, seal gaps around doors, and work during daytime hours to minimize disturbances.
Once I’ve picked a location, what’s the first tool or storage item I should invest in to get started, especially if I’m tight on space and budget?
A sturdy workbench with built-in storage is a smart first investment. It gives you a solid surface for projects and a place to organize essential tools, maximizing your space and budget. Look for compact or foldable options if your workshop area is small.
When deciding between setting up a workshop in the garage versus the basement, what should I prioritize if I want to do both woodworking and occasional repairs?
Since you want to do woodworking and repairs, prioritize ventilation, dust control, and ease of moving tools or materials. Garages often have better airflow and easier access for larger projects, while basements may need extra work for ventilation and dust management. Noise is also a factor—garages are usually further from living spaces.
I have a garage but it gets super cold in winter—do you recommend a certain type of insulation or heater that’s safe around sawdust and tools?
For garage workshops, rigid foam board or fiberglass batt insulation works well to keep things warmer. For heating, consider an electric infrared heater since it doesn’t produce an open flame, making it safer around sawdust. Always avoid propane or kerosene heaters unless they’re specifically marked as safe for indoor workshop use.
For someone with only a small spare room available, what affordable dust control solutions would you recommend to keep the rest of the house clean?
For a small spare room, try using a box fan with a furnace filter taped to the intake side to capture airborne dust. Always work with the door closed, and place a door sweep or draft blocker at the bottom to limit dust migration. Regularly vacuum with a HEPA-filter vacuum and wipe down surfaces after each session.
When you mention needing electrical upgrades for a shed workshop, how involved does that usually get and what should I expect in terms of cost or permits?
Upgrading electrical in a shed can range from adding a simple circuit to a full sub-panel, depending on your tool needs. Expect to hire a licensed electrician, which could cost from a few hundred to a couple thousand dollars. Most areas require permits and inspections for new wiring, so check with your local building department first.
When you’re recommending storage solutions to prevent clutter, do you find wall-mounted racks or mobile tool cabinets work better for a beginner working in limited space?
For a beginner with limited space, wall-mounted racks are usually more effective because they free up valuable floor area and keep tools visible and accessible. Mobile tool cabinets are handy if you need to move tools around, but they can take up room. Combining both can also work well if your space allows.
If I set up my workshop in an uninsulated garage, what’s a budget-friendly way to make it comfortable enough for year-round use, especially in the winter?
To make an uninsulated garage workshop more comfortable in winter, consider using portable electric space heaters and sealing any drafts around doors and windows with weatherstripping. Laying down inexpensive foam mats can help insulate the floor. These steps are cost-effective and make a noticeable difference without major renovations.
If I want to keep my initial investment low, which of these workshop spaces typically requires the least upfront cost for basic setup and safety improvements?
A garage or a spare room usually requires the least upfront cost for a basic workshop setup and safety upgrades. These spaces already have electricity and solid flooring, so you mostly need some basic storage, a sturdy workbench, and essential safety gear to get started affordably.
For someone on a tight budget, which essential tools should I prioritize first to get started, and what can wait until later?
To start on a tight budget, prioritize a good hammer, measuring tape, utility knife, screwdrivers, and a cordless drill. These basics cover most beginner projects. Saws, clamps, and power sanders are useful but can wait until you take on more advanced tasks.
If I want to convert a shed into my workshop but it lacks electricity, what would be a cost-effective way to safely add power and climate control?
For basic, safe power in your shed, consider running an outdoor-rated extension cord from your house if your needs are minimal. For a permanent solution, hire an electrician to install a dedicated circuit and outlets. For climate control, a portable heater or fan is affordable, or try a small window AC unit if your shed is well-insulated.
You mentioned that garages might need insulation for year-round use. How expensive is it to insulate a basic one-car garage enough to comfortably work in winter or summer?
Insulating a basic one-car garage typically costs between $500 and $1,500, depending on materials and whether you do it yourself or hire a professional. Adding batt or foam board insulation to walls and the garage door is common. Proper sealing and considering a small heater or portable AC can further improve comfort.
If I’m setting up my first workshop in a basement, what are some effective ways to deal with moisture issues and ensure my tools and materials stay protected?
To manage basement moisture, use a dehumidifier and ensure good ventilation. Store tools off the floor on shelves or pegboards, and consider sealable containers for sensitive materials. Also, check for leaks and waterproof walls as needed to keep your workshop dry and your equipment protected.
If my budget is limited, what are the absolute must-have tools for a starter workshop focused mainly on simple repairs and home projects?
For a starter workshop on a budget, focus on these essentials: a claw hammer, a set of screwdrivers, a tape measure, an adjustable wrench, pliers, a utility knife, and a cordless drill. These tools will cover most simple repairs and basic home projects without breaking the bank.
Between a garage and a shed, which space would you recommend prioritizing for insulation and electrical upgrades if I want to use my workshop year-round?
If you plan to use your workshop throughout the year, prioritizing insulation and electrical upgrades in the garage usually makes more sense. Garages are typically more weather-tight and already have some utilities, making upgrades easier and your workspace more comfortable in all seasons.
You mention that garages might need insulation for year-round use. Can you suggest affordable insulation options that won’t take up too much space?
Foam board insulation is a budget-friendly option that’s thin yet effective for garage walls. Reflective foil insulation is another space-saving choice, especially if you mainly want to reduce heat gain or loss. Both can be installed yourself and won’t eat up much workshop space.
The article mentions needing good ventilation and lighting. What are some affordable ways to upgrade lighting and airflow in a garage if I’m working with a tight budget?
For affordable lighting, try LED shop lights or clamp lights—they’re bright, energy-efficient, and easy to install. For ventilation, use a box fan in a window or doorway, and crack the garage door open while you work. Adding a portable air purifier can also help if you do a lot of sanding or painting.
I’m trying to decide between setting up my workshop in the garage or basement. The article mentions things like ventilation and moisture—how do you deal with humidity or dampness if you use the basement?
To control humidity and dampness in a basement workshop, use a reliable dehumidifier and monitor humidity levels regularly. Seal any cracks in walls or floors to prevent water intrusion, and store materials off the floor. Good ventilation is also important, so consider adding vents or a small exhaust fan if possible.
When picking between a garage and a basement for a first workshop, what tips do you have for adding extra electrical outlets without breaking the bank? I noticed power supply is a big factor in your suggestions.
For affordable extra outlets, consider using heavy-duty power strips or industrial-grade extension cords as a temporary solution. If you want something more permanent, hiring an electrician to add just a few strategically placed outlets can be cost-effective, especially if your breaker panel is nearby. Always prioritize safety and avoid overloading circuits.
You mention sheds as an option, but what are some practical ways to add electrical outlets and climate control if my shed doesn’t have them yet?
For electrical outlets, it’s safest to hire a licensed electrician to run wiring from your home to the shed, ensuring it meets local codes. For climate control, portable heaters or air conditioners are good options, along with added insulation to maintain temperature and improve comfort.
You mention that basements are usually quiet and spacious, but may have moisture issues. Can you suggest specific ways to address basement dampness to make it a safe and effective workshop space?
To manage basement dampness, use a dehumidifier to control humidity, seal any cracks in walls or floors, and consider waterproofing paint. Elevate tools and materials off the floor on shelves or pallets. Good ventilation also helps, so install vents or fans if possible.
For small projects in a spare room, what practical tips do you have to manage dust and noise without making big renovations?
To control dust and noise in a spare room, try using a shop vacuum with attachments for cleanup, and work on a mat that’s easy to shake out. Keep windows open for ventilation and use a door draft stopper to limit noise. Portable tools are generally quieter—avoid running power tools late at night to keep peace with others at home.
You mention garages may need insulation for year-round use. What type of insulation works best for turning a standard garage into a comfortable workshop space?
Rigid foam board and fiberglass batt insulation are both excellent choices for garages. Rigid foam offers high insulation value and moisture resistance, while fiberglass batts are affordable and easy to install. For best results, insulate both walls and the garage door, and consider adding drywall over the insulation for extra comfort and fire safety.
When setting up a workshop in a basement, what are some effective ways to deal with moisture and humidity so my tools and materials don’t get damaged?
To manage moisture and humidity in a basement workshop, use a reliable dehumidifier and ensure good ventilation. Store tools in airtight containers or use silica gel packs. Sealing concrete floors and walls can also help prevent dampness from seeping in, protecting both your tools and materials.
If I only have a small corner of my garage available and use that space for storage too, how can I balance having essential tools accessible without everything feeling cluttered?
Try using vertical storage like pegboards or wall-mounted shelves to keep tools visible and off your work surface. Opt for compact, multi-purpose tools and store less-used items in labeled bins. Keeping your workspace tidy after each session will help prevent clutter.
You mention the importance of proximity to power outlets. For someone converting a shed, what are the safest and most cost-effective ways to upgrade the electrical setup?
For a shed conversion, have a licensed electrician assess your needs and install dedicated circuits or additional outlets. Using proper wiring, weatherproof outlets, and a subpanel if needed ensures safety. Avoid relying on extension cords for permanent setups, as this can be a fire hazard and isn’t cost-effective in the long run.
For a beginner who’s just starting out, what would you say are the minimum set of tools needed before I start organizing storage solutions?
Before you plan storage, start with a few basics: a hammer, tape measure, screwdriver set, adjustable wrench, pliers, utility knife, and a cordless drill. Once you’ve gathered these essentials, you’ll have a better sense of your storage needs and can organize accordingly.
If my main concern is having enough electrical outlets for tools, what are some affordable and safe ways to add more power sources to a shed or garage workshop setup?
For more outlets in your workshop, consider using heavy-duty power strips or surge protectors rated for tools. Avoid daisy-chaining strips. If you need permanent outlets, hire an electrician to add circuits—they can install extra outlets safely and up to code, which is important for both safety and insurance reasons.
The article mentions that garages might need insulation for year-round use. Do you have recommendations for affordable insulation methods that don’t take up too much wall space?
For garage insulation that saves space, consider rigid foam boards (like polyiso or XPS), which are thin yet effective, and can be attached directly to walls. Reflective foil insulation is another slim option. Both are budget-friendly and won’t greatly reduce usable space compared to fiberglass batts.
Is there a minimum amount of space you recommend for a beginner workshop, especially if I’m starting with just basic repairs and small DIY projects?
For basic repairs and small DIY projects, a space as small as 6 by 8 feet can work well. Just be sure you have enough room for a sturdy workbench, some basic tools, and good lighting. Keeping things organized will help you get the most out of the area you have.
How much electrical work typically goes into converting a backyard shed into a functional workshop, and are there any code requirements in the US I should be aware of before starting?
Converting a shed into a workshop usually involves adding dedicated circuits, outlets, good lighting, and sometimes 220V power for larger tools. US codes require proper grounding, GFCI outlets, and permits for new wiring. Always check your local codes and consider hiring a licensed electrician to ensure everything is up to standard and safely installed.
The article mentions using even a large closet as a workshop—what kind of dust control solutions would work in such a small, enclosed space?
In a large closet workshop, a small portable shop vacuum with a HEPA filter works well for collecting dust at the source. Consider a mini air purifier or box fan with a furnace filter to help trap airborne particles. Always keep the door open when working, if possible, to improve airflow, and wear a dust mask for extra protection.
I’m in the early stages of planning a basement workshop but there’s a bit of moisture down there sometimes. What’s the best way to tackle humidity and keep my tools from rusting?
To manage basement humidity, consider using a dehumidifier and ensure good ventilation. Store tools in airtight containers or use silica gel packs to absorb moisture. Regularly wiping down metal surfaces and applying a light coat of oil can also help prevent rust.
For a basement workshop, you mention checking for moisture and adequate lighting. What are some effective ways to deal with dampness and improve lighting if my basement is a little dark and humid?
To reduce dampness in your basement workshop, use a dehumidifier and make sure the space is well-ventilated. Seal any cracks in walls or floors to prevent moisture seepage. For better lighting, install LED shop lights or fluorescent fixtures, and consider adding portable work lights for task areas.
I’m on a tight budget and considering converting a large closet into my workshop. Do you have recommendations for dust control and safe ventilation in such a small, enclosed space?
For a closet workshop, use a small, portable air purifier with a HEPA filter to help control dust. Always work with the door open, and if possible, add a box fan blowing outward to improve ventilation. Consider wearing a dust mask when sanding or cutting, and sweep up regularly to keep the air cleaner.
How expensive is it to insulate a garage so it’s comfortable for year-round use as a workshop? Is it usually a DIY project or would I need professional help?
Insulating a garage typically costs between $1 and $3 per square foot, depending on the materials and whether you do it yourself. Many homeowners tackle basic insulation as a DIY project, but if your garage needs electrical work, drywall, or specialized insulation, hiring a professional might be safer and more efficient.
How much space would you say is the minimum needed to set up a basic but functional home workshop for light DIY and repairs?
For light DIY and repairs, you can set up a basic, functional home workshop in as little as 6 by 8 feet (about 2 by 2.5 meters). Just make sure you have room for a sturdy workbench, some tool storage, and enough open floor space to move safely around your projects.
If I want to set up a small workshop in my basement but I’m worried about moisture and lack of natural light, what are some practical ways to address those challenges before I start moving in tools and materials?
To handle moisture, use a dehumidifier and consider sealing basement walls and floors. For lighting, install bright LED fixtures and task lights to mimic daylight. Also, use moisture-resistant materials and keep tools on shelves or pallets to avoid direct contact with the floor.
If space is tight and I have to use a spare room for my workshop, what are some practical ways to handle dust and noise so it doesn’t affect the rest of the house?
To control dust and noise in a spare room workshop, use a shop vacuum or portable air filter while working, and keep doors closed. Lay door draft stoppers and seal gaps to block sound and particles. Consider adding rugs or foam panels to absorb noise, and always clean up thoroughly after each session.
The article mentions the importance of ventilation and noise control. If I’m setting up my workshop in a spare room, what specific steps should I take to manage dust and keep noise from bothering the rest of the house?
To manage dust, consider using a shop vacuum or portable air filter, and always work with windows open if possible. Sealing door gaps with weatherstripping can help contain dust. For noise, add rugs or foam panels to absorb sound, and keep the door closed while working. Using quieter tools when possible will also make a difference.
If I set up my workshop in the basement, how can I handle moisture issues and still keep all my tools safe from rust?
To keep moisture and rust at bay in a basement workshop, use a dehumidifier to control humidity, and consider sealing the concrete floor. Store tools in airtight containers or cabinets with silica gel packs. Regularly wipe down your tools with a light coat of oil to prevent rust buildup.
How do you recommend deciding between a garage and a shed if both are about the same size, especially when it comes to factors like noise and climate control?
If noise is a concern, a shed often keeps workshop sounds further from living spaces than a garage. For climate control, garages are typically easier to insulate, heat, or cool, while sheds may need extra upgrades. Consider proximity to power sources and how much insulation or ventilation each space would require for comfortable year-round use.